
|
|
Applies to versions: 3.1, 3.2
Tabbed Employee Administration View
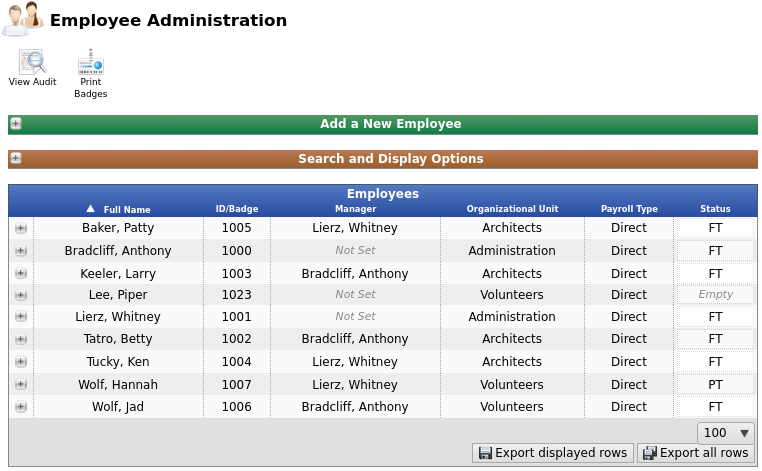
Employee Administration stores information on each of your employees, including their login username/password, ID/badge number, and current employment status.
Using the left pane Main Menu, click on: Employees » Employee Administration.
Search and Display Options
- Click on the + (plus) sign in the upper left corner of the Search and Display Options bar.
- Here you can filter which employees and which fields show in the Employees table below.
- On the left, there are a series of search boxes.
- On the right, there is a list of Available Columns and a list of Displayed Columns.
- Move items from the Available Columns window to the Displayed Columns window by clicking on the desired field to highlight it, then clicking on the blue right arrow to move it. You can also just simply double click the item you wish to move.
- Move unwanted items from the Displayed Columns list by clicking on the field to highlight it, then clicking on the blue left arrow to remove it. Again, you can also just simply double click the item you wish to move.
TIP: You can select multiple items to move by holding down the CTRL key while clicking on the individual fields. All the selected fields will be highlighted.
- To quickly bring up this same filter in the future, click Save Preset. Enter a name for it, then choose who can use this preset: personal, division, or global.
- To save this as the default, click the Make Default button while the preset is selected.
- Once you have selected your desired fields, click on the Display button to view your selections.
- Click on the + (plus) sign to the left of the employee's name to view/edit details.
- Click on the column header (Full Name, Organizational Unit, etc) to sort the table by the selected column values.
- Click on a column value (such as an Employee's Name, ID/Badge number, etc) to quickly access that detailed information for the employee.
- Employee Information can be imported from and exported to a spreadsheet program using the
 Employee Import/Export optional module. Employee Import/Export optional module.
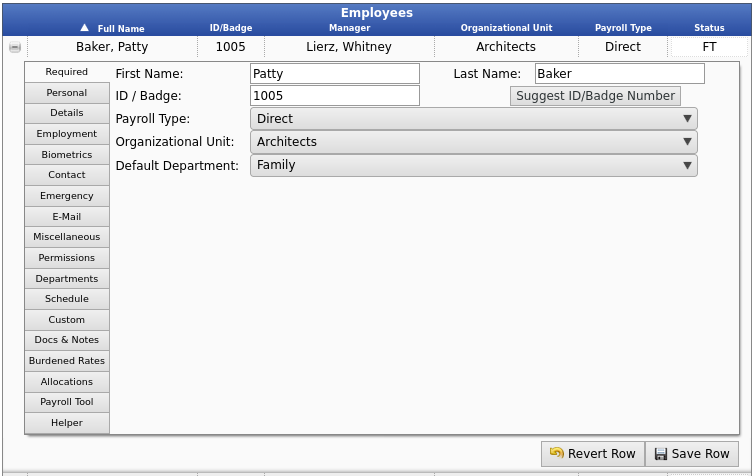
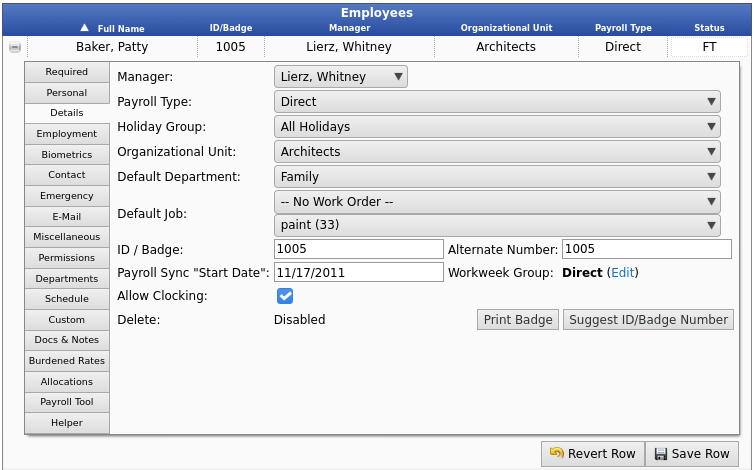
- All employee information required to start using the TimeIPS system is conveniently displayed in the Required Information tab.
- How names are viewed in the TimeIPS web pages is defined in Administration » System » Company/Divisions » Division Settings. How names are viewed on the small display when employees clock in and out is defined in Administration » Clocking » Clock Configuration.
- The Username and Password fields are not required for the employee to clock in or clock out from a TimeIPS time station. They are required for employees to view or edit information in TimeIPS or to clock in/out from a computer terminal (Remote Clocking).
- Employee Social Security Numbers (SSN) can only be viewed by a payroll administrator.
- Check Require PIN if the employee is required to enter an employee-defined Personal Identification Number when Telephone Clocking. Check Force Re-registration to require the employee to define a new Personal Identification Number on his next clock in/out using Telephone Clocking. Validate PIN numbers for employees with 'Require PIN' is set must be selected under Telephone Clocking.
NOTE: If using web based clocking from a computer terminal, a username and password must be defined on the employee's Personal Information tab.
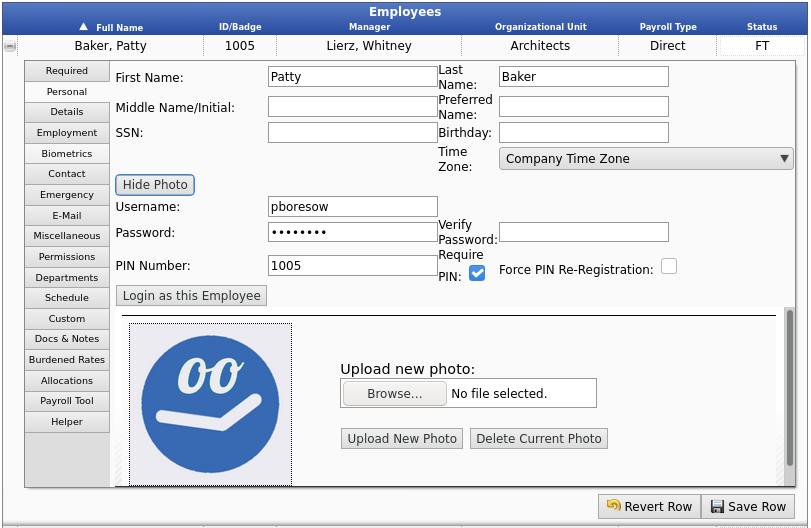
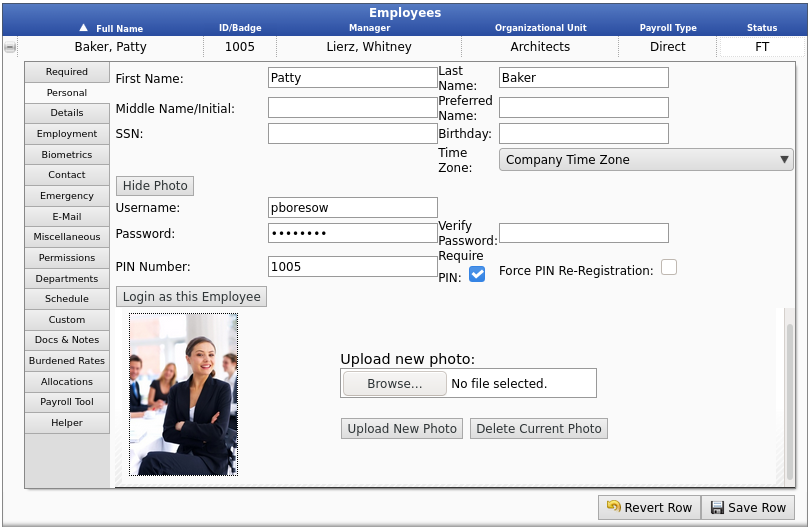
To Add a Photo
- Click on Edit Photo. The employee's Personal tab will expand as shown below.
- Click on the Browse button and navigate to the folder containing the employee's photo.
TIP: Employee photos can be taken with a regular digital camera and then saved to your computer or loaded directly from the camera's memory card.
NOTE: Employee photographs must be saved in .png or .jpg format for use with TimeIPS barcode ID badges. Images over 180 x 180 pixels will be scaled to fit the ID badge.
- Select the employee's photo and click on Upload New Photo.
- The employee's photo will appear.
TIP: To hide the employee's photo section, click on the "Hide Photo" button.
NOTE: To delete an employee's photo, click on the "Delete Current Photo" button.
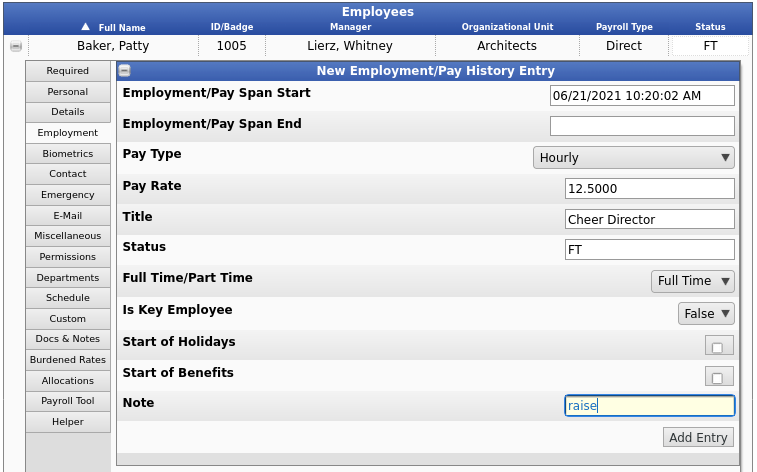
To add, view, or edit Employment/Pay History, click on the "Employment" tab.
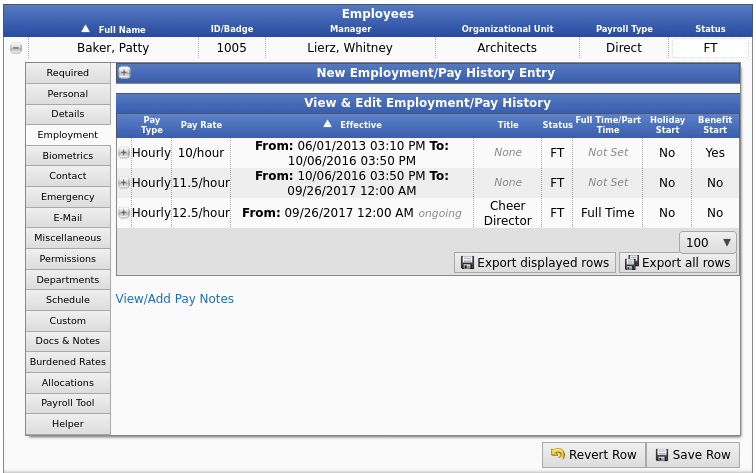
To create a New Employment/Pay History Entry
- Click on the + (plus) sign to expand that window.
- Enter the Employment/Pay Span Start date and time in the employee's timezone.
NOTE: This time range should include all of the employee's worked time. Holidays, Benefits, Piecework, and other areas throughout the system will display a warning message if time outside of the employees pay range are attempted to be entered.
- Optionally, enter the Employment/Pay Span End date and time in the employee's timezone. This may be the end of a pay rate as well as the end of employment in general. If blank, it is ongoing and does not end.
- Select a Pay Type from the drop down menu.
- Enter the employees Pay Rate.
- For non-exempt salaried employees only, enter the Scheduled Weekly Hours that the pay is intended to cover.
- Enter the employee's Title.
- Enter employee Status (such as "Training", "New Hire", or "Regular") to be used for internal tracking.
- Select whether this employee has Full Time or Part Time status as defined for insurance and/or other benefit policies.
- Select whether or not this Is a Key Employee as defined by IRS regulations.
- If Holiday waiting periods and eligibility start with this pay history segment, check the Start of Holidays box.
- If Benefit waiting periods and tenure levels start with this pay history segment, check the Start of Benefits box.
- Optionally, add a Note.
- Click on the Add Entry button to add the employee's pay rate.
To View & Edit Pay History
- Click on the + (plus) sign next to the entry you wish to view.
- Make any necessary changes and click on the Save Row button.
- If this pay history entry needs to be divided into 2 separate time periods, click on the Split This Pay History button and enter in the date of the split.
- To remove this entry, click on the Delete this pay history period button.
NOTE: If an employee does not have an open pay range, the system will consider them "inactive". To view this and other inactive employees throughout the system, you can choose to "Show" Inactive Employees on the List Options tab under My Settings or on individual pages under Display Options.
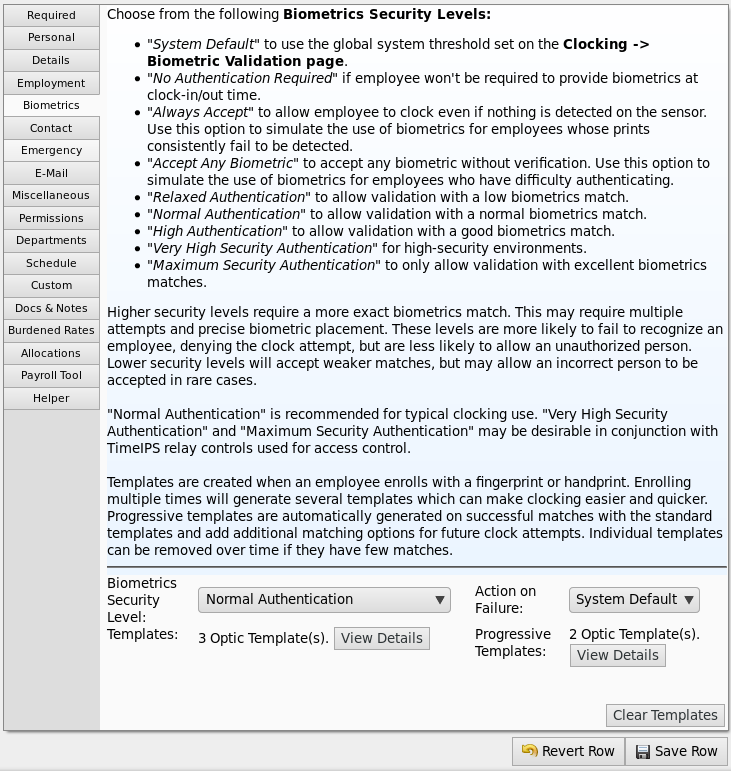
On the "Biometrics" tab, the individual employee's settings can be customized and therefore be different than the System Defaults. The System Defaults are setup on the Biometric Validation page found under Clocking in the left hand menu.
- Here, a specific employee's Biometric Security Level can be chosen.
- As well as the action to be taken when a biometric read fails.
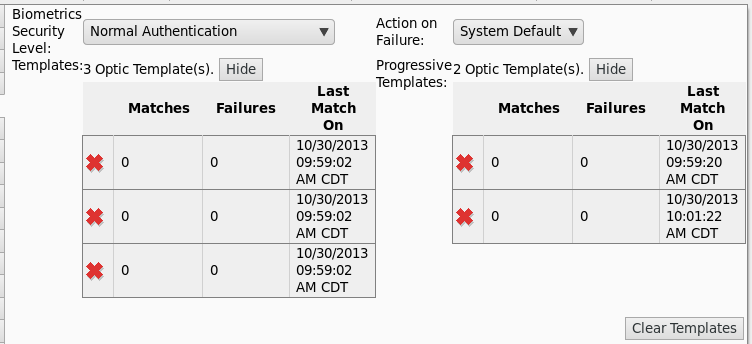
- The numbers of templates and progressive templates stored in the system are viewable including details of how many times and when the templates were last matched.
- To remove individual templates, click the View Details button and then click the red X.
- To remove all of the employee's templates, click the Clear Templates button. The employee will be taken through enrollment the next time they attempt to clock.
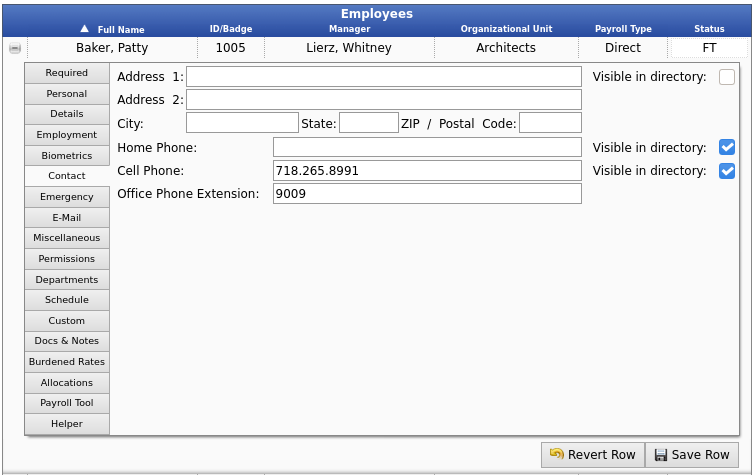
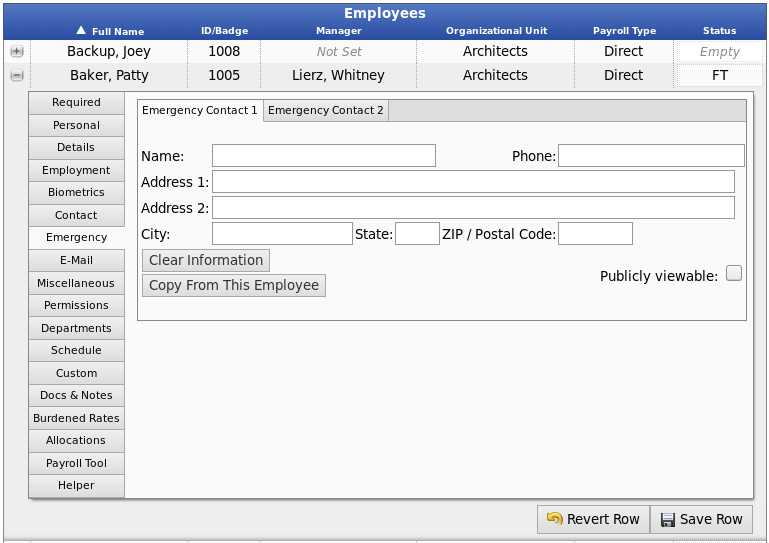
- Address and phone number(s) display in the Employee Directory if Visible in directory is checked.
- Click on the Contact #2 tab to enter an additional emergency contact.
- Check Publicly Viewable if the emergency contact information should be viewable by others.
Email Settings
- Mark the employee's email address as the Default E-mail and it will display in the Company Directory. Mark No E-mail/Private E-mail radio button if the employee's e-mail address is not entered or if you do not want the employee's e-mail address to display in the Employee Directory.
- Check the HTML checkbox to generate End of Week reports in HTML, or leave the checkbox unchecked to generate a text version of the End of Week report.
- Check the Each Clock checkbox to e-mail a notification to the corresponding e-mail address each time the employee clocks in or out
- Check the Clock Errors checkbox to e-mail a notification to the corresponding e-mail address of every clock event error. A Clock Error occurs when an employee clocks in then back out, or vice versa, within 60 seconds.
- Check the End of Week checkbox to e-mail the employee's weekly time report to the corresponding e-mail address.
NOTE: The End of Week report includes a detail of clocks and time worked, End of Week Benefit status, and Hours Worked This Pay Period.
- Check the Overtime checkbox to e-mail a notification to the corresponding address when the employee is approaching overtime based on their Scheduled Hours per Week and Overtime Limit.
- The Overtime Limit is the number of minutes prior to overtime that Overtime alerts should be sent. The employee's Scheduled Hours per Week are defined in Administration » Payroll and Reports » Payroll Settings. The Payroll Integration with Benefits Tracking optional module is required to customize employee's work weeks and define custom overtime/doubletime rules. By default, employees go into overtime after 40 hours worked during the work week or 12 hours worked in a day.
- The Overtime Alert Interval determines how often the overtime alert should be sent. The alerts will automatically stop when the employee either clocks out or goes into overtime.
- Check Schedule Alert to e-mail a notification to the corresponding address when the employee deviates from his/her set schedule. The employee's schedule is set on the Scheduling Information page. The IPSIPS optional module is required to enter an employee's weekly work schedule.
- Check the Show Errors checkbox if you would like the small LCD display to denote the clock event as a Schedule Error.
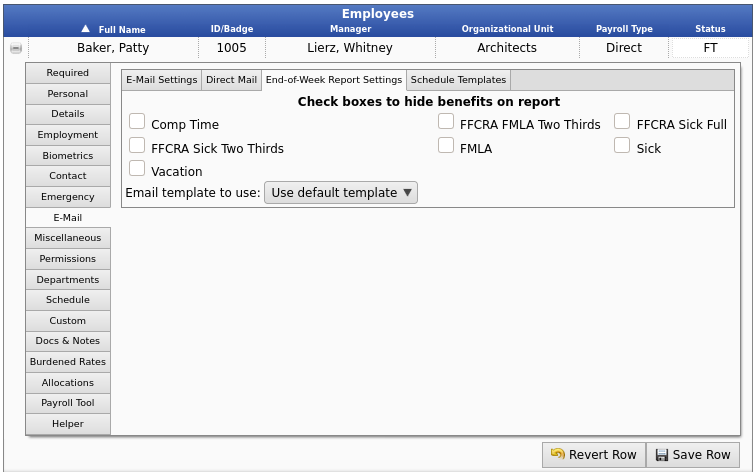
- (Optional) Check the applicable check boxes to hide benefits on report to exclude specific benefit details on the EOW report. This option can be set per employee.
- These checkboxes will be unchecked by default.
NOTE: If using the Advanced Benefits Module, any benefit types added are available to be selected.
- If IPSEML is being used, customized emails can be sent in response to a variety of situtions.
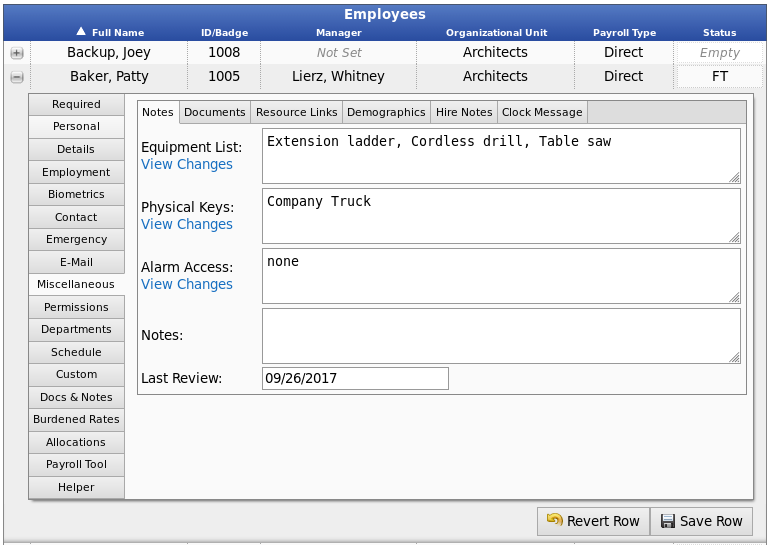
Notes
- The "Equipment List", "Physical Keys", and "Alarm Access" fields are automatically audited.
- "Notes" will display in the Employee Directory ⇒ Employee Lists for all employees to view.
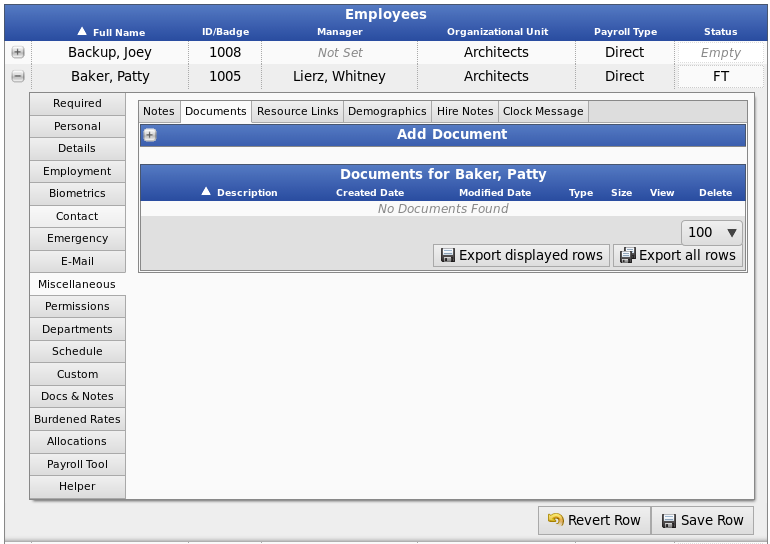
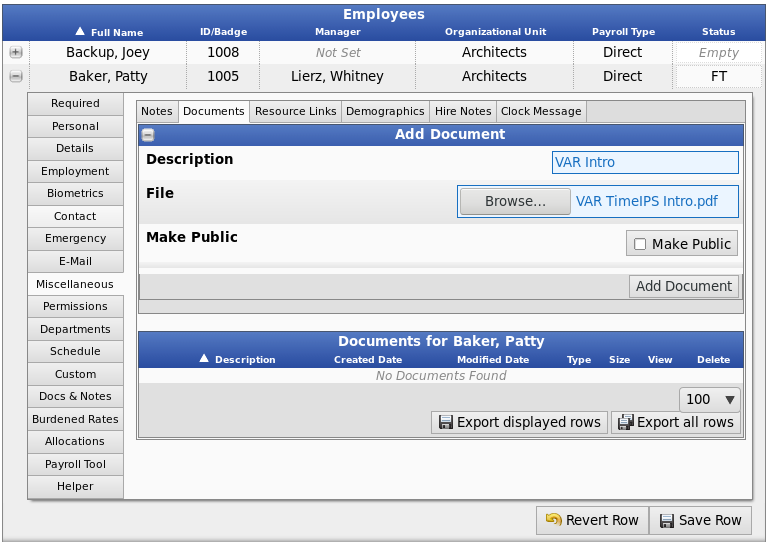
Documents
Click on the Documents tab to attach and/or view documents associated with the employee.
To Add a Document
- Click the + (plus) sign next to Add Document.
- Click the Browse button and navigate to the document.
- Employee documents are viewable by the employee they were uploaded to when that employee is logged in. Check the box for Make Public if you would like the document to appear on the employee's Documents list in Classic View.
Note: In regard to the "Make Public" option, Company Documents and Employee Documents work differently.
- Enter identifying information about the document in the Description field and click on the Add Document button.
TIP: The documents section can be used to store employee-related documents such as job applications, W-2's, and contracts.
NOTE: Documents saved in this area can be included in your back-ups by choosing "System » Backups" and clicking on the "User Media Backup" option. Please note, however, that this may increase the file size of your back-ups significantly.
Resource Links
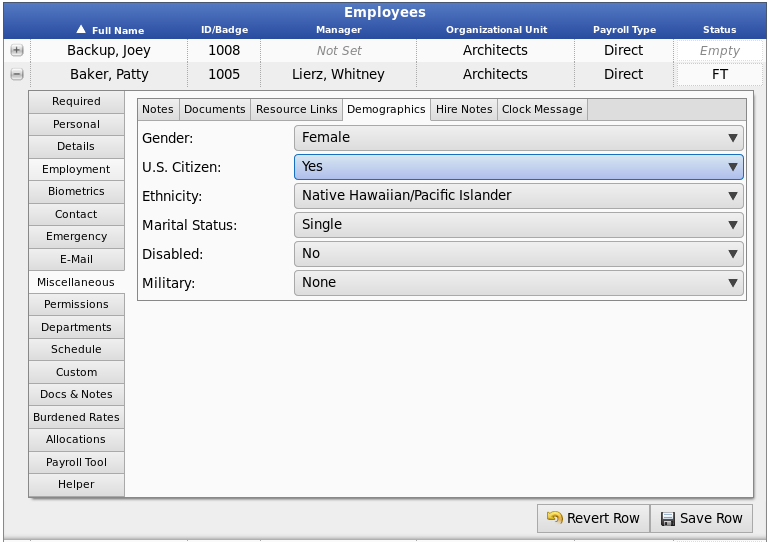
Demographics
- Click on the Demographics tab to enter information regarding the employee's gender, U.S. citizenship, ethnicity, marital status, disability status, and military status.
Hire Notes
- Click on the Hire Notes tab to add relevant employee notes related to the employee's hiring and/or the employee's release.
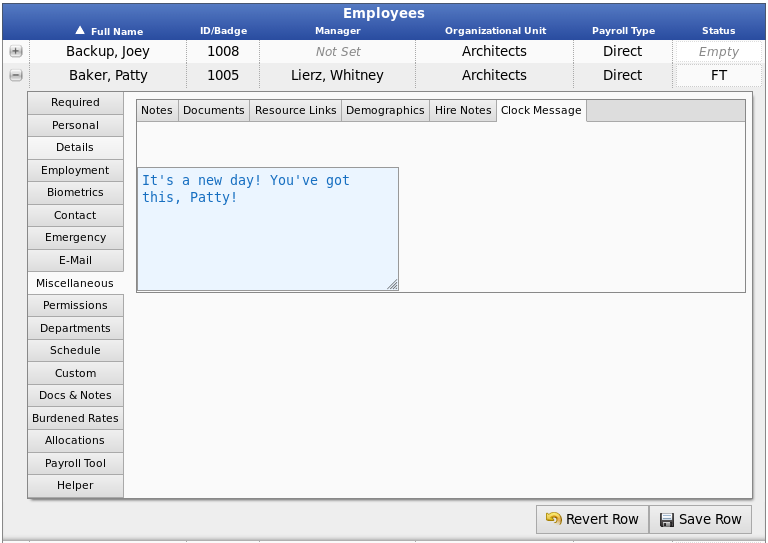
Clock Message
- Click on the Clock Message tab to save a message that will be seen every time this employee clocks in or out. Clear the message to disable it.
NOTE: Clocks are limited to displaying three lines of 18 characters. For best results, keep this message brief.
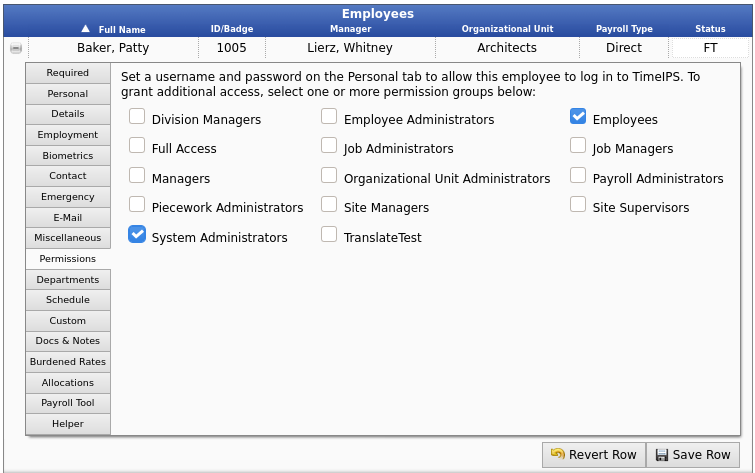
- Click on the Permissions tab to assign the employee's TimeIPS permission level(s).
- Check the corresponding box for each permission group that needs to include the employee. The employee will receive the sum of all the permissions allocated by the permission groups selected.
NOTE: Go to the Permission article for a detailed description of what each permission level entails.
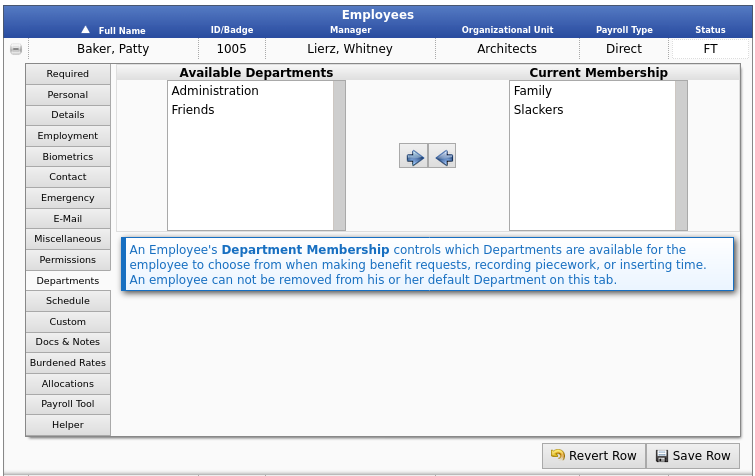
- The Departments tab allows you to select the employee's Department Membership which controls which Departments are available for the employee to choose from when making benefit requests, recording piecework, or inserting time.
NOTE: An employee can not be removed from his or her default Department on this tab.
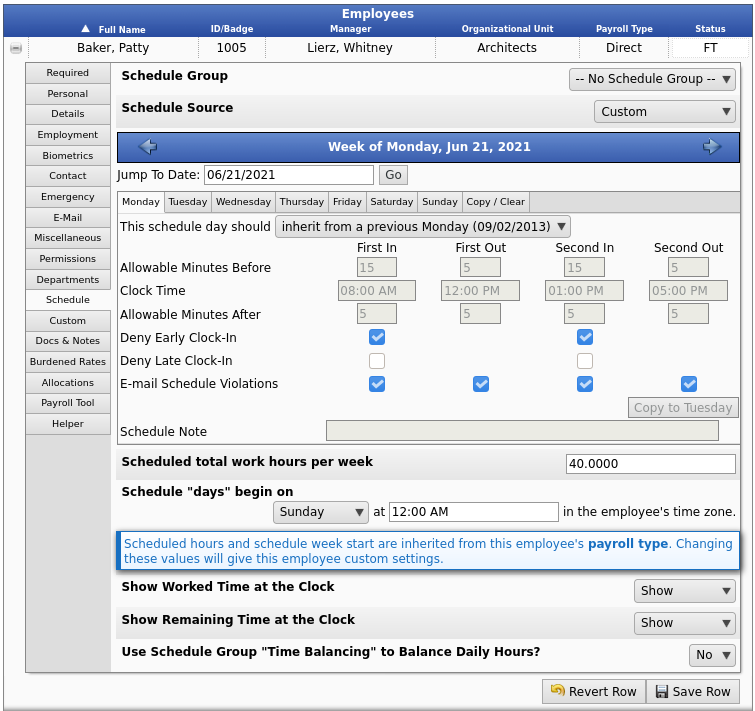
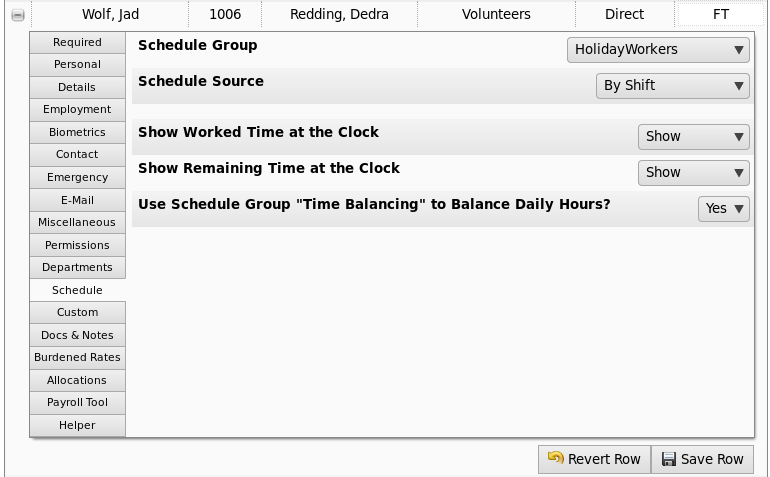
- Select the employee's Schedule Group from the drop-down box.
- Schedule Source: Select where this employee receives their schedule.
- If you would like the employee to see their hours worked or remaining time to be worked in a week, select "SHOW." When the employee clocks in or out at a network clock, telephone clock, or remote clocking, it can show the number of work hours remaining for the week.
- Select whether or not to Use Schedule Group "Time Balancing" to Balance Daily Hours. If you select yes, see the Time Balancing tab on the Schedule Groups article.
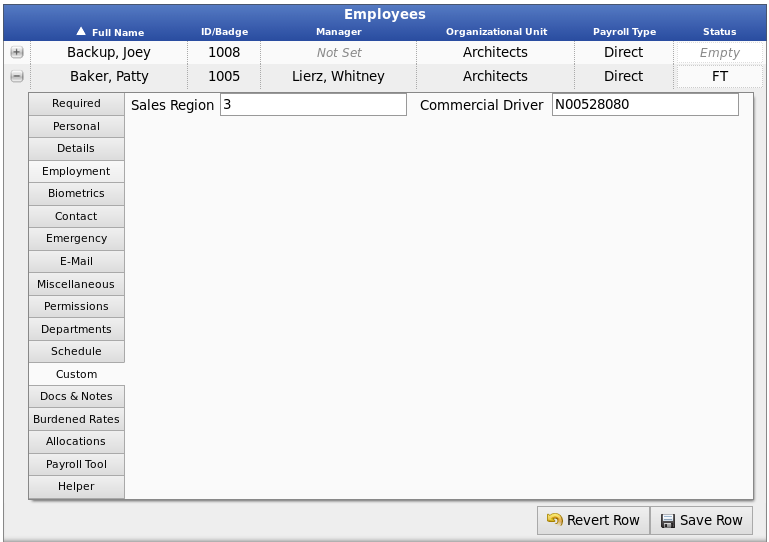
Custom Tab
- The Custom tab will display the above message prior to creating custom fields.
- To create custom fields, go to the left hand navigation column: Administration >> Employees>> Custom Fields. Add a Field Key and Field Title, then press create.
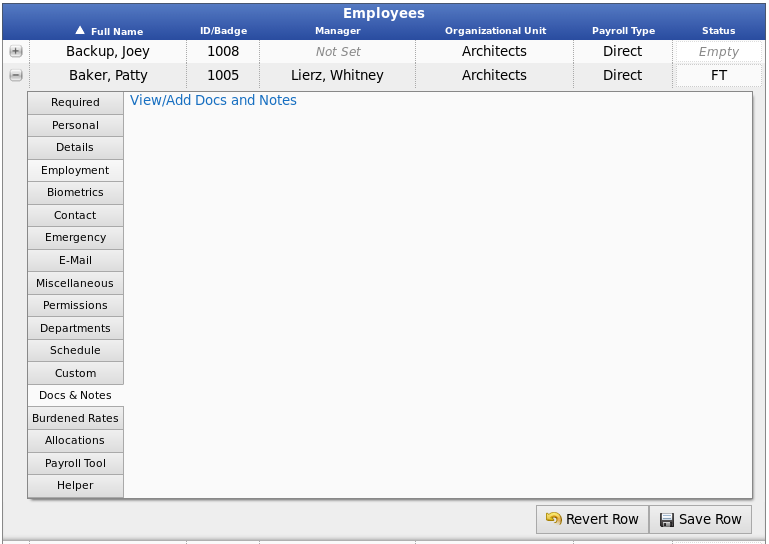
Doc & Notes Tab
- The Doc & Notes tab is an access point to our legacy change log event and document tracking system. This is not recommended for new deployement.
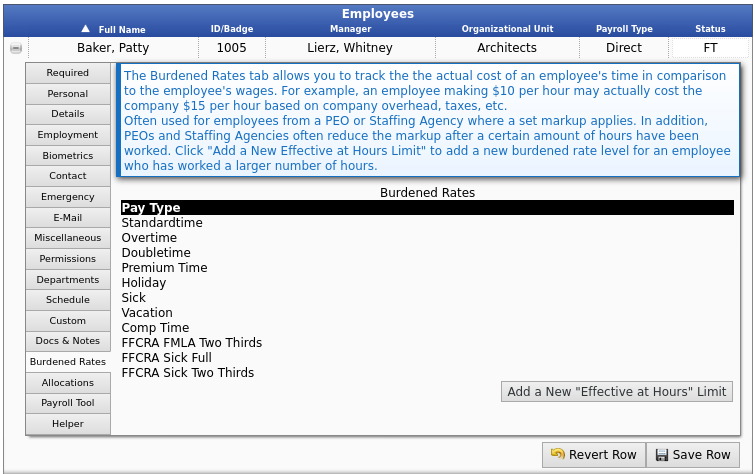
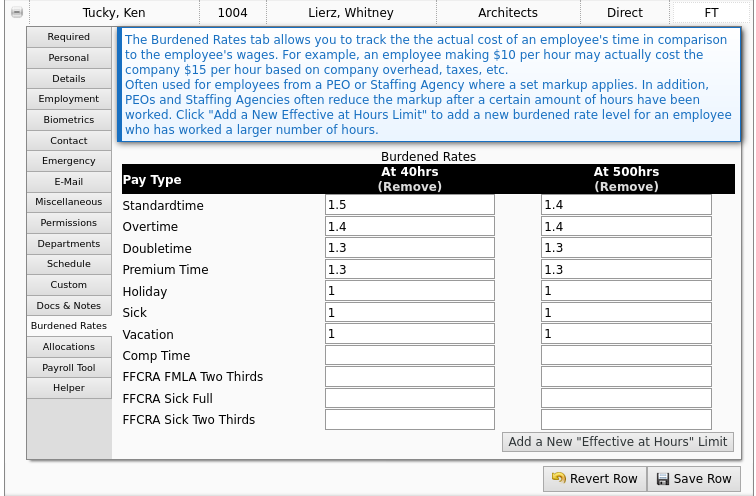
Burdened Rates tab
- Here is an example of the Burdened Rates specified.
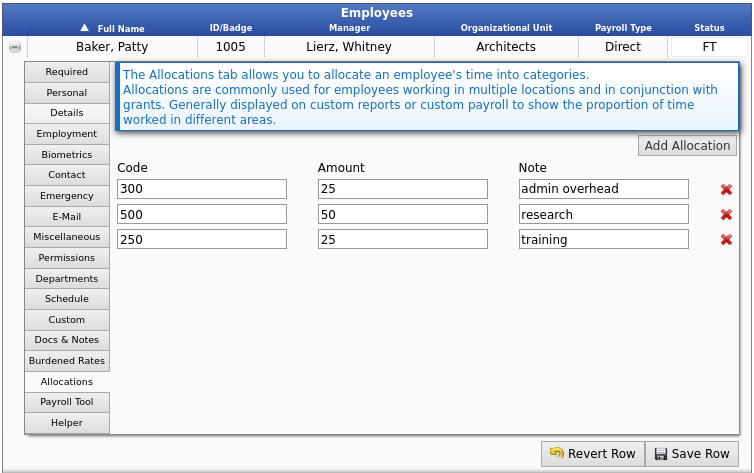
Allocations tab
- The Allocations tab allows you to allocate the employee's time into categories.
Payroll Tool tab
- The Payroll Tool tab allows you to see the payroll exports that included the employee.
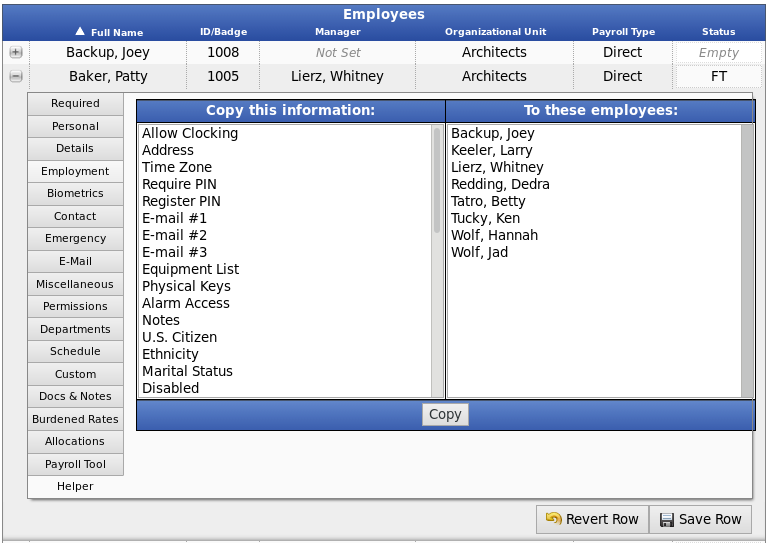
Helper tab
- The Helper tab allows you to copy information from one employee to another.
|

 Information
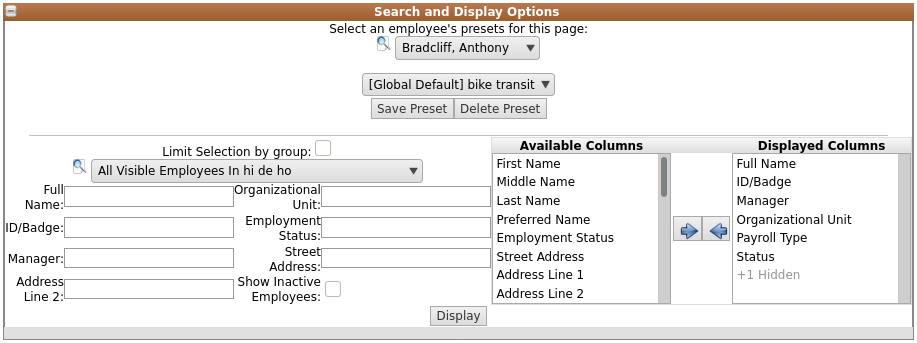


