|
|
Applies to versions: 1.3, 1.4, 1.5, 1.6
Adjusting a Client's Configuration and Security Settings
Each TimeIPS station can be named and configured. The time zone can be set differently for each clock and the web interface can be locked.
Security Level Required: System Administrtor
Using the left pane Main Menu, click on: Administration » System Administration » Client Configuration
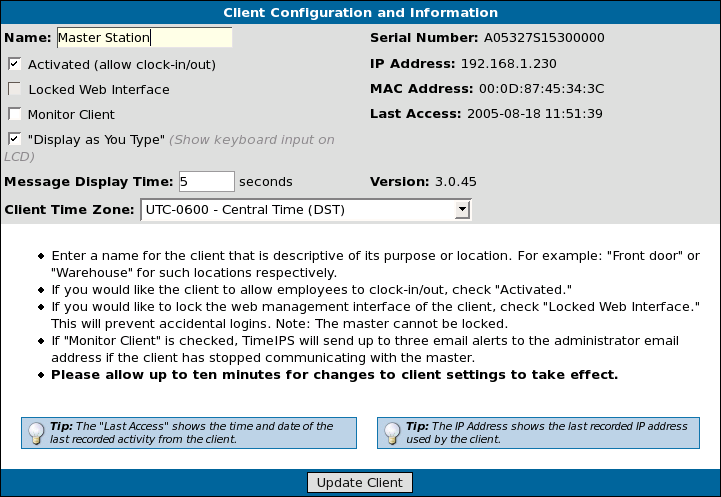
- From the Client Configuration page, click on the Name link of the time station you wish to adjust.
- Enter/Adjust the Activated, Locked Web Interface, Monitor Client, "Display as You Type", Message Display Time, and the Client Time Zone fields as necessary.
- Click on the Update Client button to save the changes.
- The client Name should be descriptive of its purpose or location. For example: "Front door" or "Warehouse" for such locations respectively.
- Check the Activated (allow clock-in/out) checkbox to activate the client on your network.
NOTE: Deactivating the Master clock will disable all clocking at the master as well as remote web based, and telephone clocking. Reactivating the master clock requires a system reboot to take effect.
- Check the Locked Web Interface checkbox to lock the web management interface of the client station. This security feature prevents accidental logins on a non-master station.
Note: The master's web interface cannot be locked.
- Check the Monitor Client checkbox to have TimeIPS send email alerts to the Admin Email address if the client stops communicating with the master. A reconnect email will be sent if the client stops communicating for an extended time then reconnects.
NOTE: The "Admin email" is identified in Administration → System Administration → Master Configuration.
- Check the
 Display as You Type checkbox to automatically activate the Display as you type option on the client on restart. Display as You Type checkbox to automatically activate the Display as you type option on the client on restart.
- Enter the number of seconds in the Message Display Time field that you would like the small LCD display to show the employee's name, status, job, time worked, and time remaining, if applicable, on the LCD Display. If a number of employees are clocking in and out within a short amount of time, reduce the number of seconds.
- Select the Client Time Zone in the pull-down. "DST" indicates Daylight Savings Time. If you are in an area that observes Daylight Savings Time, select your time zone ending with DST and TimeIPS will automatically account for Daylight Savings Time shifts.
See Also:
Require Login Access to View the Directory (1.4, 1.5, 1.6)
Adjusting the Master's Time, Date, or Time zone (1.3, 1.4, 1.5, 1.6)
Add a Job Entry (1.3, 1.4, 1.5, 1.6)
|

 Information