|
|
Applies to versions: 1.3, 1.4, 1.5
Adjusting Client's Network Information
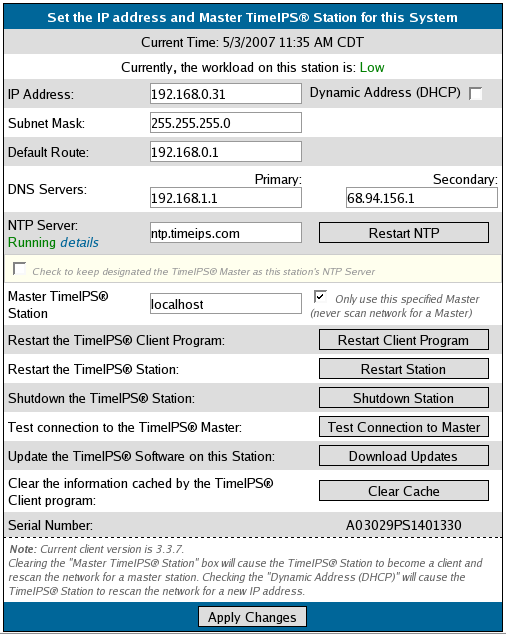
TimeIPS client network settings allow you to configure your TimeIPS to your network. The client network settings also includes options to shut down and restart the client station.
Security Level Required: System Administrator
Using the left pane Main Menu, click on: Administration » System Administration » Client Configuration
- From the Client Configuration page, click on the IP Address link of the time station you wish to adjust.
- Uncheck the Dynamic Addressing (DHCP) checkbox to use the Static Addressing Method. TimeIPS initially uses DHCP (Dynamic Host Configuration Protocol) to automatically gain an IP address from your network during setup. Once your TimeIPS system has been configured, you need to assign it a static, or never changing, IP address for easy access to your TimeIPS system. Ask your network administrator what IP Address, Subnet Mast, and Default Route used on your network or, if TimeIPS is connected directly to your computer, you may use the automatically attained settings.
- A DNS (Domain Name System) Server translates domain names, such as demo.timeips.com, into its IP address, such as 192.168.1.225. Commonly used DNS Server settings that can be used are Primary: 207.217.126.81 and Secondary: 151.164.1.7.
- An NTP (Network Time Protocol) Server synchronizes TimeIPS's system time. ntp.timeips.com is a valid NTP Server so you can leave the default unless your network administrator gives you a different one to use.
 Check to keep the designated TimeIPS Master as this station's NTP Server to synchronize the client's clock with the master's clock. Check to keep the designated TimeIPS Master as this station's NTP Server to synchronize the client's clock with the master's clock.- The Master TimeIPS Station should be set to "localhost" if you are viewing the Client Configuration screen for the master, or to the master stations IP address if you are viewing a true client's configuration.
- Check the Only use this specific Master checkbox to lock TimeIPS into the specified master. If this is checked and the client loses communication with the master, the client will not scan the network in search of a different master station.
- Enter/Adjust the networking information as necessary.
- Click on the Apply Changes button to save the changes.
- Click on the appropriate button to Restart the NTP server connection, Restart the Client Program, Restart the TimeIPS Station, Shutdown the TimeIPS Station, Test the Connection to the Master, or Download Updates to the station.
See Also:
Monitor Client Stations (1.3, 1.4, 1.5, 1.6)
Shutting Down/Restarting Master Station (1.3, 1.4, 1.5, 1.6)
|

 Information
 Sales
Sales Support
 Check to keep the designated TimeIPS Master as this station's NTP Server to synchronize the client's clock with the master's clock.