|
|
Applies to versions: 1.3, 1.4
QuickBooks Integration - Setup TimeIPS
Before running the QuickBooks Integration for the first time, you will need to setup your TimeIPS QuickBooks Payroll Export Type Settings. These settings do not need to be adjusted each time your run the Integration unless changes are made to your QuickBooks Payroll Items or other settings.
Using the left pane Main Menu, click on: Administration » Payroll and Reports » Payroll Export
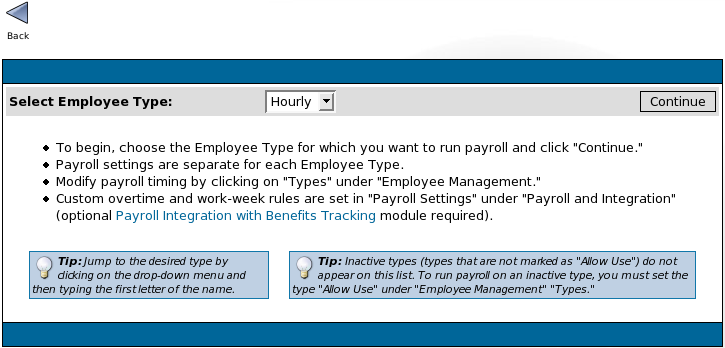
- Select an Employee Type in the pull-down and click on the Continue button.
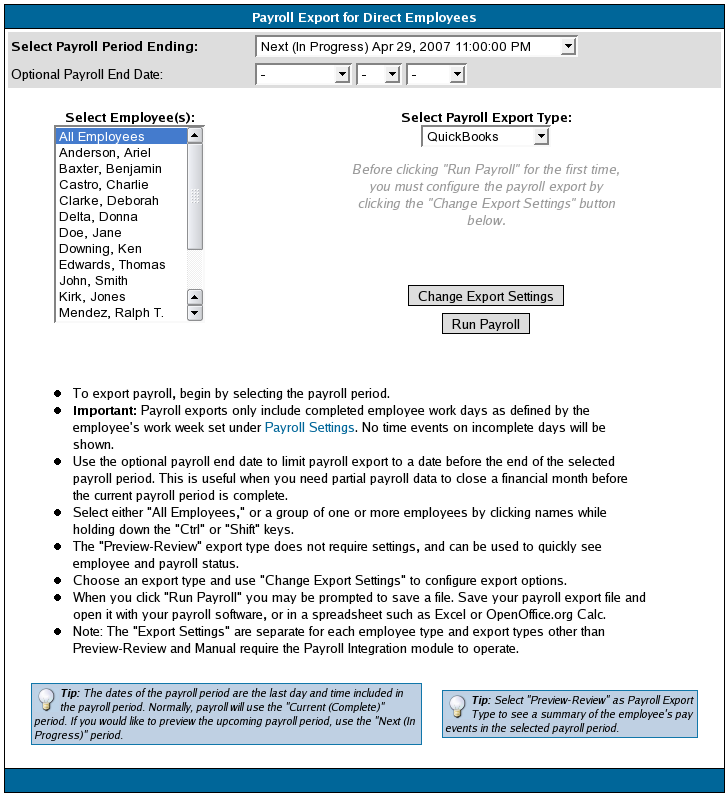
- Select QuickBooks in the Payroll Export Type pull-down.
- Click on the Change Export Settings button.
- If you have not done so already, download the TimeIPS QuickBooks Client.
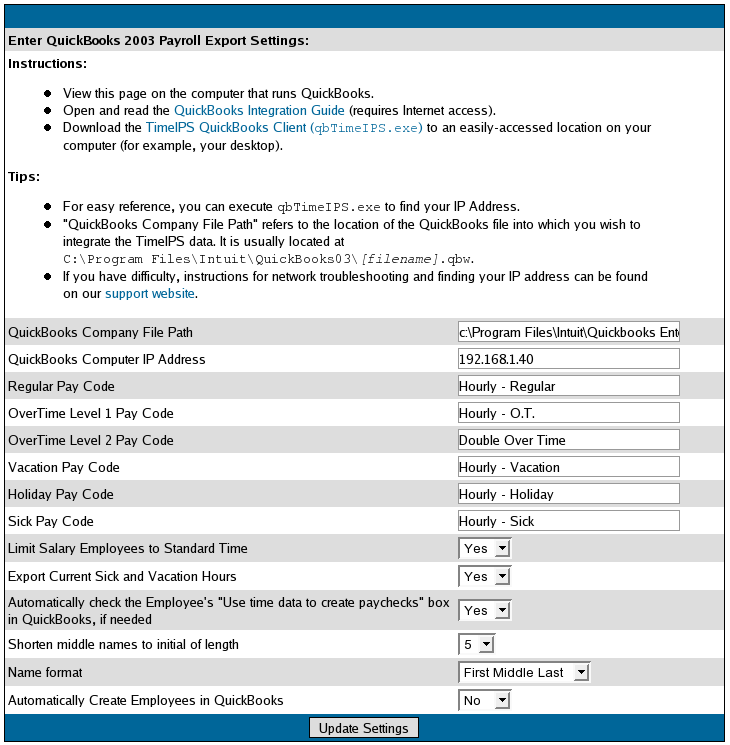
- Change the QuickBooks Payroll Export Settings, as necessary.
- The QuickBooks File Company Path is the path you wrote down in "SETUP QUICKBOOKS Company info - step 4."
- The QuickBooks Computer IP Address is the IP address of the computer that contains the QuickBooks program and is where you will run the Integration.
To Identify your Computer's IP Address:
- Ask your network administrator.
OR
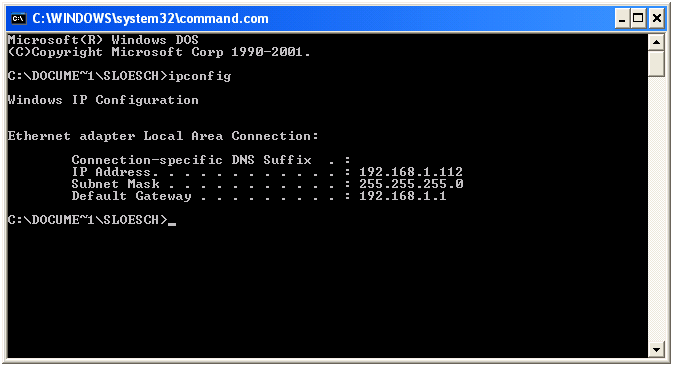
- Go to the Start menu - Run option.
- In the Open/Run window, type in the following command and press ENTER: command
- In the Command prompt, type in the following command and press ENTER: ipconfig
- Enter the IP address listed under the Ethernet Adapter Local Area Network Connection listing as the QuickBooks Computer IP Address.
- We highly recommend that TimeIPS be on the same network as the system running QuickBooks. If your QuickBooks system is not on the same network as TimeIPS, it is possible to allow TimeIPS to communicate with QuickBooks by port forwarding TCP 6035 from your computer to an IP address that can be seen by TimeIPS. This would normally be done on a router or Internet gateway. For this configuration, enter the IP address that is port forwarding 6035, rather than the IP address of the computer running QuickBooks. If you need help configuring port forwarding, please ask your network administrator.
- Enter the corresponding QuickBooks Payroll Item codes exactly as you wrote down when Setting up QuickBooks.
- Select Yes in the Limit Salary Employees to Standard Time pull-down if you do not want salary employees to post overtime and double time hours into QuickBooks, otherwise select No.
- Select Yes in the Export Current Sick and Vacation Hours if you want TimeIPS to export employee's current available benefit time, otherwise select No.
- Select Yes in the Automatically check the Employee's Use time data to create paychecks" box in QuickBooks, if needed. TimeIPS will then automatically select this setting for each employee in QuickBooks.
- Select the number of middle name characters to use during the Integration in the Shorten middle names to initial of length pull-down.
 Select the Name format of First name or Last name first based on how you have names displayed in QuickBooks. Select the Name format of First name or Last name first based on how you have names displayed in QuickBooks.- Choose whether or not to Automatically Create Employees in Quickbooks (available in TimeIPS v1.4 and above).
NOTE: You must initially setup the QuickBooks Export Settings. Once complete, you do not need to change them each time you run payroll.
- Click on the Update Settings button to save your changes.
NOTE: The Payroll Period (in Payroll Types) and each Payroll Type's Work Week, Overtime, and Doubletime Starts (in Payroll Settings) should already be setup. If not, click on the underlined feature to learn more.
NOTE: TimeIPS doesn't push the pay rate information into QuickBooks. .
NOTE: TimeIPS doesn't push the Pay Type into QuickBooks. QuickBooks defaults this to an Hourly employee setting.
See Also:
QuickBooks Integration - Setup QuickBooks (QB v3.0) (1.3, 1.4, 1.5, 1.6)
QuickBooks Integration - Run Payroll (1.3, 1.4, 1.5, 1.6, 1.8, 1.9, 1.10, 1.11, 2.0, 2.1, 2.2, 2.3)
Was this article relevant to your question? Yes No |

 Information