|
|
Applies to versions: 1.3, 1.4, 1.5, 1.6
Employee Management Display Options
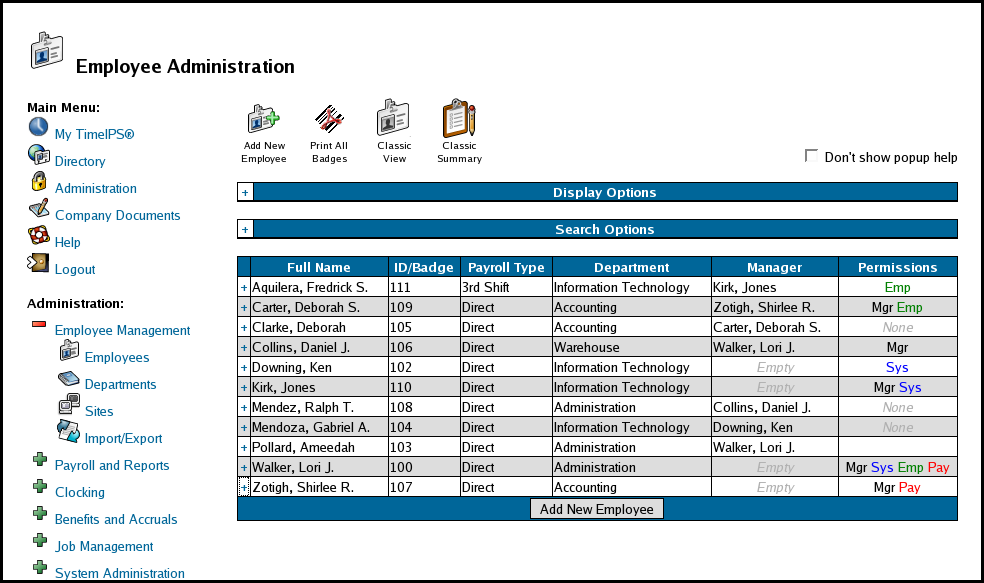
 Employee Administration stores information on each of your employees. Employee Administration stores information on each of your employees.
Security Level Required: Employee Administrator
Using the left pane Main Menu, click on: Administration » Employee Management » Employees
Display Options
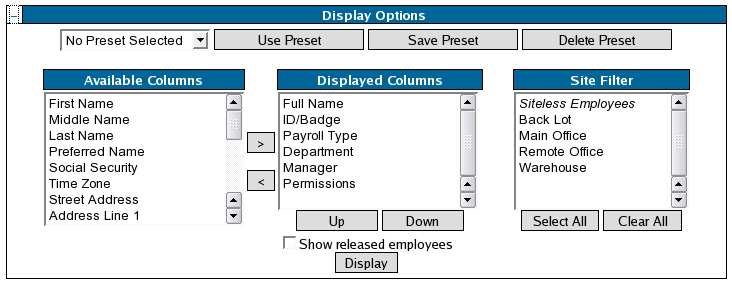
- Customize your view of the Employee Administration table by clicking on the + (plus sign) on the Display Options bar. The display options bar will expand as shown below:
- Move items from the Available Columns window to the Displayed Columns window by clicking on the desired field to highlight it, then clicking on the > (greater than) sign to move it.
TIP: You can select multiple items to move by holding down the CTRL key while clicking on the individual fields. All the selected fields will be highlighted.
- Move unwanted items from the Displayed Columns by clicking on the field to highlight it, then clicking on the < (less than) sign to remove it.
- To change the order in which the Displayed Columns appear, use the Up and Down buttons to arrange the list in the order you prefer.
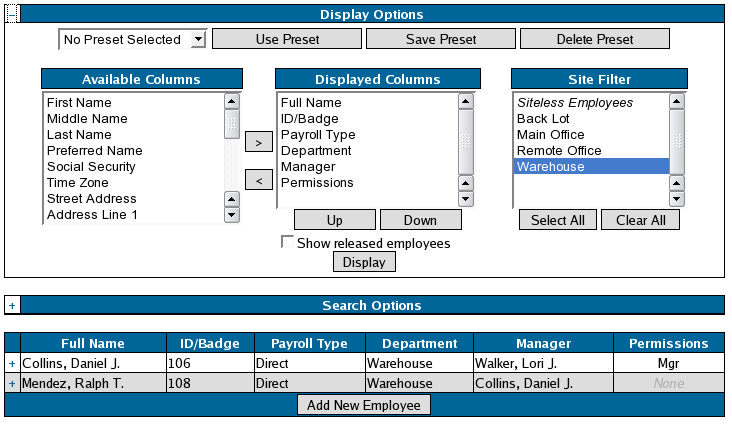
- Use the Site Filter to select "Siteless Employees" (employees who are not assigned to a site), or to select employees from individual or multiple sites.
TIP: You can select multiple site names by holding down the CTRL key while clicking on the individual sites. All the selected sites will be highlighted.
- Check the Show released employees checkbox to include employees who have been terminated. Released employees are identified in the Permissions column with the word "Released".
- Once you have selected your desired fields, click on the Display button to view your selections.
EXAMPLE: In the image shown above, employees who are assigned to the "Warehouse" site are displayed using the Site Filter.
- Some of the employee fields, such as ID/Badge, City, State and Zip Code are "edit-in-place" fields when displayed. You can type the information directly into the field displayed on the Employee Administration table, rather than expanding the employee's record and opening the appropriate tab.
EXAMPLE: Clicking on the Zip Code above will make the field become editable, allowing you to change the zip code on the spot.
- Clicking on fields that do not offer the edit-in-place option will automatically expand the employee's record, opened to the appropriate tab.
EXAMPLE: Clicking on the word "Warehouse" in Daniel Collins' record above will open Daniel's employee record to the Employment tab, where you can edit his department, if desired.
Customizing Your Display
- Once you have moved the desired fields to the Displayed Columns window, click on Save Preset to save your custom view.
- You will be prompted to enter a name for this Preset. Enter a descriptive name.
- Click on the Use Preset button to see your Employee list with your custom view..
TIP: To use a saved Preset display, select the Preset name from the pull-down menu and click on the "Use Preset" button.
See Also:
Employee Administration (1.3, 1.4)
|

 Information