Date printed: 04-18-2024   Last updated: 06-29-2007

To view our complete support knowledge base and most current version of this article visit support.timeips.com.
316-264-1600
Information
Sales
Support

Applies to versions: 1.5


Creative Solutions Export Settings


TimeIPS Payroll Export can generate a file with your payroll data. Using the 
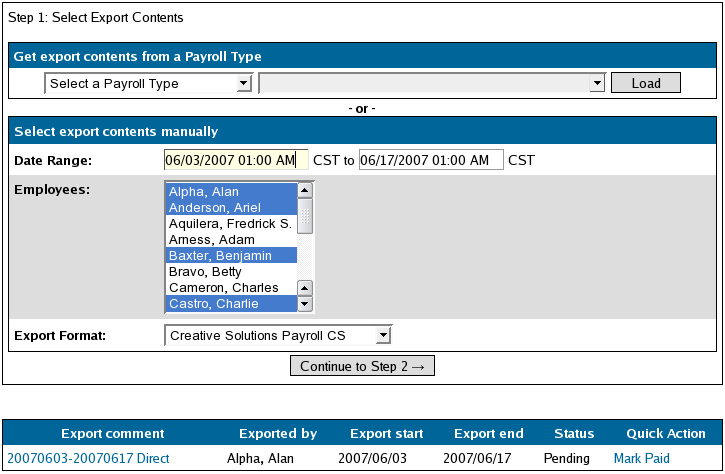
Payroll Integration with Benefits Tracking (IPSQBI) optional module, the file can be imported in your Creative Solutions payroll application.
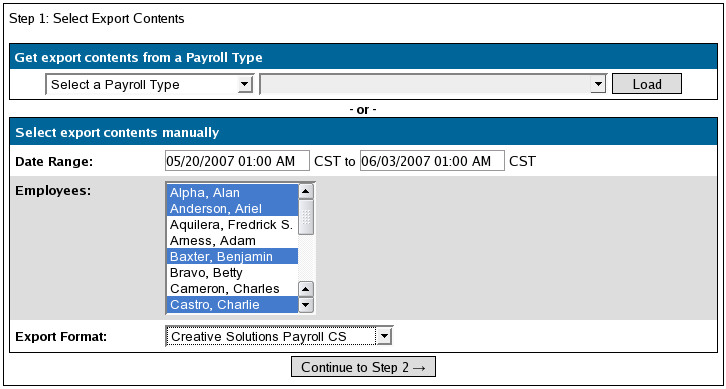
Security Level Required: Payroll Administrator

Using the left pane Main Menu, click on: Administration » Payroll and Reports » Payroll Export


Step 2: Configure Export

Before you export:


  1. After selecting your export contents (date range, employees and export format), click on the Continue to Step 2 --> button.

  2. The first time you run a payroll export, you will be asked to provide a "preset", or template, for your export. Click on the Add Preset button to configure your payroll preset.
    - OR -
    If you already have a defined preset you wish to use, select the preset name from the Export Settings pull-down, then skip to Step 4.

  3. NOTE: A Preset is a set of stored settings that are used each time a payroll file is generated. If your settings change from one group of employees to another, you may create multiple presets and select the preset that applies for the group you are exporting at the time.

  4. The preset window will appear. Enter the Preset Name, modify the Wage Codes if needed, then click on Save Settings.

  5. (Optional) Enter a descriptive Comment to assist in differentiating past and future payroll runs.

    NOTE: If you decide not to calculate time for your payroll export at this time, click on "<-- Back to Step 1"
  6. Once you are ready to calculate payroll, click on the Continue to Step 3 --> button. TimeIPS will calculate your payroll and generate the Creative Solutions Payroll CS export file based on the settings in the selected Preset.

  7. Once payroll has been calculated, your screen will refresh back to Step 1 and you will see your pending export at the bottom of the screen. Click on Mark Paid to examine your export file and/or to export the file into Creative Solutions Payroll CS.


  8. NOTE: TimeIPS locks the selected payroll events from editing while the payroll is in Pending status. This prevents employees from adjusting time events that are being processed for payroll.

  9. Click on the file name link (PayrollCS-1183240163.tci in the example below) to view the contents of the export in a text application such as Notepad. Once you have confirmed that the contents have exported correctly, click on Yes, the export was accepted to import the file into your Creative Solutions payroll software, or click the <-- Cancel button to return to Step 1.


    NOTE: Once your transactions have been payrolled, TimeIPS will lock the time events from future edits.

  10. When your payroll has been successfully imported into your Creative Solutions payroll software, the screen will refresh and you will see that the "Mark Paid" status has changed to Payrolled.

  11. As you continue to export payroll, TimeIPS will maintain a list of all of your payroll exports. The latest export will always be at the top of this list.


See Also:
Payroll Export (TimeIPS Version 1.5) (1.5)

©2004-2023 TimeIPS, Inc. All Rights Reserved - TimeIPS and the TimeIPS logo are registered trademarks of TimeIPS, Inc.
"Intelligent Personnel System" "Run your Business. We'll watch the clock." are trademarks of TimeIPS, Inc.
TimeIPS is protected by one or more patents. Patent No. US 7,114.684 B2.