|
|
Applies to versions: 1.5
Paychex Paylink 9 Export Settings
TimeIPS Payroll Export can generate a file with your payroll data. The file can be opened in a spreadsheet application, such as Microsoft Excel or Open Office. Using the  Payroll Integration with Benefits Tracking (IPSQBI) optional module, the file can be imported in your Paychex Paylink 9 payroll application. Payroll Integration with Benefits Tracking (IPSQBI) optional module, the file can be imported in your Paychex Paylink 9 payroll application.
Security Level Required: Payroll Administrator
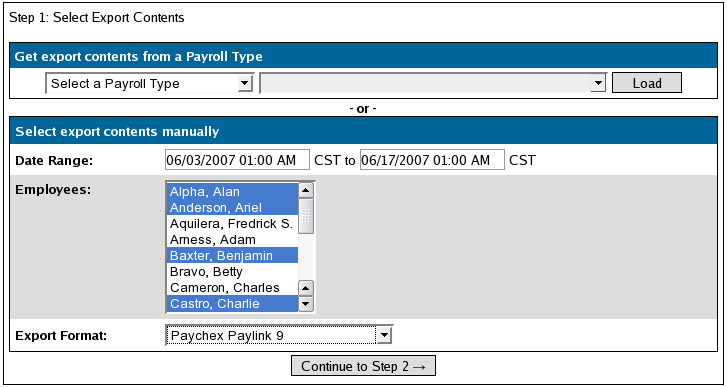
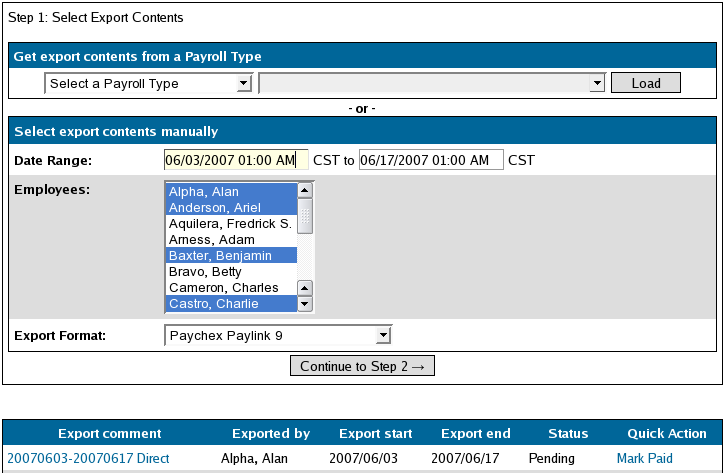
Using the left pane Main Menu, click on: Administration » Payroll and Reports » Payroll Export
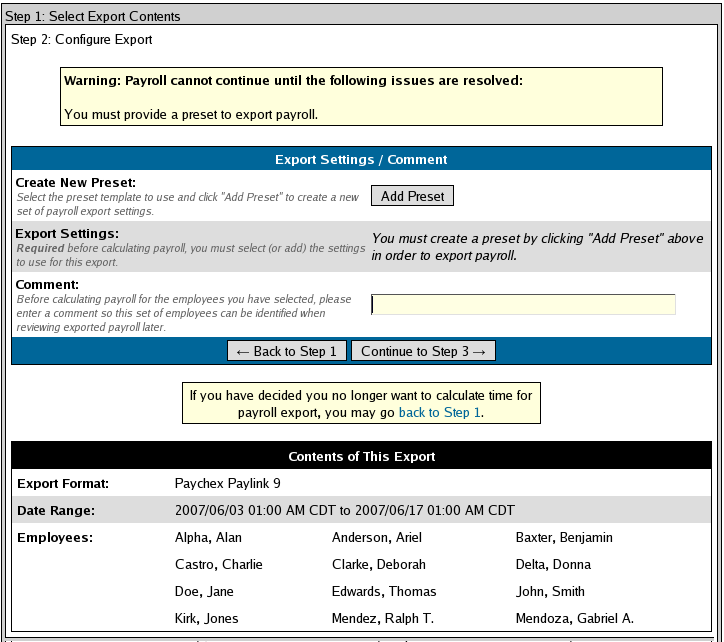
Step 2: Configure Export
Before you export:
- After selecting your export contents (date range, employees and export format), click on the Continue to Step 2 --> button.
- The first time you run a payroll export, you will be asked to provide a "preset", or template, for your export. Click on the Add Preset button to configure your payroll preset.
- OR -
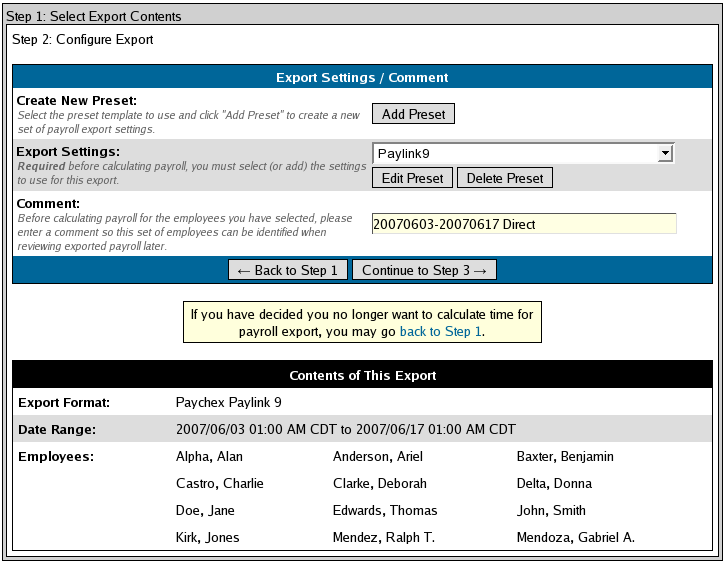
If you already have a defined preset you wish to use, select the preset name from the Export Settings pull-down, then skip to Step 4.
NOTE: A Preset is a set of stored settings that are used each time a payroll file is generated. If your settings change from one group of employees to another, you may create multiple presets and select the preset that applies for the group you are exporting at the time.
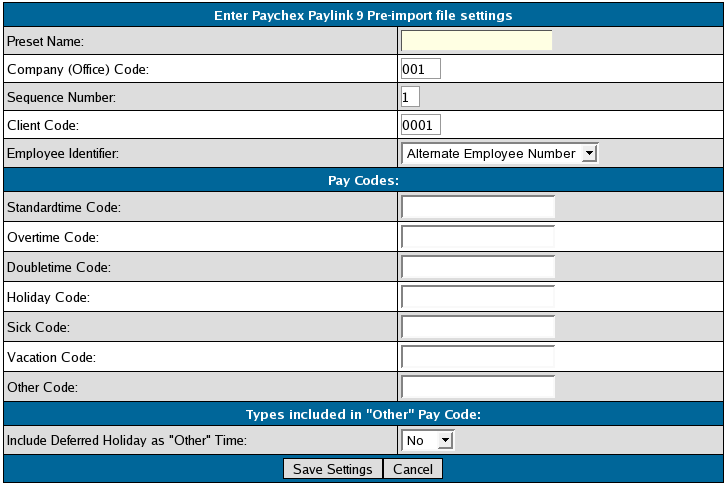
- The preset window will appear.
Your preset options are:
- Preset Name: Enter a descriptive name for your preset
- Company (Office) Code: Must be 3 digits (use leading zeros if less than 3 digits.) This will be exported as the "Office Code" column in your payroll export file and is used as the first 3 digits of the export file name.
- Sequence Number: This is the 1-digit Paychex site code. This will be used as the last digit in your export file name.
- Client Code: Enter the 4-digit Paychex client number. This number will be used in between the Company Code and Sequence Number in the export file name and will be exported as the "Client Code" column in your payroll export file.
- Employee Identifier: Your choices are "Alternate Employee Number", "Social Security Number (SSN)", or "Badge Number"
- Standardtime Code: Enter the Code used to define regular hours
- Overtime Code: Enter the Code used to define overtime hours
- Doubletime Code: Enter the Code used to define Doubletime hours
- Deferred Holiday Code: Enter the Code used to identify Deferred Holiday hours
- Holiday Code: Enter the Code used to identify Holiday hours
- Sick Code: Enter the Code used to identify Sick hours
- Vacation Code: Enter the Code used to identified Vacation hours
- Include Deferred Holiday as "Other" Time: Choose "Yes" to include deferred holiday hours with "Other" hours, otherwise, leave this option at "No".
- Click on Save Settings to save, or Cancel to exit without saving.
- (Optional) Enter a descriptive Comment to assist in differentiating past and future payroll runs.
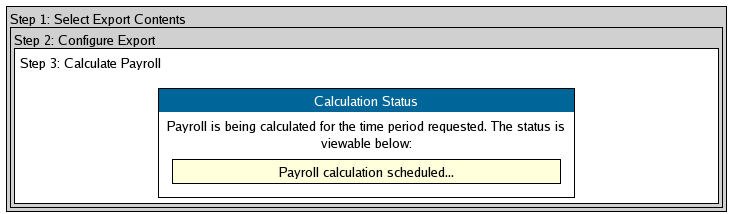
NOTE: If you decide not to calculate time for your payroll export at this time, click on "<-- Back to Step 1"
- Once you are ready to calculate payroll, click on the Continue to Step 3 --> button. TimeIPS will calculate your payroll and generate the export file based on the settings in the selected Preset.
- Once payroll has been calculated, your screen will refresh back to Step 1 and you will see your pending export at the bottom of the screen. Click on Mark Paid to examine your export file and/or to export the file into your payroll application.
NOTE: TimeIPS locks the selected payroll events from editing while the payroll is in Pending status. This prevents employees from adjusting time events that are being processed for payroll.
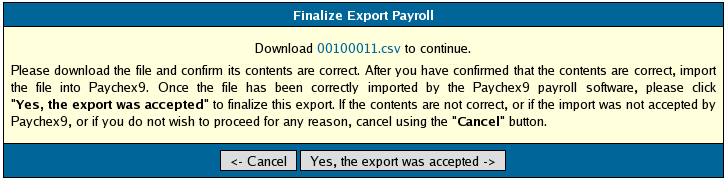
- Click on the file name link (00100011.csv in the example below) to view the contents of the export in a spreadsheet application such as Excel or OpenOffice Calc. Once you have confirmed that the contents have exported correctly, click on Yes, the export was accepted to import the file into your payroll software, or click the <-- Cancel button to return to Step 1.
NOTE: Once your transactions have been payrolled, TimeIPS will lock the time events from future edits.
With the default settings, the following fields will be exported:
- Office Code
- Client Code
- File #
- Reg Hours
- O/T Hours
- (Doubletime) Amount (The word "Doubletime" will be replaced with the pay code you provided.)
- (Vacation) Amount (The word "Vacation" will be replaced with the pay code you provided.)
- (Holiday) Amount (The word "Holiday" will be replaced with the pay code you provided.)
- (Sick) Amount (The word "Sick" will be replaced with the pay code you provided.)
- (Other) Amount (The word "Other" will be replaced with the pay code you provided.)
- When your payroll has been successfully imported into your payroll software, the screen will refresh and you will see that the "Mark Paid" status has changed to Payrolled.
As you continue to export payroll, TimeIPS will maintain a list of all of your payroll exports. The latest export will always be at the top of this list.
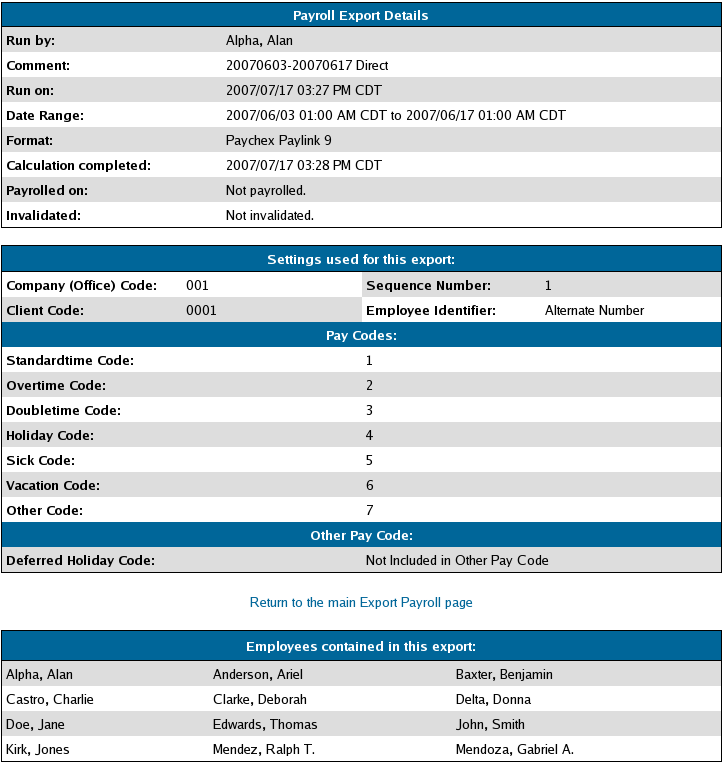
- To review the contents and settings of any payroll export, click on the corresponding link under "Export Comment". Your Payroll Export Details will be displayed.
See Also:
Payroll Export (TimeIPS Version 1.5) (1.5)
|

 Information