Applies to versions: 1.5, 1.6
Backups
Backing up your TimeIPS data is critical. TimeIPS provides several backup options to ensure the safety of your TimeIPS data.
NOTE: All TimeIPS backup options create an encrypted file of your TimeIPS data. You should not attempt to open the encrypted file as this can cause file corruption, destroying the integrity of your backup file. Only TimeIPS systems can decrypt and install a TimeIPS backup.
Security Level Required: System Administrator
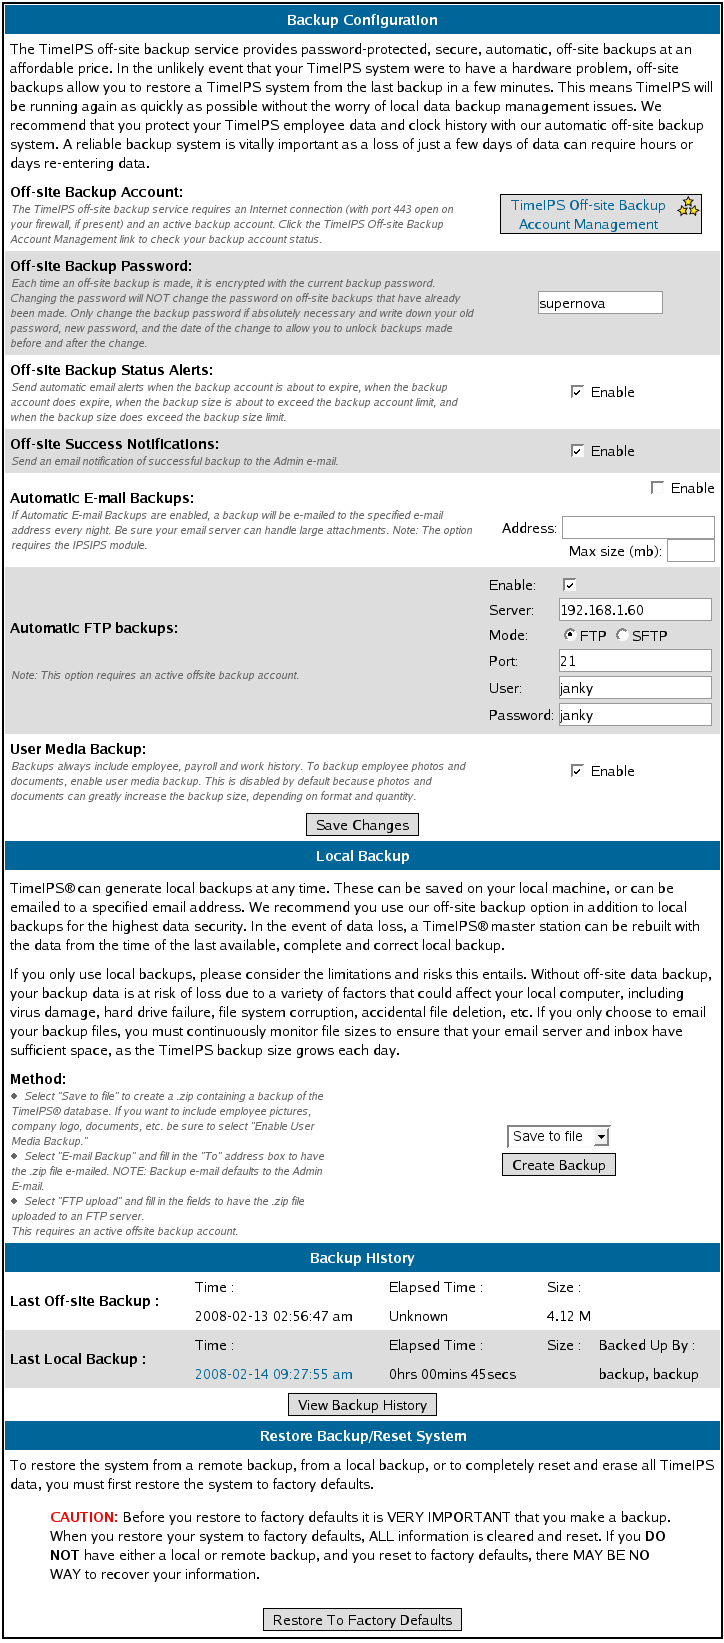
Using the left pane Main Menu, click on: Administration » System Administration » Backups
- If you have a firewall or router, certain ports must be opened. View the list of required ports on the Updates page.
NOTE: You must have an Internet Connection to TimeIPS to send off-site backups. Use the "Click here to check your Internet connection to TimeIPS" link on the Updates page to test your connection.
To Automatically Send Encrypted Off-site Backups:
TimeIPS can automatically e-mail nightly backups to a TimeIPS off-site backup server or transmit the backup to your designated FTP server. An active Off-site Backup account is required.
TIP: Use the
TimeIPS Off-site Backup Account Management link to check the status of your account.
To automatically send nightly backups to a TimeIPS off-site backup server:
- Enter an Off-site Backup Password.
WARNING: This password is required to download an off-site backup if necessary. It is critical you remember this password.
- Click on the Save Changes button to save the changes.
To automatically send nightly backups to your designated FTP server:
- Check the Enable checkbox in the Automatic FTP backups section.
- Enter the IP Address (i.e., 192.168.1.200) or the FTP server address (i.e., ftp.company.com) in the Server field.
- Select the Mode (FTP or SFTP) to use.
- Enter the User name and Password.
- Click on the Save Changes button to save the changes.
NOTE: Enable the "Off-site Success Notifications" checkbox to receive an email confirming successful off-site backup receipt.
TIP: Check the "Off-site Backup Status Alerts" checkbox to enable automatic email alerts when the backup account is about to expire, when the backup account does expire, when the backup account is about to exceed the backup account limit, and/or when the backup size does exceed the backup size limit.
NOTE: We recommend that you uncheck the "User Media Backup" checkbox to disable backing up employee photos and documents which can greatly increase the size of your backup. On a weekly basis, enable user media, make a local backup, then disable user media. Therefore, you will have a local weekly backup of photos and documents without using up e-mail server disk space with daily e-mailed backups.
To Automatically E-mail Nightly Backups
TimeIPS can automatically e-mail nightly backups to a specified e-mail address.  The IPSIPS optional module is required.
- Check the Automatic E-mail Backups checkbox to enable the e-mail backup service.
- Enter the e-mail address to send the backups to in the Address field.
- Click on the Save Changes button to save the changes or the Back icon to leave the page without applying the adjustments.
You can manually create a local backup of your TimeIPS data and either save the file to your local drive, e-mail the file to a specified e-mail address, or transmit the file to your designated FTP server.
- Select Save to file, E-mail to, or FTP upload from the drop-down box in the "Method" section of Local Backup.
- Save to file - Creates a .zip containing a backup of the TimeIPS database.
- Email to - Fill in the "To" e-mail address to have the .zip file e-mailed to the recipient.
- FTP upload - Fill in the fields that appear to have the .zip file uploaded to an FTP server.
- Click the Create Backup button to create your backup.
NOTE: If you want to include employee pictures, company logo, documents, etc., with any of the above local backup methods, check the "Enable" box next to User Media Backup.
Click on the Create Backup button to save/e-mail the backup file or the Back icon to leave the page without creating the backup.
To View or Clear your Backup History
The Backup History displays the Last Offsite and Local Backup time and size.
- Click on the View Backup History button to view recent backup history.
- Click on the Back icon to return to the Backups page or on the Clear Backup History button to delete the backup history.
NOTE: Deleting the backup history does not affect your stored backups in any way. It simply clears the history log.
 Information