|
|
Applies to versions: 1.6, 1.8, 1.9, 1.10
Custom Reporting/Payroll Export Settings
The TimeIPS Custom Payroll/Report Engine allows users to define the characteristics and contents of the file including the file extension, number of columns, field delimiter, line terminator, and data output. Custom Payroll requires the IPSCPE Customizable Payroll Export module (included in the IPSEPI Extended Payroll Integration module), the defined file can be generated then imported in your payroll application. Custom Reporting requires the IPSRPT Custom Report Module. .
For Payroll: Using the left pane Main Menu, click on: Administration » Payroll and Reports » Payroll Export
For Custom Report: Using the left pane Main Menu, click on: Administration » Payroll and Reports » Special Reports » Custom Report
Before you export:
- Obtain the file layout requirements, including the field level detail, that your payroll application will import. You can obtain this information from your payroll application’s help documentation or support resources. This document should specify the data fields (columns of information) to be included in the file generated from TimeIPS.
EXAMPLE A: Landon Payroll Application provided the following file layout requirements:
| Name | Description | Data Type | Required? | Example |
| File # |
Unique number that identifies employee |
Numeric |
Y |
46228 |
| Emp Name |
Employee’s Name |
Text |
N |
Jones Mark |
| Payroll Date |
Payroll Period End Date |
Date (YYYYMMDD) |
Y |
20070420 |
| Emp Division |
Division (Location) Code employee is assigned to |
Text |
N |
557 |
| Reg Hrs |
Regular labor hours worked |
Numeric |
Y |
40 |
| O/T Hrs |
Labor hours worked; paid at 1.5 times normal rate |
Numeric |
N |
3.48 |
| Sick Hrs |
Sick hours used |
Numeric |
N |
8 |
| Vacation Hrs |
Vacation hours used |
Numeric |
N |
8 |
| Holiday Hrs |
Holiday hours paid |
Numeric |
N |
8 |
- Map the available TimeIPS fields to each required field included in the file layout.
EXAMPLE A2: TimeIPS contains several employee fields that can store a unique identifier as the "File #" including the employee's "ID/Badge Number," "Alternate Employee Number," or "SSN." In this example, we will enter the Landon Payroll Application's Employee "File #" as the TimeIPS "Alternate Employee Number." The “Emp Division” field is not a default field in TimeIPS. However, there are a number of employee fields that can store the data and be mapped as the “Emp Division.” In this example, we will enter the employee’s "Division Code" in TimeIPS’s "Department" field. The "File #" will be mapped to the "Alternate Employee Number" and the "Division Code" will be mapped to the TimeIPS’s "Employee Department" field in your custom payroll export preset’s Column tab.
| Name | Description | Data Type | Required? | TimeIPS Field | Example |
| File # |
Unique number that identifies employee |
Numeric |
Y |
Alternate Employee Number |
46228 |
| Emp Name |
Employee’s Name |
Text |
N |
Employee's Name (Last, First Mid) |
Jones, Mark |
| Payroll Date |
Payroll Period End Date |
Date (YYYYMMDD) |
Y |
Enter Payroll End Date |
20070420 |
| Emp Division |
Division Code (Location) employee is assigned to |
Text |
N |
Employee's Department |
557 (code for North Branch) |
| Reg Hrs |
Regular labor hours worked |
Numeric |
Y |
Calculated by TimeIPS |
40 |
| O/T Hrs |
Labor hours worked; paid at 1.5 times normal rate |
Numeric |
N |
Calculated by TimeIPS |
3.48 |
| Sick Hrs |
Sick hours used |
Numeric |
N |
TimeIPS Benefit Hours |
8 |
| Vacation Hrs |
Vacation hours used |
Numeric |
N |
TimeIPS Benefit Hours |
8 |
| Holiday Hrs |
Holiday hours paid |
Numeric |
N |
TimeIPS Benefit Hours |
8 |
- Once you have the file format you wish TimeIPS to generate, you are ready to build your custom preset.
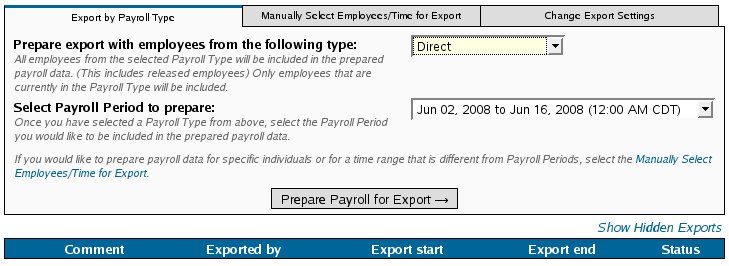
Step 1: Select Export Contents
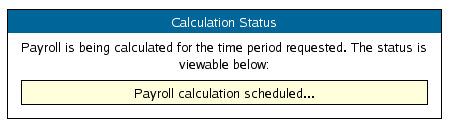
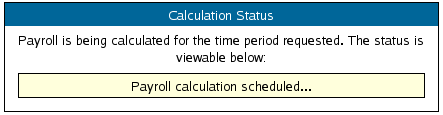
Select a Payroll Type and Payroll Period for the date range you are working on from the drop-down boxes and click on the button labeled Prepare Payroll for Export. Next you should see the payroll calculation being scheduled
NOTE: If necessary, it is possible to manually select your payroll time range and employees as well as change the export settings for payroll using the appropriately labeled tabs at the top of this page..
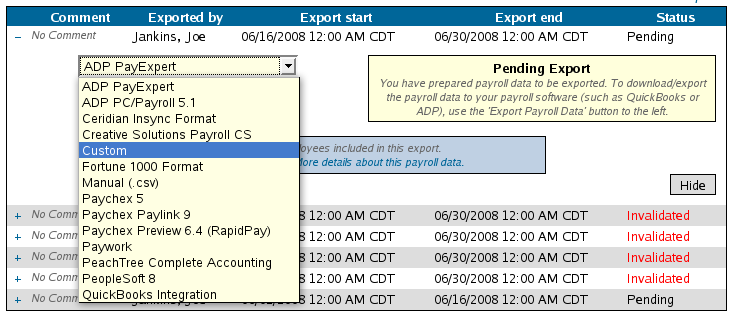
Step 2: Choose an Export Format
Select Custom from the drop down menu and then click on the button labeled Export Payroll Data
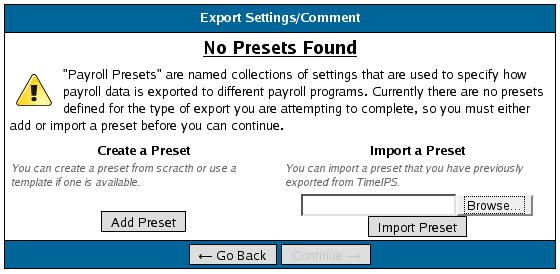
Click on Add Preset to begin setting up a preset for the Custom payroll export
NOTE: A Preset is a saved list of settings that are used each time a payroll file is generated. If your settings change from one group of employees to another, you may create multiple presets and select the preset that applies for the group you are exporting at the time.
The General Tab
The General tab defines information about the format of the file. The field level detail will be specified in the Columns tab.
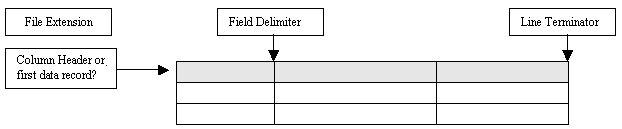
- Check Include column headers if the first row of data contains headers.
TIP: Most payroll applications that import delimited files (such as comma, tab, or special character delimiters) can include column headers and will ignore the first row. This allows you to preview the file with the label for each field identified in the first row before importing the file into your payroll application. You can preview the generated file in a spreadsheet application (for delimited files) or word processing application (for fixed length files).
- The Line Terminator defines the end of a row (line) of data in the file. The CR/LF (Carriage return/Line Feed) is the most common as it is used by Microsoft Operating Systems by default. If you are unsure, select your operating system (Windows, Macintosh, or Unix).
- A Field Delimiter separates each piece of data in the file. A CSV (Comma Separated Value) file uses a comma. A tab separated file uses a tab. A fixed length file does not use a Field Delimiter.
- The Text Wrapper indicates the type of quotations, if any, to use for identifying text output.
- If the file includes dates, select the Date Format to use.
- If the file includes times, select the Time Format to use.
- The File extension defines the file type and may associate the generated file with an application. A Comma Separated Value file’s extension is "CSV." A fixed length file is generally “txt.” If your payroll application does not specify the file extension, use “CSV” for files using a Field Delimiter of a comma (,) and “TXT” for any other file type.
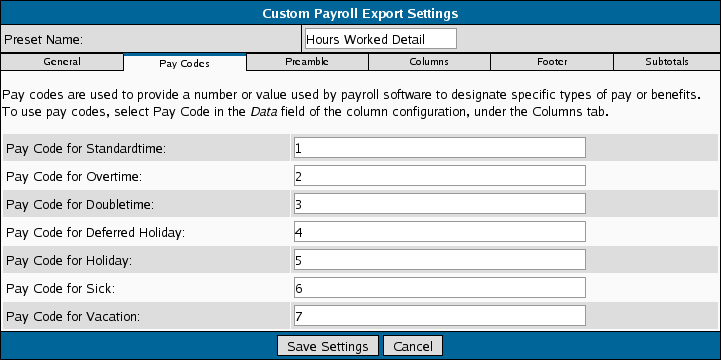
The Pay Codes Tab
The Pay Codes tab associates each type of earnings or pay with a specific name or code for identification in your payroll application.
EXAMPLE: In the screen shot above, standardtime hours will be designated with code 1, overtime with code 2, and so forth. In that way, all hours can be included in a single column with a specific code (or name, such as "Hourly" and "Overtime") identifier.
NOTE: The Landon Payroll Application file requirements from example A separate each pay type into its own column. Therefore, the pay codes will not be used.
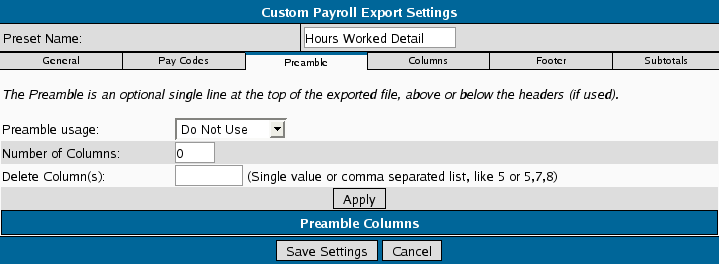
The Preamble Tab
The Preamble tab defines file heading rows that include summary data about the file. Unless preamble records are specified in the file layout requirements provided by your payroll application, leave the default value of “Do Not Use”.
NOTE: Most payroll applications do not require a preamble.
The Columns tab
The Columns tab defines the number of columns, the format for each column, and the data contained in each.
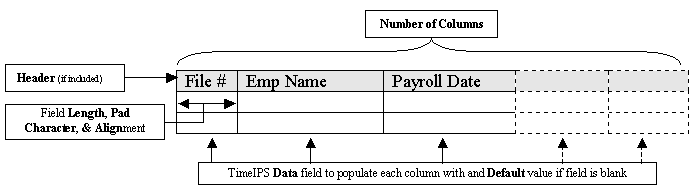
- The Number of Columns defines the number of data fields included in the export.
If you wish to add more blank columns:
- Enter the new Number of Columns.
- Click on Save Settings.
- Edit your preset again and the new columns will be available.
EXAMPLE: The default preset selected includes 6 columns. The payroll file layout requires 3 additional fields at the end. Therefore, adjust the "Number of Columns" to 9, "Save Settings," and edit your preset again.
If you wish to delete an existing column:
- Enter the column number(s) in the the Delete Column(s) field.
- Click on Save Settings.
- Edit your preset again and the columns will be deleted.
NOTE: You do not need to adjust the # of columns as TimeIPS will automatically adjust them based on the duplicated/deleted columns entered.
If you wish to move a column:
- Click and hold on the drag and drop icon
 . .
- Now drag the column to where you want it to show up in the custom export.
- Release your mouse button.
or
- Click on the move icon
 . .
- This will move the column up one spot or down one spot depending on the direction of the arrow.
If you wish to insert a single blank column:
- Click and hold on the drag and drop icon
 . .
- This will insert a new column directly below the column you chose the icon from .
If you wish to duplicate a single column:
- Click on the duplicate icon
 . .
- This will duplicate the column directly below the column you chose the icon from .
- The Header defines the name of the column. If "Include Column Headers" is checked on the General tab, the first row of the generated file will contain Column Headers, otherwise, the first row will be the first data record/row.
- Pad Character defines the character to use in order to pad fixed length fields. Generally, fields are padded with a “0” or a space. For space padding, type a space in the Pad Character field.
- Length defines the maximum length of a field. Fixed length fields will be truncated or padded to the defined Length. Delimited fields will be truncated to the Length.
- Align defines how data is aligned in a fixed length field.
EXAMPLE: The Employee name “Thomas-Jones, Michael Anthony” will be output based on the column settings as indicated in the table below. Do note that text fields are generally padded with spaces. "x" is used in this example to provide a better visual explanation of the available settings:
| Length | Pad | Align | Output |
| 20 |
x |
Left |
Thomas-Jones, Michae |
| 20 |
x |
Right |
nes, Michael Anthony |
| 40 |
x |
Left |
Thomas-Jones, Michael Anthonyxxxxxxxxxxx |
| 40 |
x |
Right |
xxxxxxxxxxxThomas-Jones, Michael Anthony |
- The Data field defines the contents of the column – the TimeIPS field to output in this column.
- The Default data will be used if the selected "Data" field is blank.
EXAMPLE: Job Code is mapped into a column. If employee’s do not specific a job code when clocking in, their time should be billed to the job code 1511. The "Data" field should be mapped to the "Job Code" and the "Default" should be "1511."
- If Total is checked, the data will be summarized for each record of matching information.
EXAMPLE: Below is the column data for a file without totals:
| Record # | Employee Name | Date | Job Code | Reg Hrs | O/T Hrs |
| 1 |
Jones Mark |
2007-06-04 |
84005 |
3 |
0 |
| 2 |
Jones Mark |
2007-06-04 |
84005 |
1 |
0 |
| 3 |
Jones Mark |
2007-06-04 |
37121 |
4 |
0 |
| 4 |
Jones Mark |
2007-06-05 |
84005 |
3.5 |
.5 |
EXAMPLE: Below is the same column data for a file with Total selected for the Reg Hrs field. Note that the Regular hours were totaled from the first and second records because the employee name, date, and job code were the same. The third row was not totaled because the job code was unique, and the fourth record was not totaled because the date was unique.
| Record # | Employee Name | Date | Job Code | Reg Hrs | O/T Hrs |
| 1 |
Jones, Mark |
2007-06-04 |
84005 |
4 |
0 |
| 3 |
Jones, Mark |
2007-06-04 |
37121 |
4 |
0 |
| 4 |
Jones, Mark |
2007-06-05 |
84005 |
3.5 |
.5 |
If Clear Duplicate is checked, the data in the column will be cleared if it's the same as the row(s) above. This is used, for example, to clear the employee's name for all rows after the first row to improve the appearance and readability of the report.
Notes on Payable Time Duration
- The "Other Payable Time Duration" column will display all hours NOT shown in other columns for specific pay types. For example, if your export includes a column for Standard Time, then standard time will be removed the from the total time shown by "Other Payable Time Duration."
- The "Total Payable Time Duration" column will display all hours, even if shown in other columns in the export.
Notes on Payable Rates
- Payable Hourly Rate (base, no modifiers): This is the employee's base hourly rate as entered on the employee tab. This is the raw rate without any kind of differentials, overrides, overtime, etc. applied.
- Payable Hourly Rate (diff/override): This is the employee's base hourly rate as above, plus any differentials or overrides due to jobs or per-event modifiers, but still without any overtime/doubletime/premiumtime multiplication.
- Payable Hourly Rate (diff/override and OT/DT/PT): This is what is used to actually pay an employee. It's the employee's base hourly rate, plus any differentials or overrides due to jobs or per-event edits, multiplied by overtime/doubletime/premium time multipliers, if applicable. For FLSA compliance, when in overtime/doubletime/premiumtime, this amount is at least the Payable FLSA Weekly Base Hourly Rate times the OT/DT/PT multiplier.
- Payable FLSA Weekly Base Hourly Rate: This is the FLSA Weekly Base Hourly Rate used to figure OT/DT/PT minimums for the entire week. For example, if an employee works 20 hours at $10/hour, then 20 hours on a job that pays $20/hour, then 10 more hours at $10/hour, FLSA requires that the 10 overtime hours be paid at 1.5x the employee's FLSA base rate, calculated as the total base pay for the week divided by total hours for the week. In this example: 20 x $10 + 20 x $20 + 10 x $10 = $700 / 50 = $14. So, the pay for the 10 OT hours must be a minimum of $14 * 1.5 = $21/hour.
Notes on Removing Rows
Any row that contains any field that evaluates to or consists of nothing but the keyword "action_remove_this_row" will cause the entire row to be removed. This is useful in cases where specific types of time, pay, jobs, workorders, etc. should be excluded from the report.
The Footer Tab
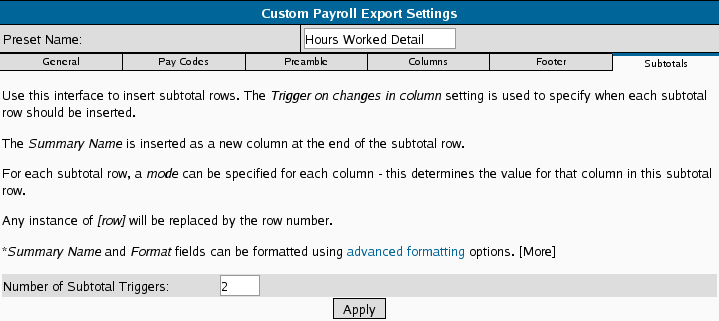
The Subtotals Tab
- The Subtotals tab allows you to create subtotal in the custom pay export.
- Type in the the number of subtotals you would like in the Number of Subtotal Triggers: field

- The Subtotal Triggers defines what information will have a subtotal.
- Trigger on changes in column is used to specify when each subtotal row should be inserted.
- Summary Name* is inserted as a new column at the end of the subtotal row. You can use advance formatting or it can be any value you would like. ( Example: If you are subtotaling total hours worked for a pay period, you could call it Worked Time.)
- Column tells you the name of the column in the custom payroll export.
- Mode allows you to choose a function for each column.
- Sum sums the information in the column by the defined trigger.
- Mean is the arithmetic average of a set of values,
- Median is the number separating the higher half of a sample from the lower half.
- Mode is the element that occurs most often.
- Min is the minimum number in the range.
- Max is the Maximum number in the range.
- Count counts the number of values in a range.
- Distinct counts the number of unique values in a range.
- Format* allows you to us advance formating.
Once your preset has been configured, click on Save Settings to save, or Cancel to exit without saving.
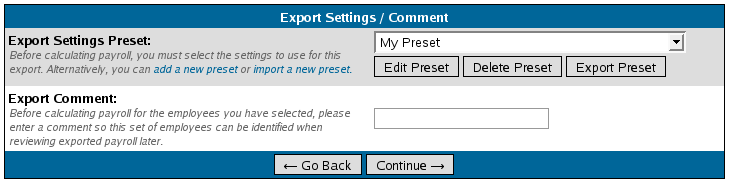
Step 3: Export Payroll
- On the next screen be sure that your new preset is the one selected in the Export Settings Preset drop down menu.
- Optionally if you wish to add a comment to the export making it unique and easily identifiable you can do so now.
- Click Continue
Step 4: Download Payroll Export
Note: Editing of time events is locked during payroll processing to avoid having another user make changes via the Time/Edit Report that would not be reflected properly in the current payroll run.
Click on the download link to save the newly created payroll export file.
If you have confirmed that the information contained in this export is correct and wish to permanently lock the payroll period click the button labeled Yes, the export was accepted otherwise choose Cancel, return to TimeIPS
If you chose Cancel return to TimeIPS the export will be listed as Pending. Pending exports can be exported again to other payroll output formats as often as you like until they have been finalized
If you chose Yes, the export was accepted you should now see the payroll run labeled as Exported Exported payroll runs are locked, time can no longer be edited in the system for this period of time.
The TimeIPS Knowledge Base is updated frequently.
Please continue to check back for further details about TimeIPS payroll exports.
For immediate assistance with any of the above payroll exports,
call our Customer Support staff at 877-846-3256.
See Also:
Payroll Export (TimeIPS Version 1.6) (1.6, 1.8, 1.9, 1.10)
Advanced Formatting for Custom Payroll (1.5, 1.6, 1.8, 1.9, 1.10, 1.11, 2.0, 2.1, 2.2, 2.3, 2.4, 2.5, 3.0, 3.1, 3.2)
Custom Payroll Export Settings (TimeIPS Version 1.5) (1.6, 1.8, 1.9, 1.10)
Was this article relevant to your question? Yes No |

 Information