Date printed: 04-26-2024 Last updated: 11-04-2010
To view our complete support knowledge base and most current version of this article visit support.timeips.com.
 Information Sales Support
Date printed: 04-26-2024 Last updated: 11-04-2010 To view our complete support knowledge base and most current version of this article visit support.timeips.com. |
316-264-1600 Information Sales Support |
The Time Edit/Report interface is designed to be a quick, simple, easy to use yet powerful and flexible tool for viewing employee worked time, benefit time, and holiday time. This support article will walk you through the basics of the interface itself for the most common tasks, and also explore some of the features and options that make Time Edit/Report a powerful tool for running your business.
For customers using the IPSPRM Module, access to the Time Edit/Report Interface is controlled by the Clock Events permission. Any Employee that can view worked time will be able to access the interface itself. The content of the reports are restricted by the Employee's permission to view Clock Events, Benefits, and Holiday Events for other employees. These reports will be restricted by these permissions as well.
When you first access the Time Edit/Report interface, you will be presented with the following control panel.

This simple control panel presents the basic options necessary in order to generate a Time Report.
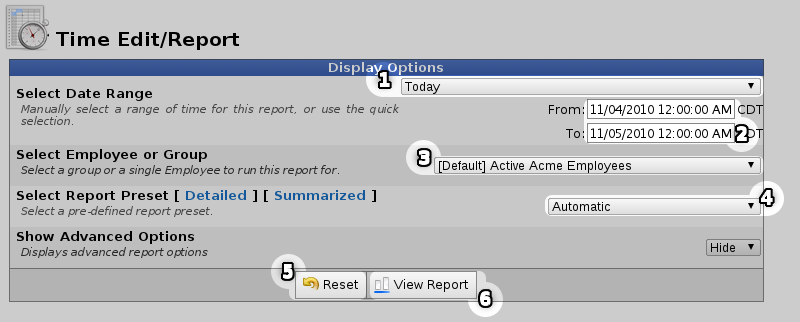
1. Predefined date ranges. This selector contains a number of predefined ranges, such as "This week", "Last Month", and the current and loast completed periods for your configured payroll types. You can use this selector to quickly access the most commonly used time ranges.
2. Custom date ranges. You can use these selectors to fin tune your report selection. The Time Reporting utility will warn you with an error message if you attempt to reverse the dates so that the "From" box is later than the "To" box.
3. Employee Selection. Use this selector to filter which Employees you would like to see in the report. It works in conjunction with Employee Selection Groups, and your custom presets will appear in the list.
4. Report Options and Column Presets. You can use this selector to choose between Detailed and Summarized reports, and choose your presets that determine which columns should be displayed in the report. The Detailed Time Report will show every individual event for the Employees selected in a given range, while the Summarized Time Report by default will summarize all worked time by employee.
5. Reset. Clicking this button will reset your selections.
6. View Report. Clicking this button will create the report for you to view.
Viewing a report will give you the following:

In this example, the report is displaying a summarized view of the worked time for the logged in manager's employees. There are three people with time in this report. One person, Randy Bartlett, is on vacation this week, while Melissa Matthews has used some benefit time as well.
The columns that are visible in this report can be set up using the presets provided in the Control Panel. In the default preset, the Summarized Time Report shows a basic summary of information. Clicking on an Employee's name will generate a Detailed Time Report for that person.
By clicking on Melissa Matthew's name in the Summarized Time Report, we are able to view her detailed information.

The Detailed Time Report displays all the information about the clocked time, including the Job, Work Order, Clock Location, and Duration of the event. More details are available in different columns, which can be configured using the Presets for the Detailed Time Report. To view the auditing information about an event, you can expand the row by clicking the expansion icon to the left of the row.
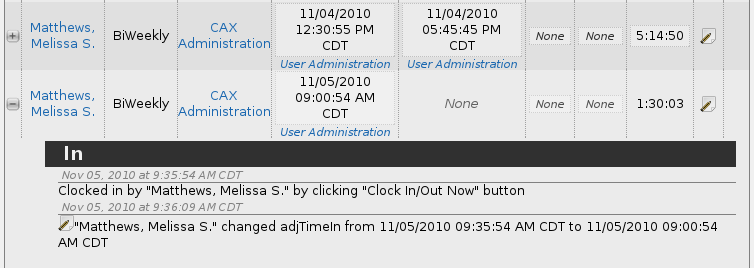
In this audit, we can see that Melissa clocked herself in by clicking the "Clock In/Out Now" button at the bottom of the Time Edit/Report Interface, and then changed the time from 9:35am to 9:00am. Clicking on the Clock Location for the In Time And Location or Out Time and Location columns will take you to the Time Edit interface, where the clock even can be modified or deleted. In Figure 3-a, the Clock Location is "User Administration".
By Showing Advanced Options on the Control Panel, you can enable additional options for advanced operation.


And just like the Detailed Time Report, you can expand the individual rows to see more detailed information about the range you have selected.
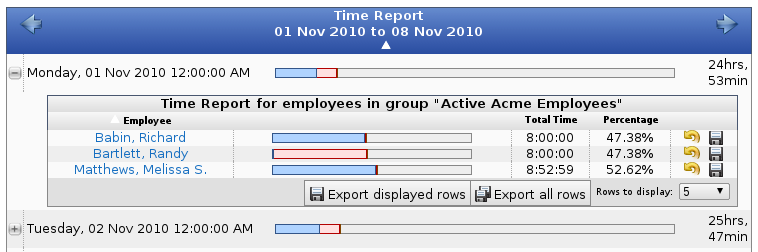
Like most reports in TimeIPS, the Time Edit/Report can provide a download for a Comma-Separated-Value export file. Clicking the Export Displayed Rows will generate a CSV file for the page you are currently looking at, while Export All Rows will generate a CSV export for the entire report, including all of its pages.