|
|
Applies to versions: 1.8, 1.9, 1.10
Employee Status View
The Employee Status View is an electronic In/Out board for tracking employee's status throughout the day.
Security Level Required: Login access (username and password)
Using the left pane Main Menu, click on: Directory » Employee Status
General Information
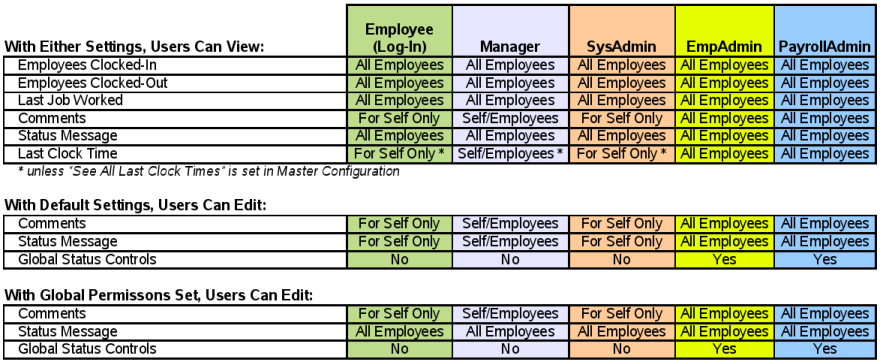
- All active employees are listed on the Employee Status View screen along with their current In or Out status and the last Job they worked. This information is viewable by all employees.
- Employees currently clocked IN display in green text.
- Employees currently clocked OUT display in red text.
Automatic Refresh
Comments
- Employees and System Administrators can not view or edit Comments for anyone but themselves.
- Managers can view and edit Comments only for themselves, their employees and/or their employee's employees.
- Employee Administrators and Payroll Administrators can view and edit Comments for all employees.
- An employee can log-in and enter a Comment to accompany his/her last clock event by clicking on Click to add a note next to his/her name.
- Managers can add Comments for themselves, their employees, and/or their employee's employees.
- The clock Comment is cleared from the Employee Status View screen when the employee clocks again.
- Once a clock Comment is entered, it can be edited only until the employee clocks again. After the employee clocks again, the clock Comment is "locked" from future edit.
- The Comment is saved as a Clock Note and can also be viewed by editing the time in the employee's Time Edit/Report.
Adding / Removing Clock Comments
EXAMPLE: An employee comes back from lunch and realizes she forgot to clock out before she left. After clocking back in, she enters "Forgot to clock out for lunch at 12:05pm" using the Comment section of the Employee Status View screen. This will attach a note to the employee's clock-in time that her manager will be able to see on the Time Report. In addition, the comment will be visible on the Status View screen to her manager and any Employee or Payroll Administrator, but will not be visible to other employees.
NOTE: The "Click to add note" prompt will only appear next to an employee who has had clock events within the last calendar week (168 hours).
Status Messages
- Employees can view the Status message for all employees, but can only edit the Status message for themselves, unless global status permissions have been set up by a System Administrator in Master Configuration.
- With global permissions, employees can view and edit the Status message for any other employee. See the article on Using Global Messages for more information.
- Managers can view the Status message for all employees, but can only edit the Status message for themselves, their employees, and/or their employee's employees.
- Employee Administrators and Payroll Administrators can view and edit the Status message for all employees.
- Employee Administrators and Payroll Administrators can also add, change or remove Status messages from the defaul list by using Global Controls.
Last Clock
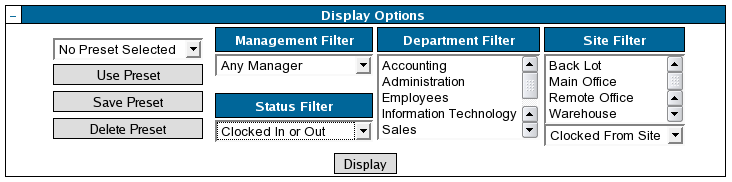
- Once you have selected your desired filters, click on Save Preset to save your custom view.
- You will be prompted to enter a name for this Preset. Enter a descriptive name.
- Click on the Use Preset button to see the Employee Status screen with your custom view.
TIP: To use a saved Preset display, select the Preset name from the pull-down list and click on the "Use Preset" button.
NOTE: You can remove Preset display filters by choosing the Preset name from the pull-down list and clicking on the Delete Preset button.
See Also:
Adding / Removing a Status Message (1.3, 1.4, 1.5, 1.6, 1.8, 1.9, 1.10)
Using Global Status Messages (1.4, 1.5, 1.6, 1.8, 1.9, 1.10)
|

 Information