Applies to versions: 1.11, 2.0, 2.1
Batch Time Entry
Batch Time Entry provides a quick way to manually enter time for multiple employees.
Requires the IPSSFT shifts module.
Using the left pane Main Menu » Administration, click on: Schedules » Shifts
and then click on the Batch TIme Entry icon  at the top of the page.
- or -
Using the left pane Main Menu » Administration, click on: Clocking » Batch Time Entry
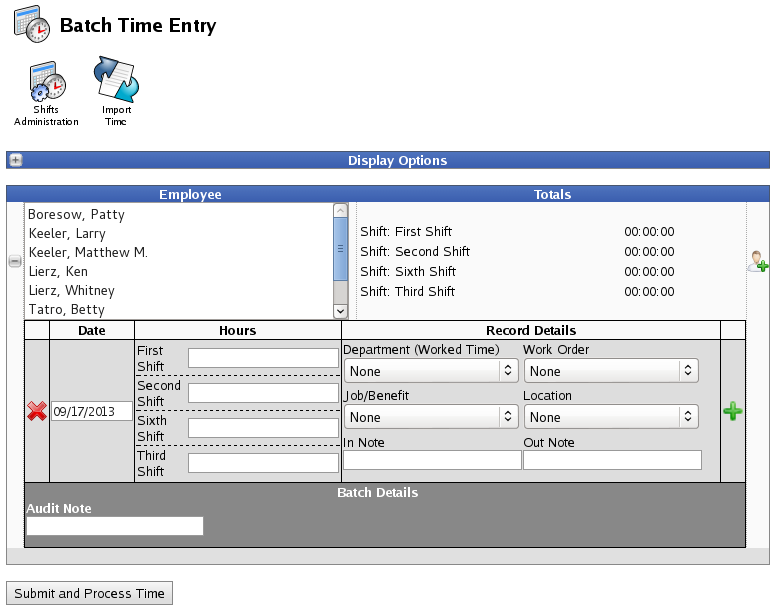
Display Options
Click on Display Options to configure advanced options regarding how you wish to interact with Batch Time Entry. If you typically want to use this interface in a custom manner you can save the configuration as a preset and optionally make that preset the default view for this page.
- If you choose to Show Time As:
- Shift and Duration, the exact clock-in and out time in HH:MM:SS will be displayed in the Hours column. NOTE: You must have at least one shift configured in the system.
- Start Time and Duration, the exact clock-in and out time in HH:MM:SS will be displayed in the Hours column.
- Start and Stop Time, the exact clock-in and out time in HH:MM:SS will be displayed in the Hours column.
- Employee Selection Preference provides choices on how you want to select employees.
- If you select Single Employee, you can only enter time for one employee per batch.
- If you select Multiple Employees: 3, 6, or 10 rows, that is how many rows show in the employee column without having to scroll..
- Choose which Shifts to Include by checking the box next to each shift you want to appear in the table.
- The following Advanced Display Options can be...
- set to Show Each Record, Show Each Batch, or Hide.
- arranged in any order by changing the number of their Position, 1 appearing first.
- given a Default value.
- given a Display As name.
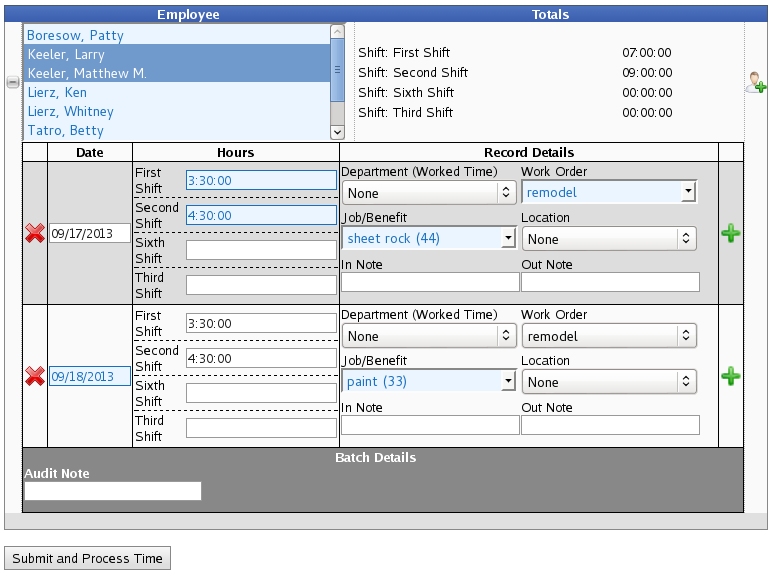
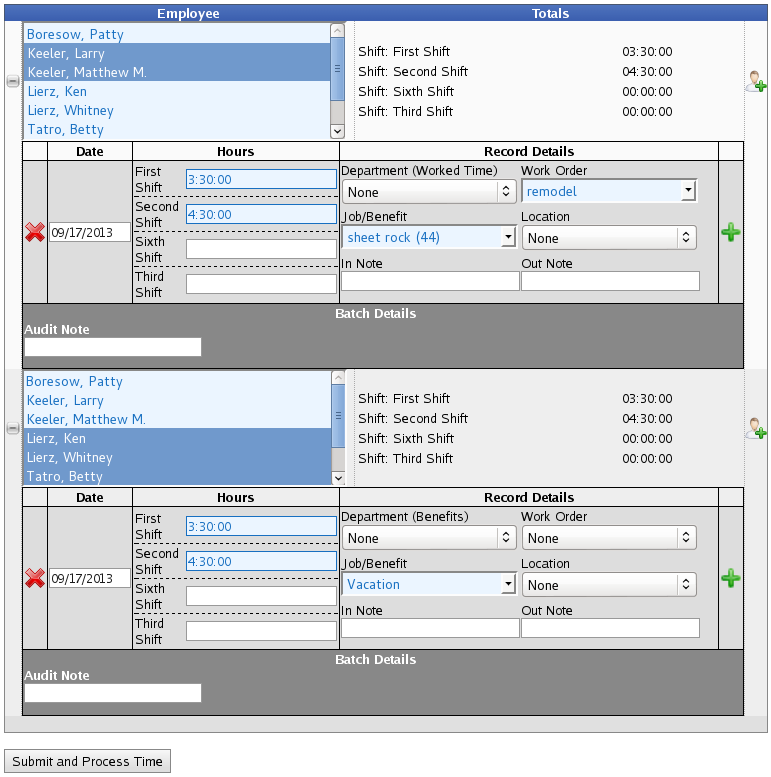
- Department (Worked Time) This is the option to specify the department from the list of departments tracked against worked time. Time is either worked time or benefits if the value of the Job/Benefit selector is a Job or Benefit Type respectively. This option will not show unless there is at least one department configured to track time against worked time as configured on the Department Administration page.
- Department (Benefits) This is the option to specify the department from the list of departments tracked against benefits. Time is either worked time or benefits if the value of the Job/Benefit selector is a Job or Benefit Type respectively. This option will not show unless there is at least one department configured to track time against benefit usages as configured on the Department Administration page.
- Work Order With the IPSJWO module this option allows you to specify the Work Order that this time is associated with. The Work Order option is tied to the Job/Benefit selector as specifying a Work Order will restrict the list of available jobs.
- Job/Benefit Selecting from the list of Jobs specifies that the events to be created are worked time. Selecting one of the available benefit types indicates that the created events are benefit usages.
- Location Select an option from this list to associate time events with a specific location.This list comes from the list of clocks associated with this division as seen on the Clock Configuration page.
Note: This option is ignored when entering benefit time.
- In Note Specify an optional Clock In Note to be associated with a time event.
Note: This option is ignored when entering benefit time.
- Out Note Specify an optional Clock Out Note to be associated with a time event.
Note: This option is ignored when entering benefit time.
- Audit Note Text specified will be used either as an audit note for a worked time event or a comment for a benefit event.
- Tracking Fields You can be prompted with a list of tracking fields as configured on the Tracking Field Administration page. There are potentially seperate fields that will be prompted based on whether an event is worked time or benefits. Time is either worked time or benefits if the value of the Job/Benefit selector is a Job or Benefit Type respectively. Default values for tracking fields and their display text is configured on the Tracking Field Administration page.
- Once you have finished customizing, click the Update Display button.
 Information
  (plus) sign at the end of the row. To delete, click the red