|
|
Applies to versions: 1.11, 2.0, 2.1, 2.2, 2.3, 2.4
QuickBooks Integration - Setup TimeIPS
Before running the QuickBooks Integration for the first time, you will need to setup your TimeIPS QuickBooks Payroll Export Settings. These settings do not need to be adjusted each time you run the Integration unless changes are made to your QuickBooks Payroll Items or other settings.
You will also need to set up QuickBooks prior to running payroll. Review the QuickBooks Integration - Setup QuickBooks article for instructions.
Using the left pane Main Menu » Administration, click on: Payroll » Payroll Export
Prepare Payroll for Export
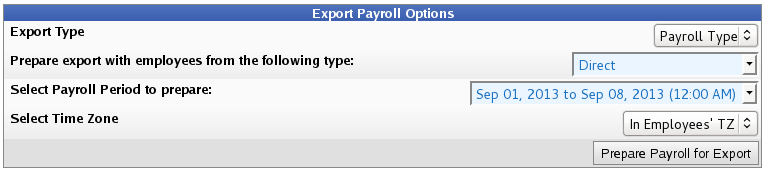
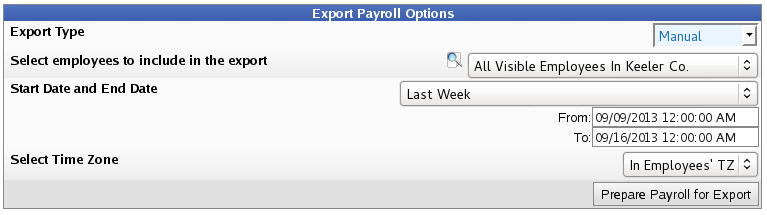
First, choose to generate the report by Payroll Type or Manually select employees and a range of time.
Payroll Type
- Under Export Type, select Payroll Type to generate the report. (See "Manual" below for specifics on that option.)
- Select a Payroll Type. All employees (including released employees) that are currently in the selected Payroll Type will be included in the prepared payroll data.
- Select the Payroll Period from the drop-down boxes.
- Select a Time Zone. The start and end time of the export can be interpreted in the company's timezone or separately for each employee.
- Click the Prepare Payroll for Export button.
Manual
- Under Export Type, select Manual to generate the report. (See "Payroll Type" above for specifics on that option.)
- Select an employee or group of employees to include in the export.
- Manually select a range of time for this report, or use the quick selection drop down box.
- Select a Time Zone. The start and end time of the export can be interpreted in the company's timezone or separately for each employee.
- Click the Prepare Payroll for Export button.
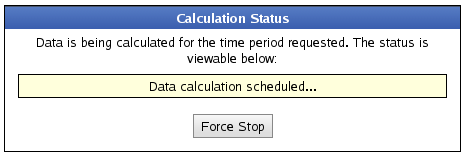
Next you should see the payroll calculation being scheduled.
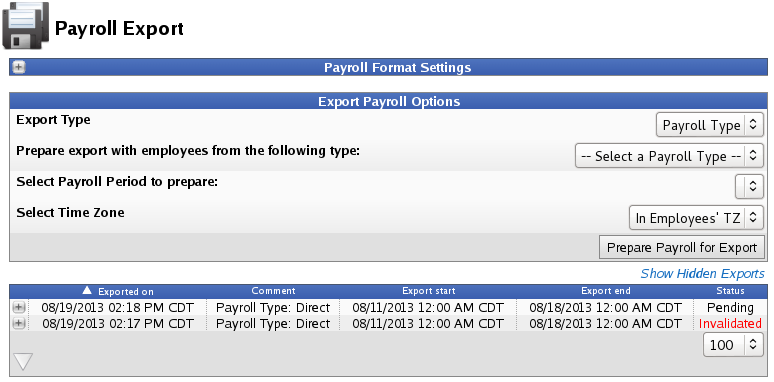
Export Payroll
After the payroll data is prepared for export, the Pending Export window will open. 
- Select QuickBooks Integration from the drop down menu.
- Next click on the button labelled Export Payroll Data.
NOTE: Editing of time events is locked during payroll processing to avoid having another user make changes via the Time/Edit Report that would not be reflected properly in the current payroll run.
If you have not already created a QuickBooks Integration preset, you will see the following screen. 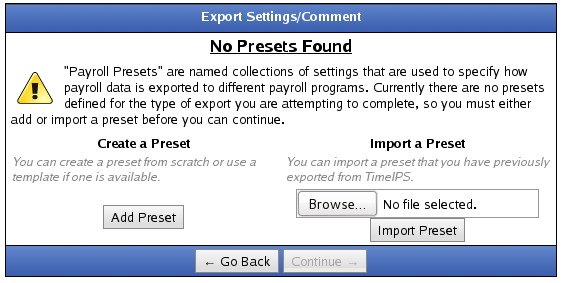
Click the Add Preset button to begin setup.
NOTE: A Preset is a set of stored settings that are used each time a payroll file is generated. If your settings change from one group of employees to another, you may create multiple presets and select the preset that applies for the group you are exporting at the time.
The preset window will appear.
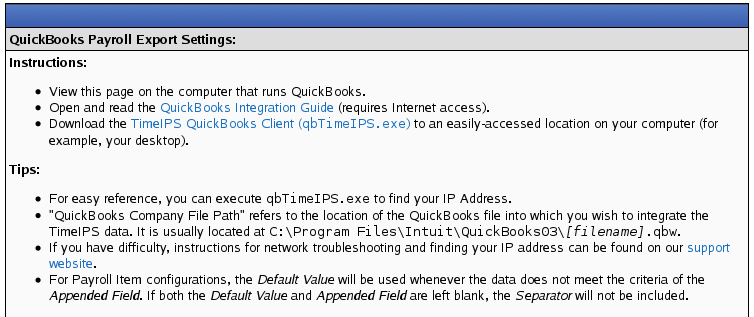
If you have not done so already, download the TimeIPS QuickBooks Client.
Change the QuickBooks Payroll Export Settings, as necessary.
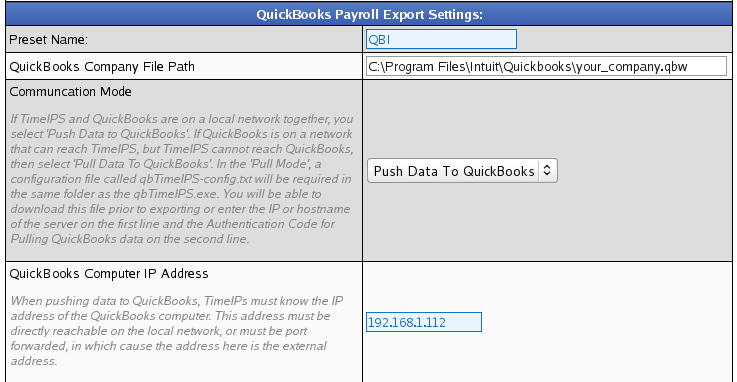
- The Preset Name can be anything you choose. In this example we have used the name QBI
- The QuickBooks File Company Path is the path you wrote down in "SETUP QUICKBOOKS Company info - step 4."
- The Communication Mode is determined by networking.
- If TimeIPS and QuickBooks are on a local network together, you select 'Push Data to QuickBooks'.
- If QuickBooks is on a network that can reach TimeIPS, but TimeIPS cannot reach QuickBooks, then select 'Pull Data To QuickBooks'. In the 'Pull Mode', a configuration file called qbTimeIPS-config.txt will be required in the same folder as the qbTimeIPS.exe. You will be able to download this file prior to exporting or enter the IP or hostname of the server on the first line and the Authentication Code for Pulling QuickBooks data on the second line.
- The QuickBooks Computer IP Address is the IP address of the computer that contains the QuickBooks program and is where you will run the Integration. Unless, you are port forwarding, in which cause the address here is the external address.
- Ask your network administrator.
OR
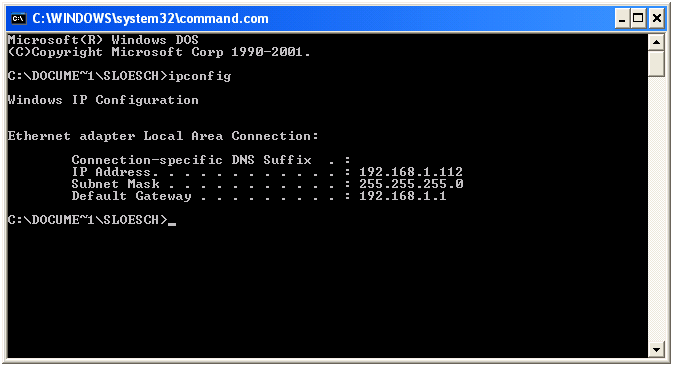
- To Identify your Computer's IP Address:
- Go to the Start menu - Run option.
- In the Open/Run window, type in the following command and press ENTER: command
- In the Command prompt, type in the following command and press ENTER: ipconfig
- Enter the IP address listed under the Ethernet Adapter Local Area Network Connection listing as the QuickBooks Computer IP Address.
- For security reasons, we highly recommend that TimeIPS be on the same network as the system running QuickBooks. If your QuickBooks system is not on the same network as TimeIPS, it is possible to allow TimeIPS to communicate with QuickBooks by port forwarding TCP 6035 from your computer to an IP address that can be seen by TimeIPS. This would normally be done on a router or Internet gateway. For this configuration, enter the IP address that is port forwarding 6035, rather than the IP address of the computer running QuickBooks. If you need help configuring port forwarding, please ask your network administrator.
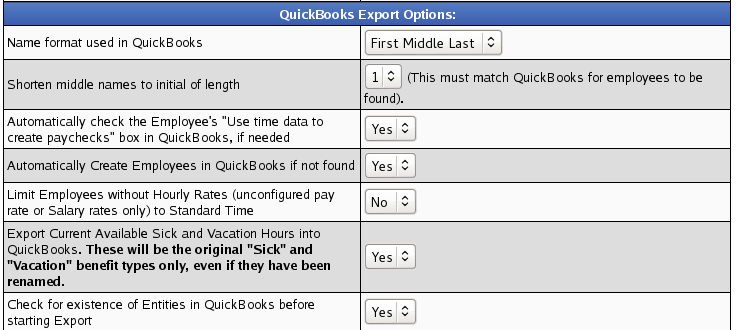
Change the QuickBooks Payroll Options, as necessary.

Enter the corresponding QuickBooks Payroll Item codes exactly as they appear in QuickBooks.
- In some cases, it may be desirable to use different Payroll Items for specific jobs, departments, or employees.
To facilitate this, use the Separator and Appended Field/Default Value. For example, to pay two departments ("Marketing" and "Accounting") with different Payroll Items ("Regular Pay - Marketing" and "Regular Pay - Accounting"):
1) Create both Payroll Items in QuickBooks
2) Enter " - " as the Separator (without the quotes)
3) Select "Employee Department" as the Appended Field.
4) If the Appended Field could be blank, TimeIPS would attempt to export a Payroll Item like this "Regular Pay - " which QuickBooks would not match. To make sure there's always an Appended Field value, set the Default Value to what you want in this case, i.e. "Other." This will cause the Payroll Item to be "Regular Pay - Other" if an employee does not have a department.
Be sure the total length of the Payroll Item does not exceed the QuickBooks limit of 31 characters.
NOTE: This MUST match exactly or QuickBooks will be unable to receive payroll data.
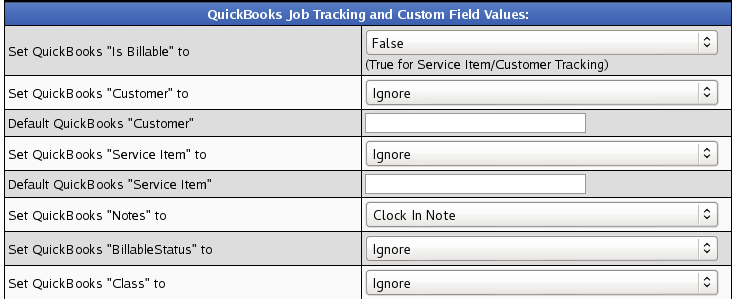
The QuickBooks integration can support certain Job Tracking functions with a properly configured QuickBooks.
- Set QuickBooks "Is Billable" as follows: If "Is Billable" is true, the tracked time is billable, and you must specify a Customer and a Service Item so that an invoice can be created. If no invoice will be created, set Is Billable to false.
- Set QuickBooks "Customer" as follows: In a TimeTracking request, Customer refers to the customer or customer job to which this time could be billed. If 'Is Billable" is set to true, Customer is required. QuickBooks limits this field to 209 characters.
- Quickbooks "Jobs" and "Phase" the job and phase in quickbooks is a subfield of the customers. To export the job and phase you would need to add it to what you have the "Customer" set to. If you have the "Customer" set to job long name you would then need to set the job's long name to something like this (example: dillions:front:checkout). In the example you have a Job in TimeIPS called dillions:front:checkout the break down in quickbooks would be that you have a customer called dillions a job called front and a phase called checkout. The name will need to have the : as a separator as quickbooks uses this to figure out the sub fields.
- Set Default QuickBooks "Customer" as follows: Because a Customer is required if "Is Billable" is true, and some time events may not have a value in the "Set QuickBooks Customer" option above, set a default value for the Customer in these cases. For example, "Other" and be sure to create a Customer in QuickBooks called "Other."
- Set QuickBooks "Service Item" as follows: The Service Item refers to services that a business charges for or purchases. Examples include specialized labor, consulting hours, and professional fees. QuickBooks limits this field to 159 characters.
The Service Item refers to the type of work performed. If "Is Billable" is set to true, then both Service Item and Customer are required.
- Set Default QuickBooks "Service Item" as follows: Because a Service Item is required if "Is Billable" is true, and some time events may not have a value in the "Set QuickBooks Service Item" option above, set a default value for the Service Item in these cases. For example, "Other" and be sure to create a Service Item in QuickBooks called "Other."
- Set QuickBooks "Notes" as follows: QuickBooks can accept an optional note field. This can be blank or any option on the drop down list. QuickBooks limits this field to 4095 characters.
- Set QuickBooks "BillableStatus" as follows: The billing status of this item line or expense line. If the billing status is empty (that is, if no billing status is specified), then no BillableStatus value will be seen in QuickBooks. If set, QuickBooks limits this field to one of the following three values:
Billable
NotBillable
HasBeenBilled.
- Set QuickBooks "Class" as follows: Classes can be used to separate transactions into meaningful categories. (For example, transactions could be classified according to department, business location, or type of work.) For Time Tracking, Class refers to the QuickBooks class into which the timed activity falls. In QuickBooks, class tracking is off by default. QuickBooks limits this field to 159 characters. If you use a sub class this can be defined with a : (example: class name:sub class name)

The QuickBooks integration can support Clock In and Out Notes with a properly configured QuickBooks.This is a legacy feature that was used to send over extra data to QuickBooks. If you need a feature like this, consider using Piecework.

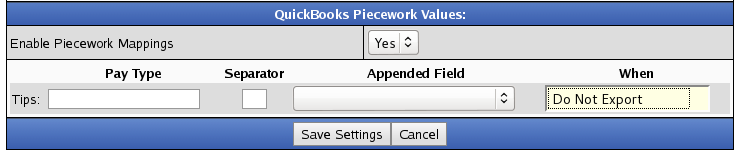
The QuickBooks integration can support Piecework with a properly configured QuickBooks.
- To Enable Piecework Mappings, select Yes.
- Click on the Save Settings button to save your changes.
- Set up Piecework using the left pane Main Menu » Administration, click on: Piecework » Piecework Admin

- Click on the + (plus) sign to the left of the Create a new Piecework bar.
- Add a descriptive Name for this piecework, such as "Widgets" or "Tips".
- Click on the Create button to save.
- Return to the QuickBooks Preset, and this new Piecework will be displayed and ready for configuration.
NOTE: TimeIPS doesn't push the Pay Rate information into QuickBooks.
NOTE: TimeIPS doesn't push the Pay Type into QuickBooks. QuickBooks defaults this to an Hourly employee setting.
NOTE: QuickBooks is picky about special characters. Please DO NOT use symbols or special characters such as ! @ # $ % ^ & * ? , etc. in any field that will be exported. For example, employee names, job names, employee or job code, customer name, or payroll items.
Once your preset has been configured, click on Save Settings to save, or Cancel to exit without saving.
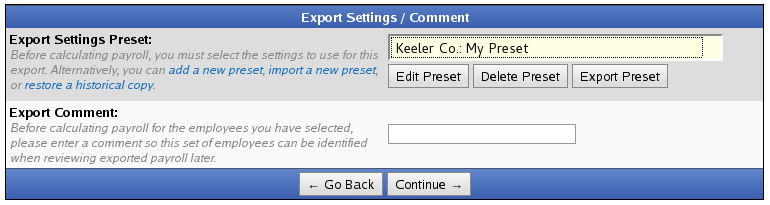
- On the next screen be sure that your new preset is the one selected in the Export Settings Preset drop down menu.
- Optionally, you can add a comment to the export making it unique and easily identifiable.
- Click Continue.
Next you should see the payroll calculation being scheduled.
Payroll Export Data - Final Step

- If you are confident that the information contained in this export is correct and wish to permanently lock the payroll period, click the button labelled Yes, send export to QuickBooks otherwise choose Cancel. Locking the payroll period prevents future modifications of any kind.
NOTE: If you choose "Cancel", the export will be listed as "Pending" and further changes can be made to the data. Pending exports can be exported again to other payroll output formats as often as you like until they have been accepted/locked.
If you choose "Yes, send export to QuickBooks", the payroll status will show "Exported". Exported payroll runs are locked and time can no longer be edited in the system for that period of time.
For immediate assistance with any of the above payroll exports,
call our Customer Support staff at 877-846-3256.
You have now setup TimeIPS for QuickBooks.
You will also need to setup QuickBooks prior to running payroll. Review the QuickBooks Integration - Setup QuickBooks article for instructions.
Then you are ready to Run Payroll.
Was this article relevant to your question? Yes No |

 Information