Date printed: 04-23-2024 Last updated: 02-03-2014
To view our complete support knowledge base and most current version of this article visit support.timeips.com.
 Information Sales Support
Date printed: 04-23-2024 Last updated: 02-03-2014 To view our complete support knowledge base and most current version of this article visit support.timeips.com. |
316-264-1600 Information Sales Support |
Backing up your TimeIPS data is critical. TimeIPS provides several backup options to ensure the safety of your TimeIPS data. Use the Backup Administration page to configure these options.
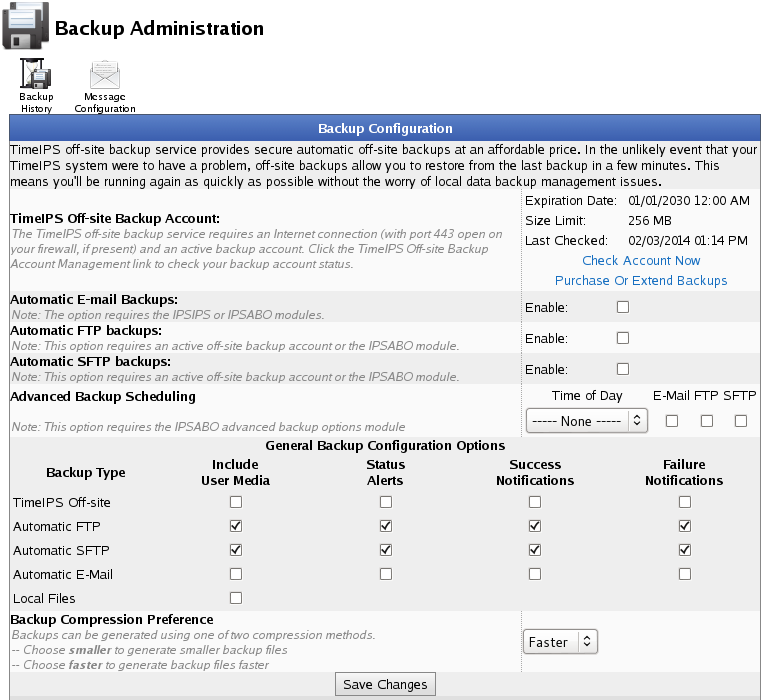
Content Included: Backups include all TimeIPS data including system settings but not network configuration. A TimeIPS system restored from a backup needs to have network settings reapplied. Backups include company logos and small employee photos up to 100k in size. Larger photos and company documents are not included unless you check the option to "Include User Media" in the general backup configuration.
Backups can be transmitted daily to TimeIPS Off-site Backup Servers, automatically to an E-mail address, FTP server, and/or SFTP server of your choice. Automatic backups to E-mail, FTP, and/or SFTP servers can be scheduled to happen at specific times of the day with the IPSABO module.
Backups can be saved as local files or off-site backups. Off-site backups provide the most security against disaster.

To increase your size limit or extend your backup expiration date for TimeIPS Off-site backups contact your sales representative. If you have recently purchased Off-site backups but they are not registering on your system you can click the "Check Account Now" link on the Backup Administration page.

To configure automatic E-mail backups begin by clicking the check-box next to "Enable." Supply the destination E-mail address and an optional value for max size. A max size of 0 will mean no maximum. Check that the E-mail server in question can handle large attachments. Options for E-mail in the general configuration options will apply as well.
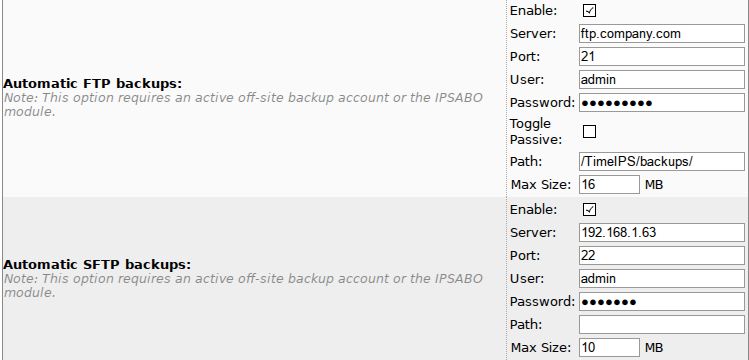
FTP and SFTP backups can both be configured to run automatically. Begin by clicking the check-box next to "Enable" for one or both methods.
Server: Identify the FTP/SFTP server address to use. This can be an IP like 192.168.1.63 or a domain name like ftp.company.com
Port: Identify the port number to use. Traditionally FTP uses port 21 and SFTP uses port 22
User: Supply the user-name for TimeIPS to use when accessing your FTP/SFTP server
Password: Enter the password for TimeIPS to use when accessing your FTP/SFTP server
Toggle Passive (FTP only):Checking this box will cause TimeIPS to send the "passive" command before it attempts to upload the backup file. Whether or not this is necessary depends on the FTP server's configuration. When configuring FTP backup settings attempt to send a backup with Toggle Passive on. If the FTP upload fails then uncheck Toggle Passive and try again.
Path: This is the path that TimeIPS will attempt to use when uploading your backup file. It can be an absolute path or it can be relative to the FTP user's default directory. If the directory does not exist or if the FTP user does not have permission to use it then the backup will still be uploaded to the FTP user's default directory.
Max Size: Specify the maximum file size in MB to attempt to upload. A backup file that exceeds this size will not be transmitted. A value of 0 or blank means there is no maximum.
FTP and SFTP backups also follow the appropriate options selected in General Backup Configuration Options.

This option requires the IPSABO module. With IPSABO you can schedule the hour of the day that automatic E-mail, FTP, and SFTP backups will attempt to transmit. To add scheduled backups select a time of day from the drop down menu that says "None". To delete a scheduled backup change the time of day to "None". You can schedule one backup of each type to happen up to once per hour every day.
If a scheduled backup fails to send for any reason it will be reattempted every hour until it is successful or until the system encounters another scheduled backup of the same type.
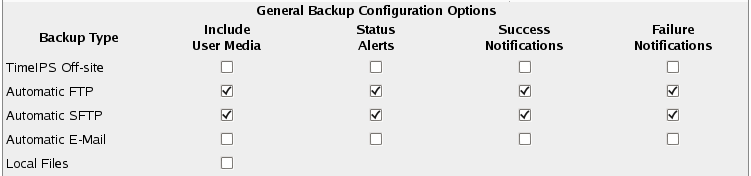
Include User Media: Check this option to include large employee photos and company documents in your backup. This is disabled by default because it can drastically increase the size of your backups.
Status Alerts: Check this option to be alerted by E-mail when a backup is within 15% of exceeding the maximum allowed size or when a backup exceeds the allowed size. Additionally, for TimeIPS Off-site backups this option will send E-mail alerts when the backup account expires or is about to expire.
Success Notifications: Check this option to be alerted by E-mail when a backup is successfully created and sent. For automatic E-mail backups this option will only indicate if the E-mail was sent; it can not indicate if the backup was received by the target E-mail address.
Failure Notifications: Check this option to be alerted by E-mail when a backup failed to be created or failed to be sent.
Alerts for FTP, SFTP, and E-mail backups go to the E-mail address on file for every Full Access user. If there are no addresses on file then alerts are sent to the admin E-mail address for the Top Level Division on the Company/Divisions page. Alerts regarding TimeIPS Off-site backups are sent to the admin E-mail address.
Backups can be generated using one of two compression methods.

Choose Smaller to generate smaller backup files.
Choose Faster to generate backup files faster.
Backups can also be transmitted manually to E-mail, FTP, and/or SFTP at any time or can be saved as a file on your personal computer. To manually create a backup scroll down to the Local Backup section.

To create a local file backup leave the drop down selector on "Save to file" and click the Create Backup button. To manually send an E-mail, FTP, or SFTP backup select the appropriate option from the drop down list and click the Create Backup button. The page will refresh and you will be presented with the status of the backup as it is being created.
Once the backup is complete, it will appear in the Backup History table below along with a link to download the file. If you chose "Save to file" it is critical at this stage that you right click on the download link and save the backup file to a secure location.
To review your backup history scroll down to the Recent Backup History section
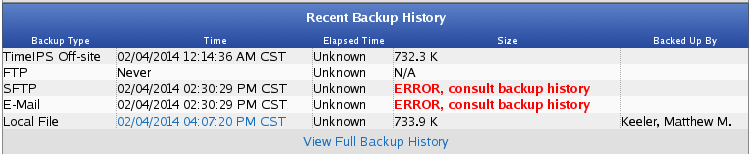
The table lists the results of the most recent backup for each type. If the time is blue it means your TimeIPS server still has the associated backup file which you can choose to right click and download.
To view your full backup history click on the View Full Backup History link or the Backup History ![]() icon at the top of the page.
icon at the top of the page.

To Clear your full backup history click on the Clear History ![]() icon at the top of the Backup History page.
icon at the top of the Backup History page.
To restore from backup with the backup file follow directions in Restore From Local Backup.
To restore from a TimeIPS Off-site backup follow directions in Restoring an Off-site Backup.