Applies to versions: 2.2, 2.3, 2.4, 2.5, 3.0
System Settings
The System Settings page lists the configuration settings for core components of your TimeIPS® Server. This includes System Management, Time/Date Configuration, Mail Settings, and Remote Database Configuration.
Using the left pane Main Menu » Administration, click on: System » System Settings
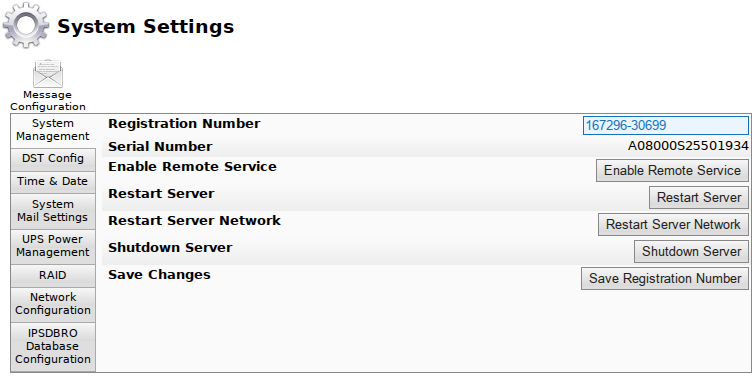
System Management
You can Enable Remote Service, Restart your master TimeIPS station, Restart the networking, and Shutdown your TimeIPS station for maintenance or moving.
- If the Registration Number is blank, enter in your Registration Number and/or Customer ID. After saving this change, it will appear in the footer of your TimeIPS system.
DST Config
Modify DST Boundaries for Time Zones.
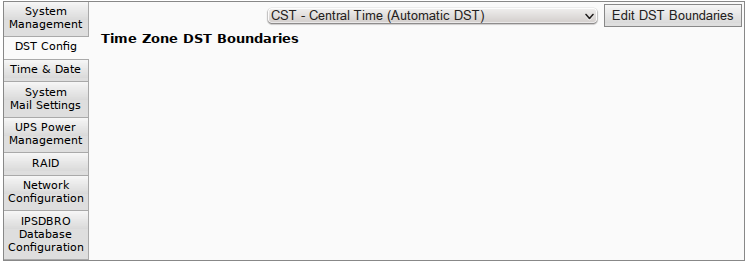
- If your company, any employees or divisions are in a time zone that observes Daylight Saving Time, select the time zone from the drop down list and click Edit DST Boundaries to view the dates when DST starts and stops each year.
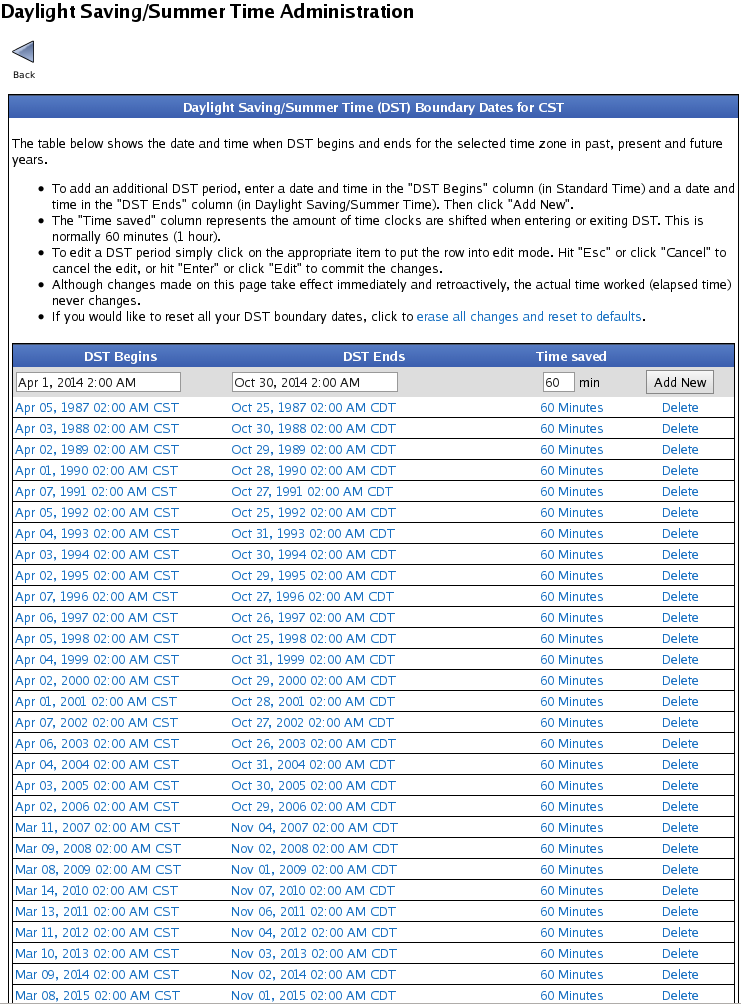
- To add an additional DST period, go to the top of the list then enter a date and time in the DST Begins column (in Standard Time) and a date and time in the DST Ends column (in Daylight Saving/Summer Time).
- Enter an amount of time in the Time saved column. This represents the amount of time clocks are shifted when entering or exiting DST, which is normally 60 minutes (1 hour).
- Then click the Add New button.

- To edit a DST period, simply click on the appropriate item to put the row into edit mode. Hit "Esc" or click Cancel to cancel the edit, or hit "Enter" or click Edit to commit the changes.
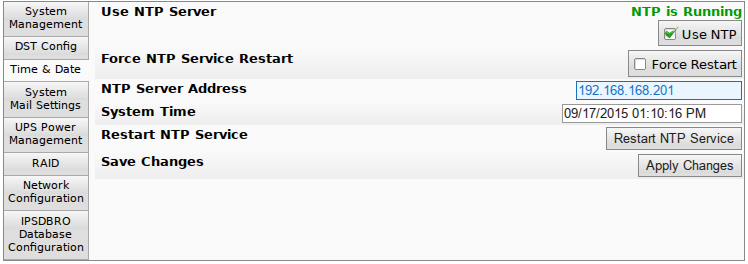
Time & Date
System Mail Settings
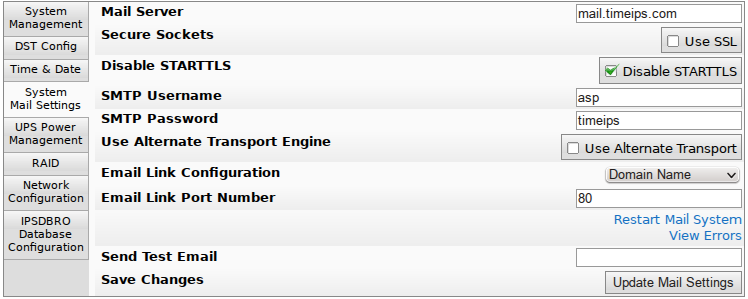
- Mail Server: Enter the outgoing SMTP server you would like the TimeIPS® System to send mail through. The default port is 25; use "server:port" to specify a different port.
- Many mail servers require that SSL be used to send messages. Check the Secure Sockets box if your mail server requires that the TimeIPS® system use SMTP over SSL. Do not check this box if your mail server needs to use STARTTLS; support for STARTTLS will be automatically detected. Checking this box causes the port to default to 465.
- Disable STARTTLS : Some mail servers report that they have support for STARTTLS, but in fact do not. If you see messages in the "View Errors" link below indicating an inability to connect to server, try checking this option.
- Enter the Username to log into the SMTP server above. Contact your System Administrator or ISP for this information if needed.
- Enter the Password required to log into the SMTP server.
- Use Alternate Transport Engine: TimeIPS includes an alternate email transport engine that may have better compatibility with older Mail Servers and/or special configurations. If you are having issues with email from this TimeIPS server, try toggling this option.
- Email Link Configuration: Some outgoing email will contain links pointing back to specific pages on this server. If email is always accessed from inside your network, select Internal IP Address. If email is accessed from outside your network, and/or you have a router/firewall with port forwarding configured, select Domain Name and set the domain name under Company/Divisions->URL tab. NOTE: Some router/firewall configurations do not allow internal access to an external IP with port forwarding. If this is the case for you, Domain Name links will NOT work inside your network. In this case, select Provide Both Links.
- Email Link Port Number: If you use port forwarding to redirect external requests to your TimeIPS® Server, set the port here so that links in E-Mails sent by this system will route properly.
- if you would like to Send a Test Email, enter an address and click the "Update Mail Settings" button.
- Click the Update Mail Settings button to save your changes.
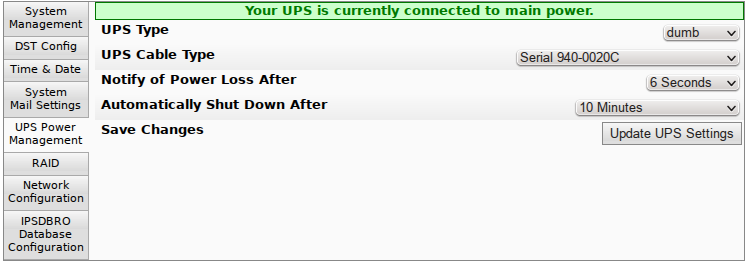
UPS Power Management
TimeIPS supports graceful shut down with APC brand Uninterruptible Power Supply (UPS) battery backup devices. Most APC brand SmartUPS and BackUPS devices are supported. The Intelligent Personnel System Upgrade (IPSIPS) module is required.
- Plug TimeIPS into the UPS device once TimeIPS has been properly shut down.
- Shut down your TimeIPS system by clicking on the Shutdown Server button in the System Management tab of the page.
NOTE: Wait until the system completely shuts down, indicated by the small LCD display turning off.
- Unplug the power cord from the wall and wait at least 60 seconds.
- Plug the power cord into the UPS device and TimeIPS will restart.
NOTE: If TimeIPS does not start the boot process after plugging the power cord into the UPS device, unplug the power cord and wait at least 60 seconds so the power can drain completely from the motherboard and reset capacitor.
- Once TimeIPS has completed booting back up, which may take up to 5 minutes, login and return to the System Settings page.
- Select the UPS Cable Type, Notify of Power Loss after time frame, and Automatically Shut Down time frame in the pull-downs.
- UPS Cable Type pull-down includes all supported APC brand cable model numbers.
NOTE: Be sure to indicate the exact model number found on the cable.
- Notify of Power Loss After pull-down indicates when TimeIPS will notify all employees with System Administrator security of the power loss via email and through the TimeIPS My Messages section.
- Automatically shut down indicates when TimeIPS should be shut down after power loss.
Note: The "When the battery is low" setting does not work with the 940-0020B or 940-0023A cables. All other devices will automatically shut the TimeIPS system down when the battery is low or when the "Automatically shut down" time has elapsed, whichever comes first.
- Click on the Update UPS Settings button to save the changes.
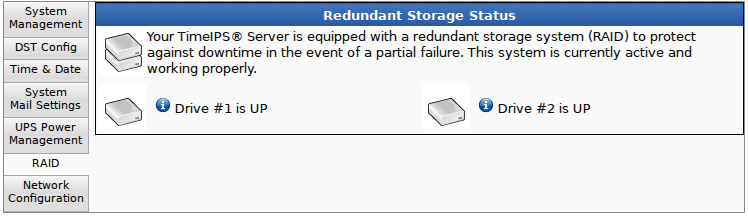
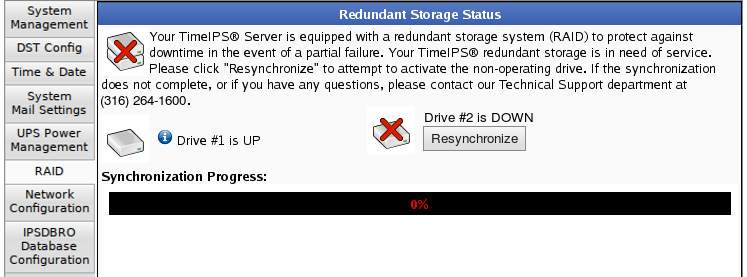
RAID
The Redundant Storage Status section shows the current status of the Redundant Storage hard drives.
If TimeIPS detects a non-operating hard drive on a redundant storage system, the System Message Sender E-mail will be alerted via email. You should first attempt to resynchronize the hard drive by clicking on the Resynchronize button as shown below. If the resynchronization does not complete, please contact TimeIPS technical support for assistance.
Network Configuration
TimeIPS initially uses DHCP (Dynamic Host Configuration Protocol) to automatically gain an IP address from your network during setup. Once your TimeIPS system has been configured, you need to assign it a static, or never changing, IP address for easy access to your TimeIPS system.
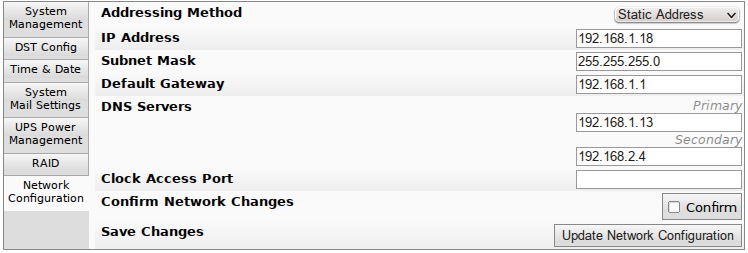
- Check the Confirm Network Change check box.
NOTE: If you are adjusting the Addressing Method, IP Address, Subnet Mast, or Default Gateway and the Addressing is currently STATIC, you first need to check the Confirm Network Change checkbox.
- Enter/Adjust the Addressing Method, IP Address, Subnet Mast, Default Gateway, DNS Servers, and Clock Access Port information as necessary.
- Use the Static Addressing Method whenever possible. Ask your network administrator what IP Address, Subnet Mask, and Default Gateway used on your network or, if your TimeIPS system is connected directly to your computer, you may set the automatically attained settings to static.
- A DNS (Domain Name System) Server translates domain names, such as demo.timeips.com, into its IP address, such as 192.168.1.225.
- If you need your TimeIPS clock stations to access the TimeIPS master station through a nonstandard port, for instance due to network policy restrictions, enter a Clock Access Port number between 1 and 65535 here.
- Click on the Update Network Configuration button to save the changes or any link in the left pane Main Menu to leave the page without applying the changes.
Setting Static Routes (Routing Table)
For advanced networks, TimeIPS can be configured with static routes. This can be done on TimeIPS master or client systems by browsing to http://{ip address of TimeIPS}/staticRoutes.php
IPSDBRO Database Configuration
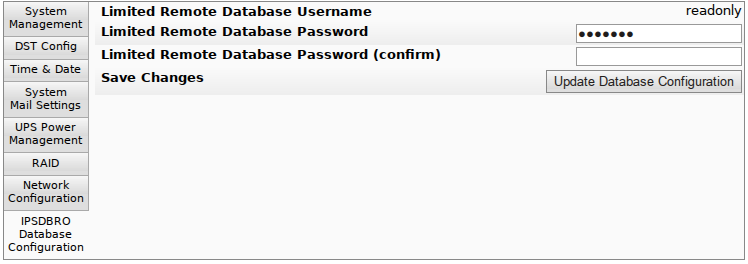
- The Limited Remote Database Username is the username used for remote database access such as from an ODBC-compliant application. This user is used primarily for read-only access.
- The Limited Remote Database Password must be between 8 and 16 characters long (inclusive). Leave blank unless changing password.
- Confirm the Limited Remote Database Password by typing it a second time.
- Click the Update Database Configuration button to save your changes.
See Also:Enable Remote Service (1.8, 1.9, 1.10, 1.11, 2.0, 2.1, 2.2, 2.3, 2.4, 2.5, 3.0, 3.1, 3.2)Restarting/Shutting Down TimeIPS (2.0, 2.1, 2.2, 2.3, 2.4, 2.5, 3.0, 3.1, 3.2)TimeIPS Server DST Configuration (2.0, 2.1, 2.2, 2.3, 2.4, 2.5, 3.0, 3.1, 3.2) Adjusting Time/Date Settings (2.0, 2.1, 2.2, 2.3, 2.4, 2.5)Adjusting SMTP Mail Settings (2.0, 2.1, 2.2, 2.3, 2.4, 2.5, 3.0)PHP Memory Settings (2.0, 2.1, 2.2, 2.3, 2.4, 2.5, 3.0, 3.1, 3.2)IPSDBBRO Database Configuration (2.0, 2.1, 2.2, 2.3, 2.4, 2.5, 3.0, 3.1, 3.2)System Settings (2.2, 2.3, 2.4, 2.5)  Information