|
|
Applies to versions: 2.2, 2.3, 2.4, 2.5, 3.0, 3.1, 3.2
Directory - Employee Status
The Employee Status Directory page provides an electronic In/Out board for tracking employee's status throughout the day. Post a status message to inform others of what you're currently working on, or check to see if a co-worker has already clocked out for lunch.
Using the left pane Main Menu under Tools, click on: Directory
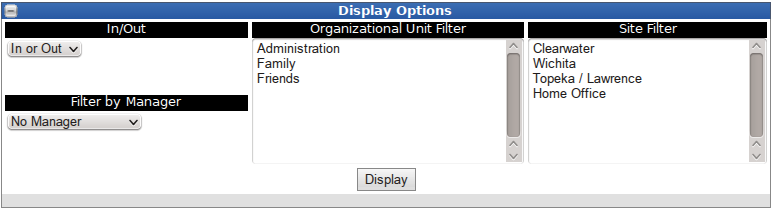
Display Options
- To expand the Display Options window, click on the + (plus) sign in the upper left-hand corner of the Display Options bar.
- The Employee Status list can be filtered by clock status (in or out), Manager, Organizational Unit, or Site.
NOTE: Employees who clock in at a site via telephone or remote clocking will not appear on the filtered list unless the applicable site coverage tracking has been set in the Global Settings under Site Administration.
- Choose the filters you want to use, then click on the Display button to view the changes made.
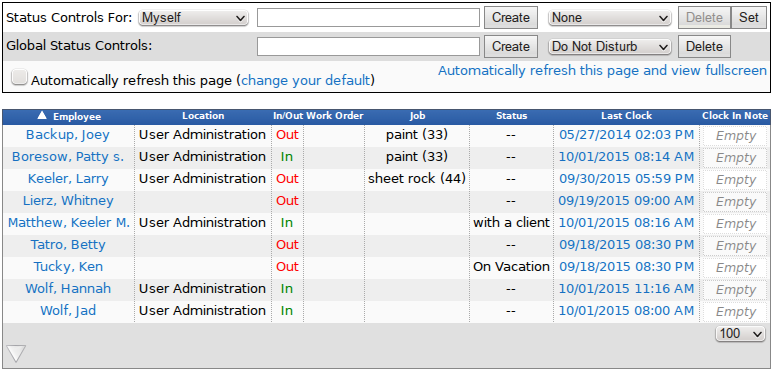
Status Messages
- Employees can view the Status message for all employees, but can only edit the Status message for themselves, unless Directory Status permissions have been set up by an administrator.
- Managers can view the Status message for all employees, but can only edit the Status message for themselves, their employees, and/or their employee's employees.
- Those with Directory Status permissions can edit the status message for all employees. See the article on Adding and Removing Status Messages for more information.
- Payroll Administrators can also add, change or remove status messages from the default list by using Global Status Controls since they have Global Directory Status permissions. Those with these permissions can also apply them to other employees/admins.
Automatic Refresh
- When viewing the Employee Status screen, users can choose to automatically refresh the Status View screen at clock out or once every minute by navigating to the Main Menu » My Settings and selecting "Refresh Automatically " on the General tab.
TIP: Click on "change your default" to go directly to the My Settings page.
- If your default setting in My Settings is configured not to automatically refresh the Employee Status View screen, you can overwrite this setting by checking Automatically refresh this page at the top of the Status View list.
NOTE: When the automatic refresh option is activated, the Employee Status View screen will not refresh while you are making changes. It will refresh after one minute of inactivity.
Links to Clock Events
The Employee Status table/Directory not only provides the last clock date/time, but also provides links to Time/Edit Report for both the current day and the day of the last clock event.
- Clicking on the Employee's name will bring you to the current day on the Time Edit/Report page. Clicking the date/time under Last Clock will bring you to that day on the Time Edit/Report page.
- Clicking on the date/time of an employee's Last Clock will bring you to the last clock event located on the Time Edit/Report.
- Administrators with permission to edit Clock Events, can then do so from the Time Edit/Report page.
NOTE: For more information about permissions, check out the Permissions article.
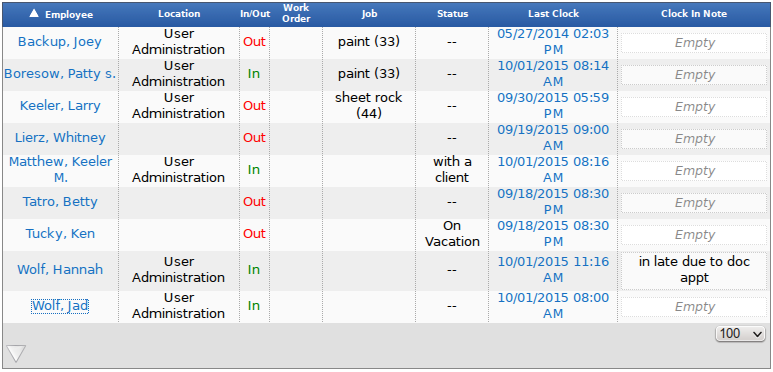
Clock In Note
- When clocking in or out, a comment can be entered to accompany it. The clock in comment then appears on the Employee Status page as the Clock In Note.
- Employees can view but not edit Clock In Notes.
- Administrators with permission to edit Clock Events, can add and edit Clock In Notes for either all employees or just the ones they manage. This can be done from the Employee Status View screen and by editing the event in the employee's Time Edit/Report.
NOTE: For more information about permissions, check out the Permissions article.
- To add or edit, simply click on the "Empty" box or on an existing comment. Type the new message and hit Tab. The box will be blue while editing and will turn white once it's saved.
- Once a clock note is entered, it can be edited only until the employee clocks again. After the employee clocks again, the clock note is "locked" from future edit and is cleared from the Employee Status View screen.
See Also:
Adding / Removing a Status Message (2.2, 2.3, 2.4, 2.5, 3.0, 3.1, 3.2)
Directory (2.2, 2.3, 2.4, 2.5, 3.0, 3.1, 3.2)
Using Global Status Messages (2.2, 2.3, 2.4, 2.5, 3.0, 3.1, 3.2)
|

 Information