Applies to versions: 2.5
Payroll Export
TimeIPS Payroll Export can generate a file with your payroll data. Many of these files can be opened in a spreadsheet application, such as Microsoft Excel or OpenOffice Calc, or, if using the Payroll Integration with Benefits Tracking optional module, the file can be imported in your payroll application, such as ADP, Paychex, or QuickBooks.
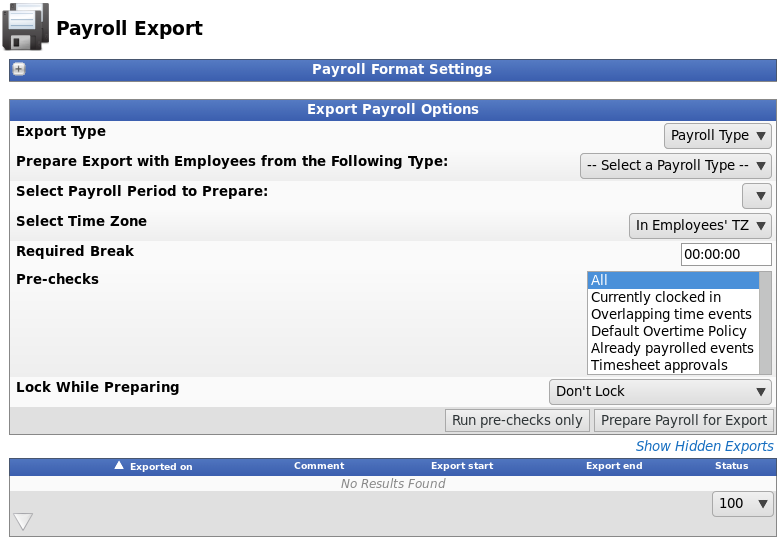
Using the left pane Main Menu » Administration, click on: Payroll » Payroll Export
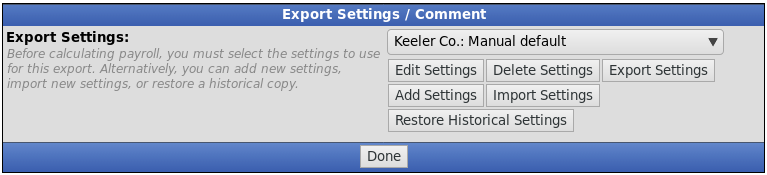
Export Format
There are many different file formats available to export and view the payroll report. Settings will need to be created using your desired format in order to export.
- Click the + (plus) sign to the left of Payroll Format Settings bar to expand the window.
- From the drop down box, select the File Format to modify.
NOTE: In the example above, "Manual (.csv)" has been chosen. The manual payroll export offers a basic comma separated values file that can be opened in a spreadsheet program such as Open Office Calc or Microsoft Excel.
- Click the Edit Payroll Export Settings button to bring up the editing screen.
If you have not already created settings for this file type, you will see the following screen.
Click the Add Settings button to create settings for the chosen file type.
There are several other different options available which vary depending on the file type being created.
- Give this set of settings a unique Name.
- Make the appropriate selections for your company's needs.
- Click on the Save Settings button.
- On the next screen be sure that your new setting name is the one selected in the Export Settings drop down menu.
- Click Done
Prepare Payroll for Export
First, choose to generate the report by Payroll Type or Manually select employees and a range of time.
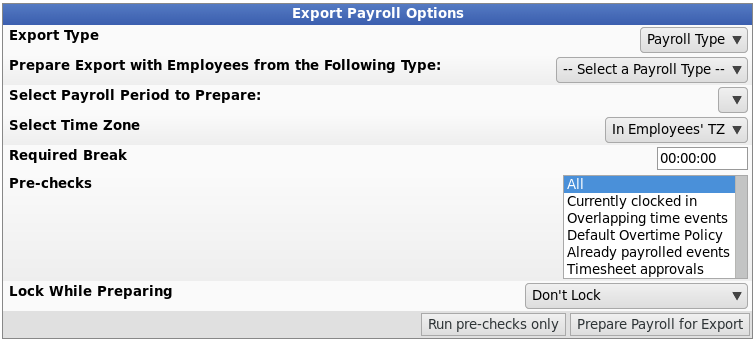
Payroll Type
- Under Export Type, select Payroll Type to generate the report. (See "Manual" below for specifics on that option.)
- Select a Payroll Type. All employees (including released employees) that are currently in the selected Payroll Type will be included in the prepared payroll data.
- Select the Payroll Period from the drop-down boxes.
- Select a Time Zone. The start and end time of the export can be interpreted in the company's timezone or separately for each employee
- Optionaly, enter the amount of the Required Break. If set, an employee must be logged out for at least this duration of time in order for the time to not be included on this payroll period. The start and end dates/times of the period will be moved forwared as needed for each employee to the next point where a break in worked/benefit/holiday time exceeds this duration.
- For example: If the payroll period ends at 12am Sunday morning, the Required Break is set to 1 hour and the employee works Saturday night through Sunday morning at 4am without taking at least an 1 hour break after 12am on Sunday, then those extra 4 hours will be included in this payroll period. If the employee works until 2am and then logs out for 1 hour or more (possibly for lunch) then logs back in and works another 2 hours, the 2 hours from 12am to 2am will be applied to this payroll period and the final 2 hours after break will be applied to the next payroll period.
- Select Pre-checks to determine what the system will check prior to attempting to prepare a payroll export.
- The following choices are available in the drop-down box: All, Currently clocked in, Overlapping time events, Default Overtime Policy, Already payrolled events, and Timesheet approvals.
- Optionally, select whether or not to Lock While Preparing. In choosing to lock the payroll period while the export is pending, you can also choose to include influence bounds which expands to include the full range of time affected.
- Optionally, click the Run pre-checks only. If you receive the "All chosen checks passed" message, you can choose to do a different check or progress forward to preparing payroll.
- Click the Prepare Payroll for Export button.
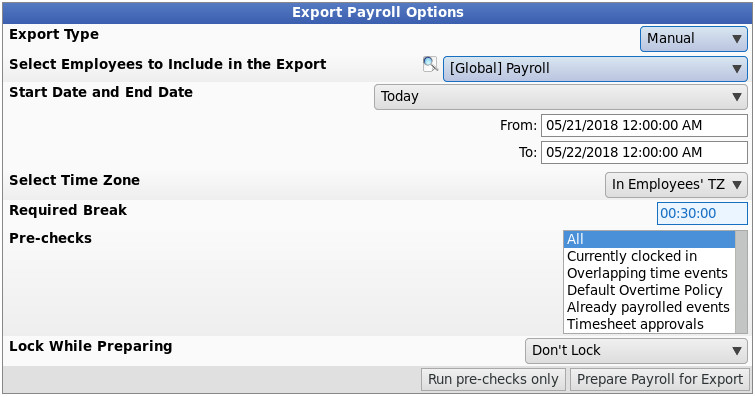
Manual
- Under Export Type, select Manual to generate the report. (See "Payroll Type" above for specifics on that option.)
- Select an employee or group of employees to include in the export.
- Manually select a range of time for this report, or use the quick selection drop down box.
- Select a Time Zone. The start and end time of the export can be interpreted in the company's timezone or separately for each employee.
- Optionaly, enter the amount of the Required Break. If set, an employee must be logged out for at least this duration of time in order for the time to not be included on this payroll period. The start and end dates/times of the period will be moved forwared as needed for each employee to the next point where a break in worked/benefit/holiday time exceeds this duration.
- For example: If the payroll period ends at 12am Sunday morning, the Required Break is set to 1 hour and the employee works Saturday night through Sunday morning at 4am without taking at least an 1 hour break after 12am on Sunday, then those extra 4 hours will be included in this payroll period. If the employee works until 2am and then logs out for 1 hour or more (possibly for lunch) then logs back in and works another 2 hours, the 2 hours from 12am to 2am will be applied to this payroll period and the final 2 hours after break will be applied to the next payroll period.
- Select Pre-checks to determine what the system will check prior to attempting to prepare a payroll export.
- The following choices are available in the drop-down box: All, Currently clocked in, Overlapping time events, Default Overtime Policy, Already payrolled events, and Timesheet approvals.
- Optionaly, select whether or not to Lock While Preparing. In choosing to lock the payroll period while the export is pending, you can also choose to include influence bounds which expands to include the full range of time affected.
- Optionally, click the Run pre-checks only. If you receive the "All chosen checks passed" message, you can choose to do a different check or progress forward to preparing payroll.
- Click the Prepare Payroll for Export button.
Next you should see the payroll calculation being scheduled. 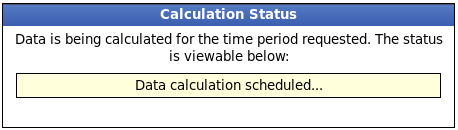
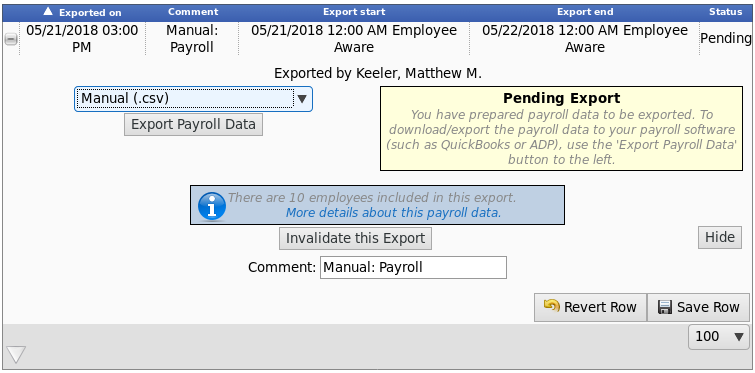
Export Payroll
After the payroll data is prepared for export, the Pending Export window will open.
- Choose a file format from the drop down menu.
NOTE: There are many export formats available, in the above example Manual (.csv) has been chosen. The manual payroll export offers a basic comma separated values file that can be opened in a spreadsheet program such as Open Office Calc or Microsoft Excel.
- Next click on the button labelled Export Payroll Data.
NOTE: Editing of time events is locked during payroll processing to avoid having another user make changes via the Time/Edit Report that would not be reflected properly in the current payroll run.
If you have not already created settings for this file type, you will see the following screen.
Click the Add Settings button to create settings for the chosen file type.
There are several different options available for customization which vary depending on the file type being created. Name your new settings and make the appropriate selections for your company's needs before clicking on the Save Settings button.
- On the next screen be sure that your new setting name is the one selected in the Export Settings drop down menu.
- Optionally, you can add a comment to the export making it unique and easily identifiable.
- Click Continue.
Next you should see the payroll calculation being scheduled.
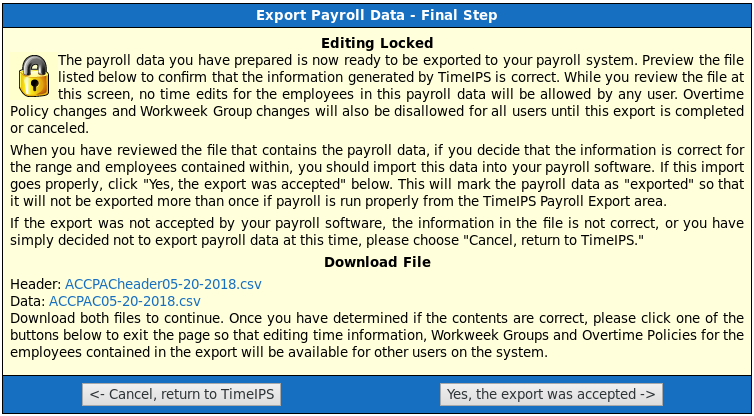
Payroll Export Data - Final Step
The final step of exporting payroll data is virtually the same regardless of file type chosen, though the window/image may vary.
Example 1:
- Click the blue link to Download the data and open it in a spreadsheet program such as Open Office Calc or Microsoft Excel.
- If you have confirmed that the information contained in this export is correct and wish to permanently lock the payroll period, click the button labelled Lock This Payroll Period, otherwise choose Unlock and Return to TimeIPS. Locking the payroll period prevents future modifications of any kind.
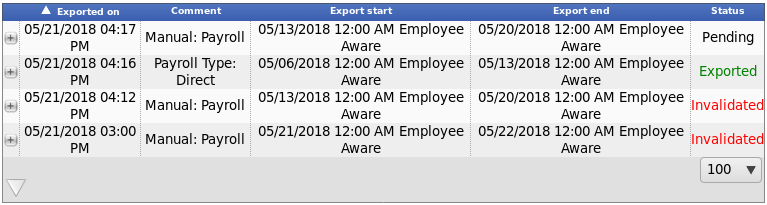
NOTE: If you choose "Unlock and Return to TimeIPS.", the export will be listed as "Pending" and further changes can be made to the data. Pending exports can be exported again to other payroll output formats as often as you like until they have been accepted/locked.
If you choose "Lock This Payroll Period", the payroll status will show "Exported". Exported payroll runs are locked and time can no longer be edited in the system for that period of time.
Example 2:
- Click the blue links to Download the newly created files and open them in a spreadsheet program such as Open Office Calc or Microsoft Excel.
- If you have confirmed that the information contained in this export is correct and wish to permanently lock the payroll period, click the button labelled Yes, the export was accepted otherwise choose Cancel, return to TimeIPS. Locking the payroll period prevents future modifications of any kind.
NOTE: If you choose "Cancel, return to TimeIPS", the export will be listed as "Pending" and further changes can be made to the data. Pending exports can be exported again to other payroll output formats as often as you like until they have been accepted/locked.
If you choose "Yes, the export was accepted", the payroll status will show "Exported". Exported payroll runs are locked and time can no longer be edited in the system for that period of time.
 Information