|
|
Applies to versions: 1.3, 1.4, 1.5, 1.6, 1.8, 1.9, 1.10, 1.11, 2.0, 2.1, 2.2, 2.3, 2.4, 2.5, 3.0, 3.1, 3.2, 3.3, 4.0
Troubleshooting: Unable to Access TimeIPS
The TimeIPS server (master) system is generally located in your administrative offices. If you are unable to access the administrative sections of your TimeIPS system, the following instructions walk you through troubleshooting possible causes.
NOTE: If you are using TimeIPS ASP service, the server is located in the TimeIPS data-center. If you are unable to access it, plaese check your Internet connection and/or call TimeIPS Support for assistance.
- Make sure system is powered on. If not, follow the troubleshooting steps for TimeIPS will not power on.
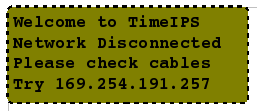
- Check the physical network connection. If no network connection is detected, TimeIPS may display the following message:
- Unplug the network cable from the back of the TimeIPS system and then plug it back in.
- Unplug the network cable from the source (ex: router, hub, personal computer etc...) and plug back in to the source.
- Make sure you are using the correct cable for your configuration (crossover cable if connecting directly to a standalone computer, patch cable if connecting to network).
- Verify that the IP address you are trying to use has not been changed (the addressing method may be set to dynamic and the IP address has changed).
- Obtain the IP address by watching for the address during boot up, or after the boot process is completed, select "Configure Network" on the initial menu, then "Show Network Info" to view the current IP address.)
  
- If needed, reset to DHCP by selecting "Revert to DHCP" and then "Apply Settings" in the network menu.
TIP: If you do not have a keypad and/or small LCD display, attach a regular monitor and keyboard to the back of TimeIPS. You do not need to shutdown TimeIPS to install the keyboard and/or monitor.
TIP: Press Enter and Backspace at the same time to enter the System menu on a configured system. If using a full size keyboard, press the number pad's Enter key and Backspace at the same time. Use the number pad to navigate the menus (not the keyboard arrow keys.)
- The LCD (or monitor) will display the version number, IP address, default gateway (GW) and the master server station (MST).
- Attempt to access TimeIPS through your web browser by entering your TimeIPS system's IP address in the address bar then pressing [ENTER] (ex: http://192.168.1.40).
- Verify that the IP address for your computer is compatible with the TimeIPS system.
- If you are using Windows, go to the Start menu and select the Run option. Type cmd (Win. XP) or command (pre- XP) and click on the OK button. At the terminal prompt, type: ipconfig then press [Enter].
- Under Ethernet adapter Local Area Connection verify that an IP address is listed and make note of it. Using a basic local area connection, the first three groups of numbers should be the same. (Ex. TimeIPS IP address 192.168.1.40 and your computer IP address 192.168.1.32)
Note: You do not want the fourth group of numbers to be the same as that would cause an IP address conflict.
- If the IP addresses are not compatible, temporarily change your computer's IP address to be compatible.
- Make sure there is not an IP address conflict.
- Ping the unit by opening a terminal (Start menu and select the Run option. Type cmd (Win. XP) or command (pre- XP) and click on the OK button.) and type: ping [IP address] and then press [Enter].
EXAMPLE: If TimeIPS has the IP address of 169.254.123.45, type ping 169.254.123.45
- If you receive 4 replies, go to your web browser and the IP address for TimeIPS in the address bar and press [Enter]. If you receive a message that the server could not be found or a web page other than TimeIPS:
- Unplug the Ethernet cable from the back of the TimeIPS System. The Ethernet cable looks similar to a phone cord connection but is larger.
- Back in the terminal window, try to ping the IP address again. If you still receive 4 replies, you have another network device using the same IP address.
- Contact your network administrator and provide him/her with the IP address for TimeIPS.
- Make sure the firewall is not blocking your access to TimeIPS through the LAN connection.
- In Windows, go to the Start menu - Settings option - Control Panel option. Double-click on the Network Connections icon. Right click on the Local Area Connection option and select Properties. Select the Advanced tab. Click on Settings under Windows Firewall and select Turn off.
NOTE: Once you are able to connect to TimeIPS, you may turn the firewall back on. If this again prevents you from accessing TimeIPS, contact your network administrator for assistance in configuring the firewall to allow access to TimeIPS.
- If you are using AOL's web browser, try connecting with a different web browser such as FireFox, Google Chrome, or Internet Explorer.
See Also:
TimeIPS Will Not Power On (1.3, 1.4, 1.5, 1.6, 1.8, 1.9, 1.10, 1.11, 2.0, 2.1, 2.2, 2.3, 2.4, 2.5, 3.0, 3.1, 3.2, 3.3, 4.0)
|

 Information
 Sales
Sales Support


