|
|
Applies to versions: 1.3, 1.4, 1.5, 1.6
Manually Enter Holiday Hours
This article describes how holiday hours can be manually entered for employees.
Security Level Required: Payroll Administrator
Using the left pane Main Menu, click on: Administration » Benefits and Accruals » Holidays
- Create and deactivate the Holiday.
NOTE: TimeIPS will automatically apply holiday hours to qualifying employees if the holiday is active. Inactivate holidays can be used to manually apply holiday hours.
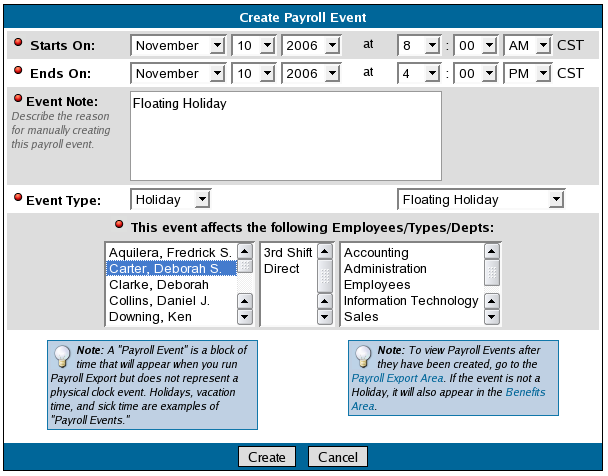
- Below the Create a new Holiday button, click on Manually Enter Holidays button. The "Create Payroll Event" screen will open.
- Enter the date/time the Holiday Starts on and the date/time it Ends on.
NOTE: The Start and End times determine the number of holiday hours the employee will receive.
- Enter an Event Note.
- In the Event Type, select "Holiday".
- In the adjacent pull-down menu, select the name of the Holiday.
- Select the employee(s), shift(s), or department(s) for whom to holiday should be applied.
- Click on the Create button to apply the holiday, or the Cancel button to exit without saving.
- From the left pane Main Menu, navigate to Administration » Payroll and Reports » Time Edit/Report.
- Run a time report for the date of the holiday, selecting at least one employee for whom the holiday was applied.
- The successfully applied holiday hours will appear in the Benefits section below the Time Report (as shown in the image below).
TIP: Click on the date link to view details of the applied hours or to make any adjustments.
See Also:
Add, Edit, or Deactivate a Holiday (1.3, 1.4, 1.5, 1.6)
Trouble-shoot Applied Holiday Hours (1.6)
|

 Information
 Sales
Sales Support
