Time clock systems by TimeIPS
Call Now! 316-264-1600
Information
Sales
Support
Knowledge Base Search:  
Main Menu
· Home

· Table of Contents
· Article Index

· Downloads
· New Features
· FAQ
· News
· Web Links

  
TimeIPS Knowledge Base

Table of Contents: Article IndexPrintable Version

Applies to versions: 1.8, 1.9


Jobs


Job Management allows you to track time worked on specific jobs and projects. You can also assign jobs to customers and organize your jobs by assigning them to categories. The IPSIPS optional module is required.  The IPSJOB module provides additional options including unlimited numbers of jobs.

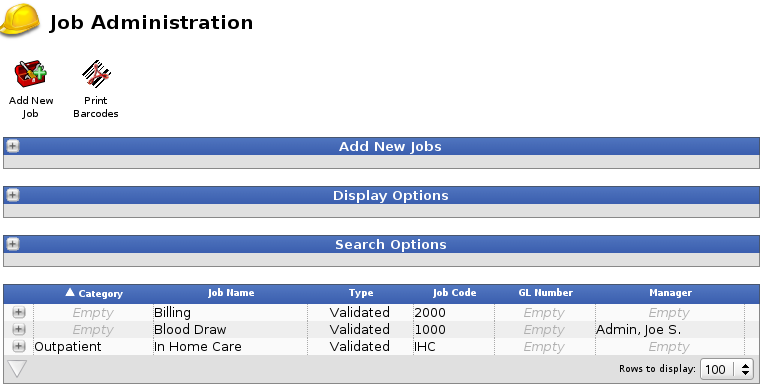
Using the left pane Main Menu, click on: Jobs » Jobs

HINT: If you plan on assigning jobs to customers for billing purposes or to organize jobs by categories, set up the Job Categories and Job Customers first.


To Add a New Job


  1. Click on the

    New Job icon at the top of the page.
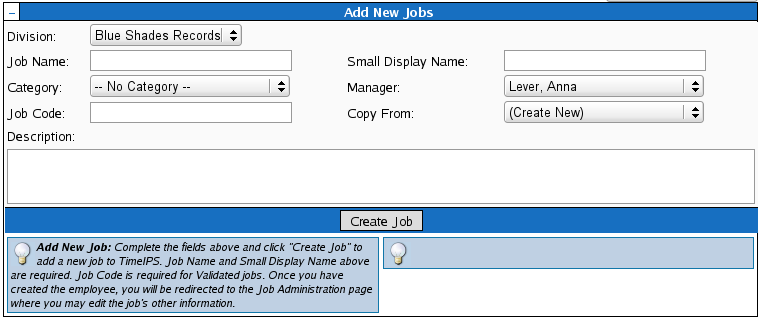
  2. The Add New Job screen will appear.

    • (Required) Job Name: If a computer monitor is connected directly to your TimeIPS time station, the Long Name displays when employees clock in and out of a job. Long names must be unique within each job category. Maximum 24 characters.
    • (Required) Small Display Name: The job Short Name displays on the TimeIPS LCD display when employees clock, and on some reports. Maximum 14 characters.
    • (Optional) Category: Job categories can be used to help organize jobs. Set up the categories before entering jobs by using the Job Categories link from the Jobs menu in TimeIPS.
    • (Optional) Manager: If a manager is selected for a job, that employee can have the special ability to edit time events where an employee worked the job. For this to work, the employee must also have the Job Manager permission group, and within that group, the option to "Edit" must be selected for "Clock Events" for "Employees working on jobs you manage." Note that a job manager must still have the ability to view clock events for all employees that might work their job, as without view permission, the edit permission alone will not cause the employee to be visible.
    • (Optional) Copy: If you select an existing job from this list and press "Create Job", a new job will be created with the settings from the copied job.
    • (Required for Validated jobs) Job Code: A Job Code can be 1-12 alpha-numeric characters in length. Each Job Code must be unique. Employees clock in and out of jobs using the this job code. The employee will enter the job code from the TimeIPS numeric keypad, from an alpha-numeric computer keyboard connected to TimeIPS (PS2 or USB), or with a barcode scanner when clocking in/out of jobs.
      NOTE: The TimeIPS 8150 Series Barcode Reader requires a minimum of 4 characters. The TimeIPS LS4000 Series Barcode Reader will read 1-12 characters.
      NOTE: Job Codes can include numbers, capital and lower case letters, and dashes. Job Codes are case sensitive.
    • (Optional) Description: Enter a description of the job for reference, if desired.
  3. Click on the Create Job button to add your new job.


To Enter Job Details or Edit an Existing Job


General Tab

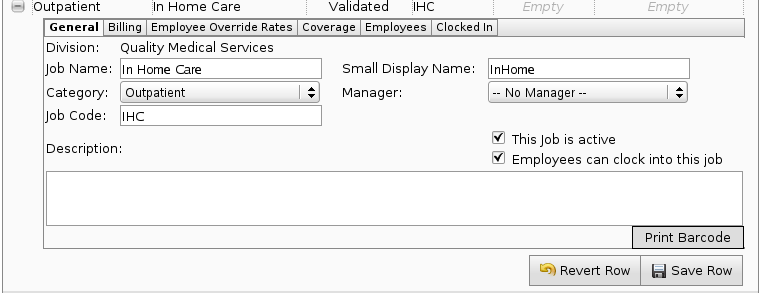
  • After clicking on "Create Job", the new job will be added and the job record will automatically open to the General tab. To edit existing jobs, click on the + sign next to the job name to open the job record.

  • Enter or edit the Job Details as needed.
  • To Hide or Deactivate Jobs toggle the Allow Use box so it is no longer checked. You will no longer be able to use this job and it will be hidden from your list of Jobs.

Billing Tab

  • The Control Number can be used to link job codes to another application you might be using.
  • GL (General Ledger) Number can be used to indicate an account number associated with the job.
  • Each job can be assigned a Billing Rate that will display on the Extended Employee/Job Report. This rate will not be used to calculate the employee's gross pay for each job. You can, however, use functions within your spreadsheet application to create gross billing calculations.
  • Jobs can be assigned to specific Customers. Set up the Customers before entering jobs by using the Job Customers link from the Jobs menu in TimeIPS.
    NOTE: You can create Customer and/or Category information at a later time and assign jobs accordingly for reporting purposes.
  • Each job can be assigned a specific Pay Rate that will be applied to any employee who works this job (if a specific job rate has not been assigned to that employee).To add a job Pay Rate:
  • Click on Add Pay Rate. The window will expand and the job rate option fields will appear.


    • Enter the Hourly Rate, Rate Multiplier percentage, or Hourly Differential and the date and time the rate becomes Effective.
      • Hourly Rate: An employee working this job will earn this rate instead of his/her usual hourly rate (defined in the employee's Employment tab in Employee Administration). Enter as a dollar amount.
      • Rate Multiplier: An employee working this job will earn his/her usual hourly rate (defined in the employee's Employment tab in Employee Administration), multiplied by this percentage. Enter as a number. Do not enter a percentage sign.
      • Hourly Differential: An employee working this job will earn his/her usual hourly rate (defined in the employee's Employment tab in Employee Administration), plus this differential. Enter the dollar amount to be added to the employee's base rate (i.e., .25 for twenty-five cents).
      NOTE: Only one of the above pay rate types may be assigned per job.
    • Click the Add button. The rate will be added.
    • Click on the Edit button to make changes to the rate type or effective date.

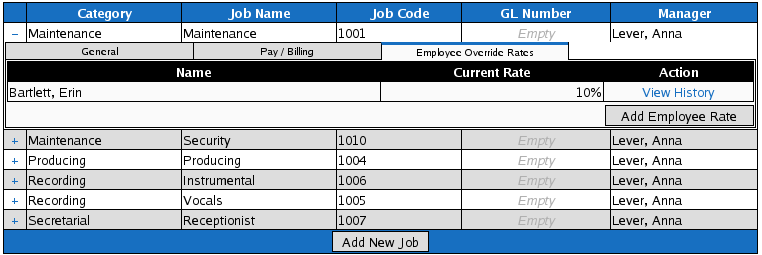
Employee Rates Tab

Each job can be assigned specific pay rates per employee.


  • Click on the Employee Rates tab to view, edit or add individual employee job pay rates. 
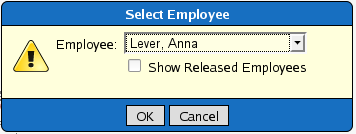
  • Click on the Add Employee Rate button. The "Select Employee" window will appear.


  •  

  • Choose the Employee from the drop-down box and click on OK to continue or Cancel to close the window.
  • After clicking on OK, the window will expand and the job rate option fields will appear below the name of the employee you selected.

  • Enter the Hourly Rate, Rate Multiplier percentage, or Hourly Differential and the date and time the rate becomes Effective.
    • Hourly Rate: An employee working this job will earn this rate instead of his/her usual hourly rate. Enter as a dollar amount.
    • Rate Multiplier: An employee working this job will earn his/her usual rate, multiplied by this percentage. Enter as a number. Do not enter a percentage sign.
    • Hourly Differential: An employee working this job will earn his/her usual base rate, plus this differential. Enter the dollar amount to be added to the employee's base rate (i.e., .25 for twenty-five cents).
    NOTE: Only one of the above pay rate types may be assigned per employee for this job.
  • Click the Add button. The rate will be added.

  • Click on the Edit button to make changes to the rate type or effective date.
  • Each employee that has been assigned an individual job rate will be listed by Name and Current Rate.
  • To review all job rates that have been assigned to an individual employee, click on the View History link for that employee. The window will expand to display that employee's rate history.

  • EXAMPLE: In the image below, we can see that Erin Bartlett's pay rate for Quality Control increases from an hourly differential of 0.15 beginning 05/01/2009 12:00am to 0.63 as of 12/01/2009 12:00am.


Employees Tab

Each job can be assigned specific set of employees.  The job can be restricted to the member employees by changing the "Allow job for" option to "Only These Employees."

Coverage Tab

Each job can be assigned coverage rules.  If the number of employees clocked into the job violate the rules, email alerts can be sent and the violations can be viewed with the "View Violation History" button.

Jobs Coverage Tab

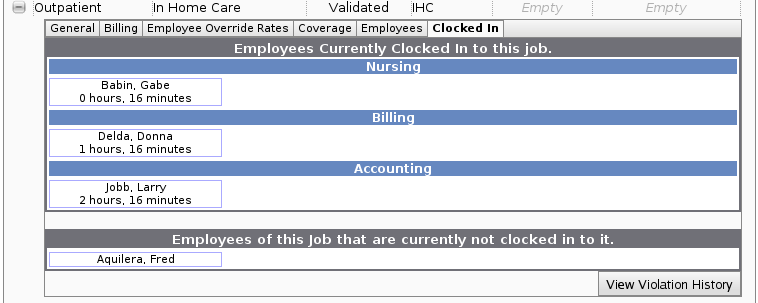
Clocked In Tab

Each job provides a quick view of employees clocked into the job.
Jobs Clocked In Tab


See Also:
Job Categories (1.8, 1.9, 1.10, 1.11)
Job Customers (1.8, 1.9, 1.10, 1.11)
Job Management Import/Export (1.8, 1.9, 1.10, 1.11)

©2004-2023 TimeIPS, Inc. All Rights Reserved - TimeIPS and the TimeIPS logo are registered trademarks of TimeIPS, Inc.
"Intelligent Personnel System" "Run your Business. We'll watch the clock." are trademarks of TimeIPS, Inc.
TimeIPS is protected by one or more patents. Patent No. US 7,114.684 B2.