
|
|
Applies to versions: 1.11, 2.0, 2.1
Schedule Groups
Schedule Groups provide automatic clocking functions that allow you to set up clock events to occur at a specific time. Requires the IPSSCH module.
Using the left pane Main Menu » Administration, click on: Schedules » Schedule Groups

Add a Schedule Group
- Click the + (plus) sign on the left hand side of the Add New Group bar.

- Enter the Schedule Group Name and click on the Add button.
- The Schedule Group record will be created and will open to the General tab of the Schedule Groups table.

- Enter the Alert E-Mail address of the person who should be notified when a schedule group violation or automatic clock event occurs for any member of this group.
NOTE: If a group of employees will be automatically clocked in and out every day, e-mail alerts of this would not be necessary. However, if employees deviate from the Minimum Break rule or are clocked into a job that earns a higher pay rate or that tracks a shift premium, an e-mail alert could be very useful.
Set up Automatic Clocking rules
- If not already open, expand the Schedule Group record you want to edit by clicking on the + (plus) sign next to the Schedule Group name.
- Click on the Automatic Clocking tab.

- Click on the Add New Rule button.

- Click the + (plus) sign to the left of the new entry .
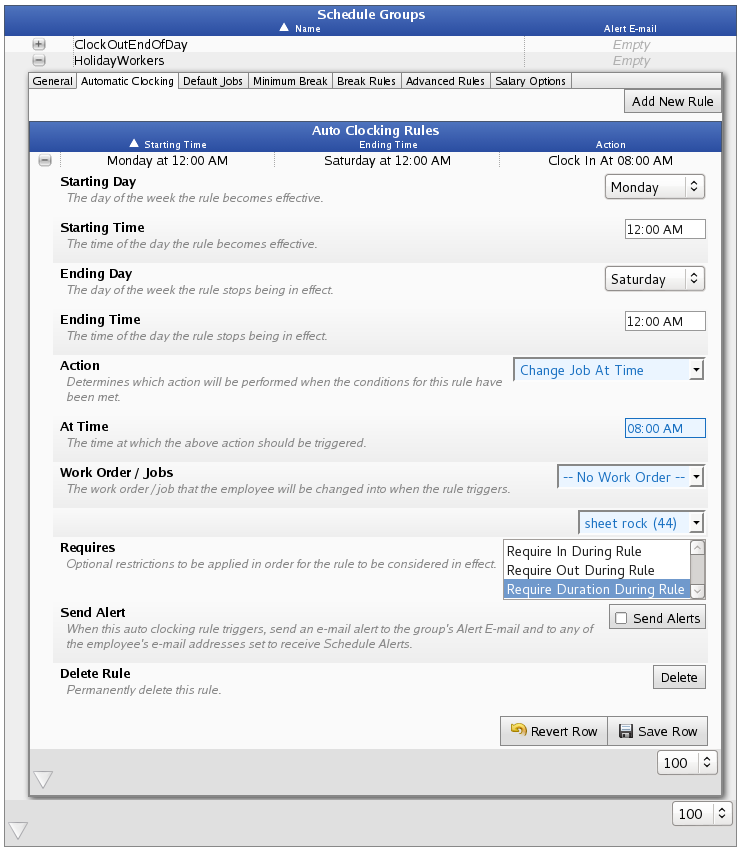
- Select the day and time when the automatic clock event should Start and End from the drop-down boxes.
NOTE: The start time is INCLUSIVE, so that a rule that starts at 12:00 AM can have an action at 12:00 AM, but the end time is EXCLUSIVE so you must set it to include at least one minute after the desired action.
- Select the Action you want taken. Your options are:
- Clock In at Time - In the At Time field, enter the time employees in this group should be automatically clocked in.
- Clock Out at Time - In the At Time field, enter the time employees in this group should be automatically clocked out.
- Clock Out After Duration - In the After Duration field, enter the number of hours and/or minutes (HH:MM) to wait before automatically clocking the employee out.
- Change Job at Time - In the At Time field, enter the time employees in this group should be automatically clocked into the job specified in Work Order/Jobs. Select the job and/or work order from the drop-down lists.
- Change Job After Duration - In the After Duration field, enter the number of hours and/or minutes (HH:MM) after the last clock in to automatically clock the employee into the job specified in Work Order/Jobs. Select the job and/or work order from the drop-down lists.
- Under Requires, you can choose optional restrictions to be applied in order for the rule to be considered in effect. Optional restrictions include:
- Require In During Rule: Requires that the employee have a clock-in after the rule starts. For example, if a rule applies between 8am and 10am, there must be a clock-in at or after 8am. Further, the employee either must NOT have a clock-out for this clock-in, or the clock-out must be after the end of the rule.
- Require Out During Rule: Requires that the employee have a time event with a clock-out that is both after the rule starts and before the rule ends. For example, if a rule applies between 8am and 10am, there must be a clock-out between 8am and 10am.
- Require Duration During Rule: Requires that a clock-in/clock-out pair exceed the specified time. If the employee has not clocked out, the rule will run when the clocked-in time reaches the requirement. If the clock-in in prior to the beginning of the rule, only the time during the span of the rule is considered. For example, a rule applies between 8am and 10am and an employee must work 1 hour. If the employee clocked in at 6am, and does not clock out, the rule would run at 9am (1 hour duration during the rule).
- Check the Send Alerts checkbox if you want to have an e-mail sent to the alert e-mail address (set up on the General tab) whenever a particular clock rule is used.
- Click the Save Row button to save changes made to the rule.
- If you wish to permanently delete this rule, click on the Delete button.
NOTE: The employee's "default job" is assigned to them on the Employment tab in Employee Administration. NOTE: Automatic clock rules are not necessarily linear unless you configure them as such. For instance, a rule that says to "Clock Out After" 4 hours, will be applied anytime the employee clocks in, including when they clock back in from lunch. So if you want them to clock out or change jobs at a different time, use the "Clock Out At" or "Change Jobs At" functions instead. NOTE: Automatic clock rules will ONLY APPLY ONCE PER DAY for each employee. This prevents problems, for example if a rule clocks employees out, then another rule clocks them in, potentially creating a loop and generating thousands of clock events for an employee. However, this also means that if you change a rule it will NOT run again until the next calendar day. If you need to run a rule more than once in a day (for example while testing), create a new rule and delete the old one.
Set up Default Jobs
- If not already open, expand the Schedule Group record you want to edit by clicking on the + (plus) sign next to the Schedule Group name.
- On the General tab, enter the Alert E-Mail address of the person who should be notified when a schedule violation occurs for this group.
- Click on the Default Jobs tab.

- Click on the Add New button.
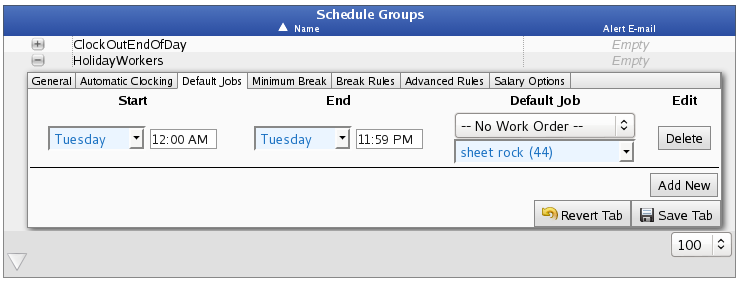
- Select the day and time when the default job rule should Start and End from the drop-down boxes.
- Select the Default Job (with or without a Work Order) the employee should be clocked into between the Start and End times.
- OR -
Select Deny All Clocks - If an employee in this schedule group attempts to clock in or change jobs between the start and end times, their clock will be denied.
NOTE: If an alert e-mail has been set up on the General tab for this schedule group, an e-mail message will be sent to the alert e-mail address to advise of the attempted clock-in.
- Click the Save Tab button to keep these changes.
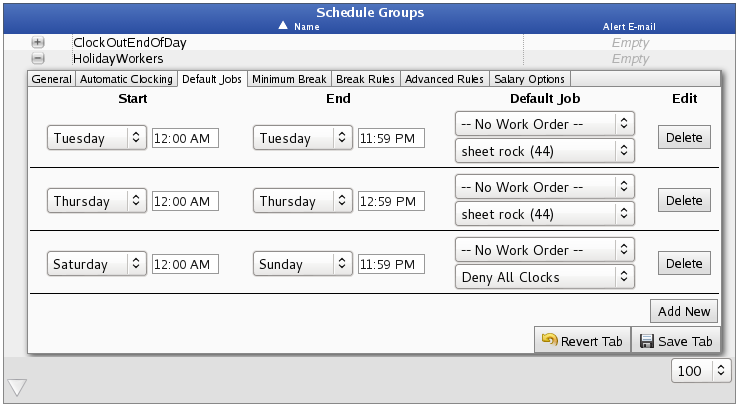
EXAMPLE: In the example above, employees in the "HolidayWorkers" schedule group are clocked into the job "sheet rock" on Tuesday's and Thursday's between 12:00am and 11:59pm whenever they clock in or change jobs and do not specify a particular job. Also, employees in this schedule group are not permitted to clock-in between Saturday at 12:00am and Sunday at 11:59pm. NOTE: Default Jobs do not work simultaneously with Automatic Clocking rules. When applying Automatic Clocking rules, the "default job" employees are automatically clocked into is the job that is assigned to them on their Employment tab in Employee Administration. However, when applying Default Job rules, the selected "default job" is assigned to employees in the schedule group only between the start and end times of the specified rule.
- Click on the Delete button to remove a Default Job rule.
Set up Minimum Break rules
- If not already open, expand the Schedule Group record you want to edit by clicking on the + (plus) sign next to the Schedule Group name.
- Click on the Minimum Break tab.

- Click on the Add New button.
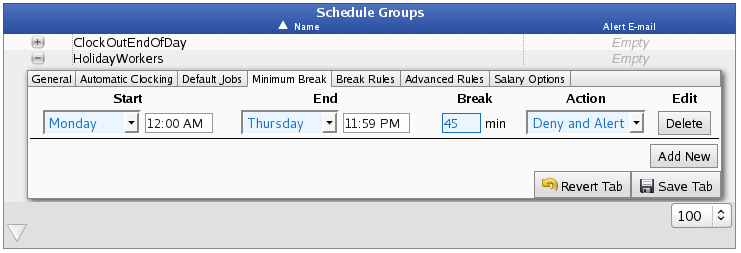
- Select the day and time when the Minimum Break rule should Start and End from the drop-down boxes.
- Enter the minimum amount of time (in minutes) the Break should last.
- Select the Action you want taken. Your options are:
- Deny and Alert - With this option selected, if the employee attempts to clock back in before the minimum amount of time has elasped, their clock will be denied and an e-mail alert will be sent to the e-mail address entered on the General tab of this schedule group.
- Deny - With this option selected, if the employee attempts to clock back in before the minimum amount of time has elasped, their clock will be denied, but an e-mail alert will not be generated.
- Click the Save Tab button to keep these changes.

EXAMPLE: In the example above, "HolidayWorkers" employees are required to clock out for at least 45 minutes Monday through Thursday and for at least 30 minutes on Friday. On Monday through Thursday, if an employee attempts to clock in before the mininum amount of time has elapsed, the clock will be denied and an alert e-mail will be generated. On Fridays, the clock will be denied, but an alert e-mail will not be generated.
Set up Break Rules
- If not already open, expand the Schedule Group record you want to edit by clicking on the + (plus) sign next to the Schedule Group name.
- Click on the Break Rules tab.

- To Show Inactive Break Rules, check the box.
- Click on the Add New Break Rule button.

- Type in the Rule Name and click the Add button.
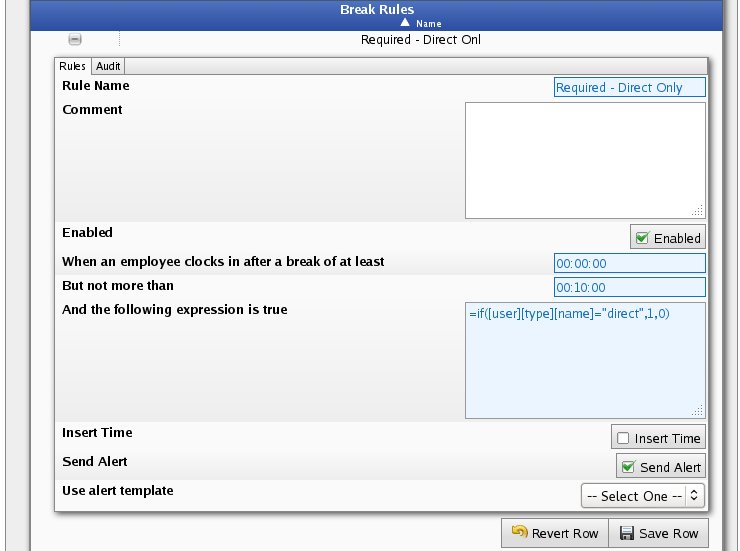
- You can then edit the Rule Name.
- Add an optional brief comment about this rule in the Comment field.
- Check the Enabled box to enable this break rule. Uncheck to disable the rule.
- Add a minimum inclusive qualifying time of a break to trigger this rule in the "When an employee clocks in after a break of at least" box.
- Add a maximum inclusive qualifying time of a break to trigger this rule in the "But not more than" box.
- In the "And the following expression is true" field, you can add an optional expression that, if set, must evaluate to true for the rule to trigger.
NOTE: Expressions allow you to customize the application of Break Rules. For example you can have one schedule group for all employees and use custom logic based on Pay Type to determine if the rule should fire. View a list of the Break Rules Expression Variables.
- If the system should insert an event during the break, check the Insert Time box. The following additional options will then be made available.
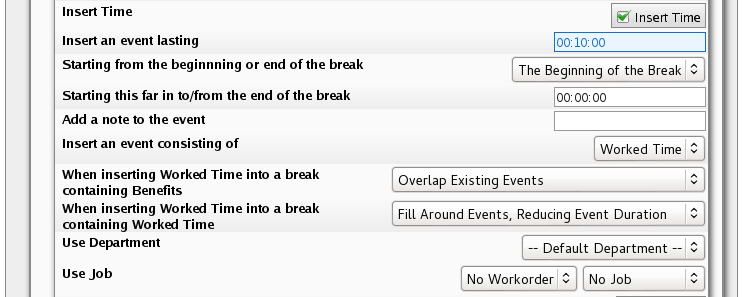
- Insert an event lasting HH:MM:SS. This is the maximum duration of the inserted event up to the length of the break.
- Starting from the beginnning or end of the break. Choose whether the inserted event should start at "The Beginning of the Break" or some time offset in from "The End of the Break".
- Starting this far in to/from the end of the break defines an offset value used to start the event at different points during the break.
- Add a note to the event that is either the clock in note or the benefit note asociated with the inserted event.
- Insert an event consisting of either "Worked Time" or "Benefits".
- When inserting Worked Time into a break containing Benefits, it can either "Overlap Existing Events", "Fill Around Events, Reducing Event Duration", or "Fill Around Events, Maintaining Event Duration".
NOTE: Overlap will insert the event ignoring the benefits. Alternatively the system can insert an event in pieces working around existing benefits. In this latter mode you must choose whether or not to preserve the duration of the inserted event.
For EXAMPE: If we choose to insert a one hour event but a 30 minute benefit usage is in the middle of our span then we can either insert 30 minutes on either side of the benefit usage (preserving the one hour duration) or we can insert 15 minutes on either side, ensuring the one hour window is filled with some kind of event.
-
When inserting Worked Time into a break containing Worked Time it can either "Fill Around Events, Reducing Event Duration" or "Fill Around Events, Maintaining Event Duration". NOTE: This might happen if there are multiple break rules configured and one has already inserted worked time during the break. The system can insert an event in pieces working around existing time. You must choose whether or not to preserve the duration of the inserted event.
- Use Department if appropriate for the type of event. If you choose default department then it will use the employee's default at the time of processing.
- Use Job designates which Work order and which Job are used when filling the break.
- If someone should be notified of this event, check the Send Alerts box. When the rule is triggered, the system will then notify everyone that is configured to receive Schedule Alerts for the employee.
- If the Send Alerts box is checked, you will then have the option to Use an alert template.
- Click the Save Row button to implement the rule.
Advanced Rules
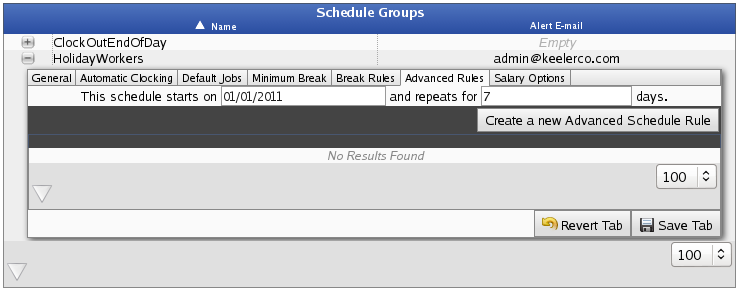
The IPSASH Advanced Schedule module extends the IPSSCH Schedule module to allow multiple complex rules with conditions, actions and repeat/date ranges. See the IPSASH Advanced Schedules article for detailed instructions.
Advanced Schedules allow automatic handling of a wide variety of situations and add great flexibility to the TimeIPS system. This same flexibility can make creating rules, conditions and actions challenging. Rules can be configured that are valid, but cause unexpected results, such as an action that makes another rule take an action causing the first rule to take an action again. This can create a "loop" where an employee is clocked in/out, changes jobs, uses benefit time, etc., over and over.
We recommend carefully testing and validating rules and/or consulting with TimeIPS technical support when creating and configuring your rules.
Set up Salary Options
- If not already open, expand the Schedule Group record you want to edit by clicking on the + (plus) sign next to the Schedule Group name.
- Click on the Salary Options tab.
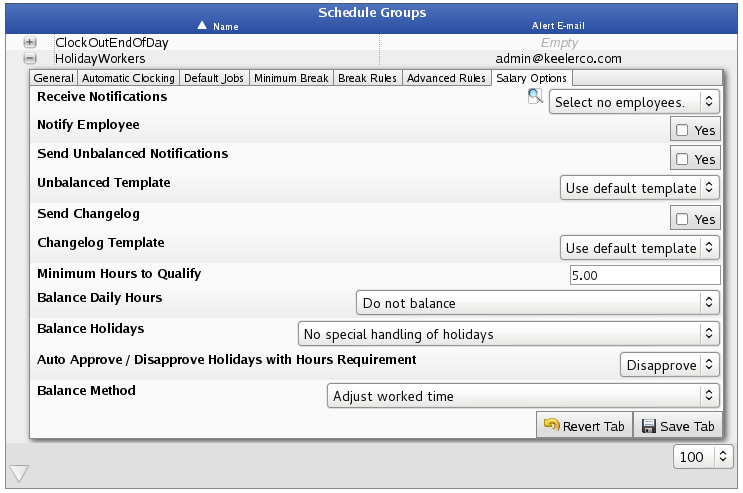
- Configure the following necessary terms.
- Select the employee to Receive Notifications of unbalanceable days and/or a summary of the changes performed.
- If the employee should receive a copy of any alerts sent, check the YES box next to Notify Employee.
- To generate a notification if an employee's day is unable to be balanced, check the YES box next to Send Unbalanced Notifications.
- If you have and want to use a customized email template to generate the Unbalanced Notification, choose it from the Unbalanced Template drop-down box.
- To provide a detailed list of all changes performed to balance an individual's time, check the YES box next to Send Changelog.
- If you have and want to use a customized email template to generate the Changelog, choose it from the Changelog Template drop-down box.
- Set the minimum number of hours an employee must have allocated to qualify for normal adjustments as specified by your settings below.
NOTE: If the employee has less hours than the minimum, all working hours are truncated, and if the below balancing method allows for benefit time, only benefit time will be used to adjust upwards. No work time will be granted if an employee is under the minimum to qualify, or if the benefits run out.
- Decide if and when an employee's daily hours should be balanced.
- If "Balance once at the end of each schedule day" is chosen from the Balance Daily Hours drop-down box, you will need to choose the Effective Date.
- If "Always balance over the last specified number of days" is chosen, you will need to choose the Effective Date and The number of days to retroactively balance.
- Choose whether or not to Balance Holidays.
- Choose to Auto Approve / Disapprove Holidays if a holiday requires adjacent days before or after to be worked, or requires a minimum amount of hours to have been worked.
- Choose the Balance Method through which daily hours will be adjusted, if necessary.
- Click the Save Tab button to implement the changes.
|

 Information
 Sales
Sales Support


