|
|
Applies to versions: 2.1, 2.2, 2.3, 2.4, 2.5, 3.0, 3.1, 3.2, 3.3, 4.0
TimeIPS Network Clock Menu
The Network Clock is primarily used to clock in and out. The clock also offers a System Menu which can be used to configure the device and access other functions. This article outlines the Menu options that are accessible.
UNCONFIGURED CLOCK MENU
On a new clock (or a clock that has had "Reset to Factory Defaults" selected), the screen and menu are different. For assistance with the initial configuration of the clock, please consult the Installation Guide for the model of clock you have and/or contact TimeIPS technical support.
Clock Not Set Up
Search for Master
- Searching for Master...
- Preparing to reach server. Please wait...
- Registering with server step 2 Please wait...
Configure Network

- Set Master IP
- NETWORK SETUP Enter Master
- Revert to DHCP
- Select "Apply Settings" to apply network changes.
- Set IP Address
- NETWORK SETUP Enter IP Address
- Set Subset Mask
- NETWORK SETUP Enter Subnet Mask
- Set Gateway
- NETWORK SETUP Enter Gateway
- Set Primary DNS
- NETWORK SETUP Enter DNS Server
- Set Secondary DNS
- NETWORK SETUP Enter DNS Server
- Set NTP Server
- NETWORK SETUP Enter NTP Server
- Apply Settings
- Applying Network Settings.
- Network Settings Applied.
Select Language
Clean Shutdown
Safely shutdown system to disconnect from power?
- Cancel
- Shutdown
- Shutting down, safe to unplug in 15 seconds.
Play Test Sound
Quick Restart
- Restarting. Please wait...
- Checking for updated firmware. Please wait...
- Configuring Attached Devices... Please wait.
Full Restart
Reboot clock? (30 to 60 seconds)
- Reboot
- Rebooting...
- Starting System Please wait...
- Checking for Updated Firmware Please Wait...
- Configuring Attached Devices... Please wait...
- Cancel
View System Info


CLOCK OUTLINE
Main Screen
The standard main screen, with the default configuration allowing both "smart" clocking and "explicit" clocking modes. (Clocking instructions can be found in the Clock In and Out from the TimeIPS Station article.)
Clock +: In -: Out
*: Change Jobs
or enter your ID
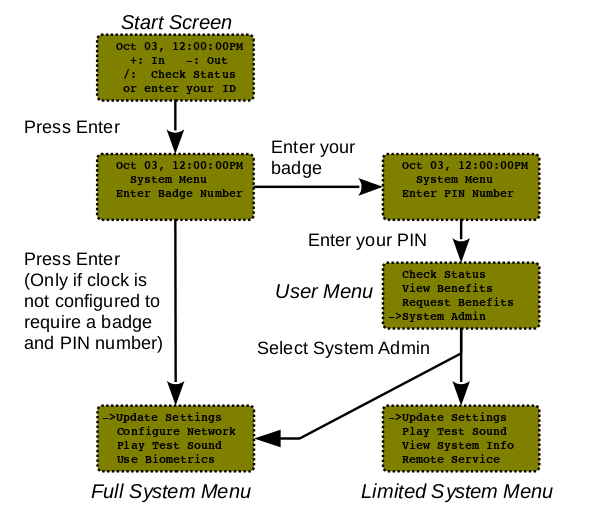
From this screen, it is possible to access the System Menu. Simply press Enter without entering a Badge number.
System Menu (aka System Admin)
- Press Enter again without a Badge number.
- Update Settings
Update settings from master?
- Update
- Registering with server step 2 Please wait...
- Cancel
- Configure Network (Additional details can be found in the Installation Guide.)

- Set Master IP
- NETWORK SETUP Enter Master
- Revert to DHCP
- Select "Apply Settings" to apply network changes.
- Set IP Address
- NETWORK SETUP Enter IP Address
- Set Subset Mask
- NETWORK SETUP Enter Subnet Mask
- Set Gateway
- NETWORK SETUP Enter Gateway
- Set Primary DNS
- NETWORK SETUP Enter DNS Server
- Set Secondary DNS
- NETWORK SETUP Enter DNS Server
- Set NTP Server
- NETWORK SETUP Enter NTP Server
- Apply Settings
- Applying Network Settings.
- Network Settings Applied.

- Synchronize NTP
Force network time sync.
- Done
- Sync
- Fetch Time
Update time from master?
- Update
- Cancel
- Set Volume (IPS125T only. IPS120T uses a volume knob)
- Set Contrast (IPS125T only. IPS120T uses a contrast knob)
- Contrast Up
- Contrast Down
- Test Relays
- Toggle Relay 1
- Toggle Relay 2
- Toggle Relay 3
- Remote Service
Enable Remote Service?
- Enable
- Remote Service has been enabled.
- Cancel
- Quick Restart
- Restarting. Please wait...
- Checking for updated firmware. Please wait...
- Configuring Attached Devices... Please wait.
- Full Restart
Reboot clock? (30 to 60 seconds)
- Reboot
- Rebooting...
- Starting System Please wait...
- Checking for Updated Firmware Please Wait...
- Configuring Attached Devices... Please wait...
- Cancel
- Num Lock Warning
Num Lock warning is currently enabled.
- Disable
- Cancel
- Offline Punches
- Logging
Set Log Level
- Level 1
- Level 2
- Level 3
- Safe Shutdown
- Check for Updates
Check for updates? Clock may restart.
- Cancel
- Update
- Restore To Factory
Erase all data and settings? Clock will require new setup.
- Cancel
- Erase
- Restarting Please wait...
- Checking for Updated Firmware Please wait...
User Menu
- To access the User Menu, enter a badge number and hit Enter
- Enter a Pin and hit Enter (or just hit Enter again if a pin has not been set up).
- Check Status
- View Benefits
- Request Benefits
- Vacation, Sick, and any other benefit types configured in the TimeIPS server.
- System Admin
- (same as the System Menu above)
- User Admin
- Enroll Badges
- Enter Existing ID/Badge Number
- Present Badge for 2 (hit Enter)
- Badge Entered
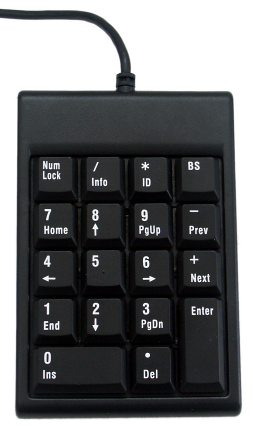
| Key Label | Key Name | Description |
4, 6, 8, 2
|
Number keys
|
These four keys are used to navigate through the menu, left/right and up/down. 4 = left 6= right 8= up 2 = down
|
 |
| ENTER |
Enter Key |
Used to select options and navigate through the menu/system.
|
| BS |
Backspace |
Used to remove last typed character in case of incorrect entry or returns to the previous menu.
|
See Also:
TimeIPS Store (2.0, 2.1, 2.2, 2.3, 2.4, 2.5, 3.0, 3.1)
Benefit Request at a Network Clock (2.1, 2.2, 2.3, 2.4, 2.5, 3.0, 3.1, 3.2, 3.3, 4.0)
Update Settings at a Network Clock (2.1, 2.2, 2.3, 2.4, 2.5, 3.0, 3.1, 3.2, 3.3, 4.0)
|

 Information
 Sales
Sales Support


