Time clock systems by TimeIPS
Call Now! 316-264-1600
Information
Sales
Support
Knowledge Base Search:  
Main Menu
· Home

· Table of Contents
· Article Index

· Downloads
· New Features
· FAQ
· News
· Web Links

  
TimeIPS Knowledge Base

Table of Contents: Article IndexPrintable Version

Applies to versions: 2.2, 2.3, 2.4, 2.5, 3.0, 3.1, 3.2


Directory


The Directory allows all employees to view general company and employee information. As well, employees can view, in real-time, who is currently clocked in.


Directory


Using the left pane Main Menu under Tools, click on: Directory


Employee Status

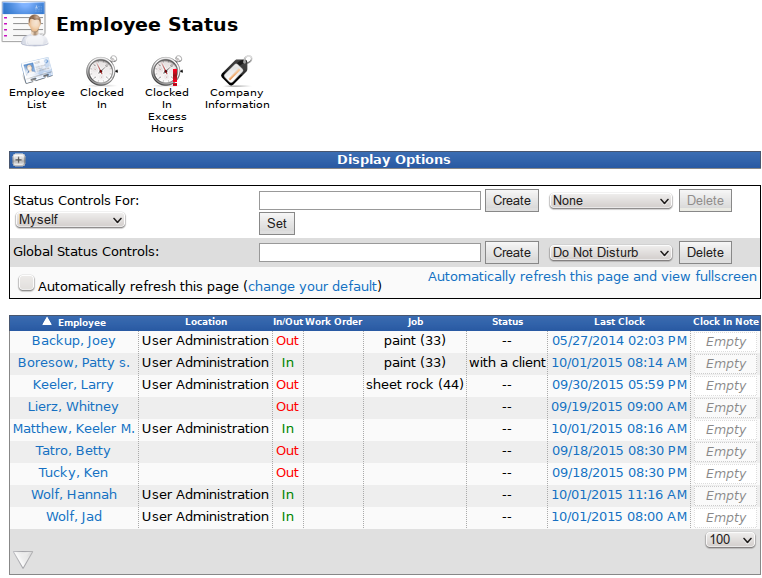
The Employee Status Page is the default and most often used section of the Directory. For a detailed break-down of this page, go to the Employee Status article.


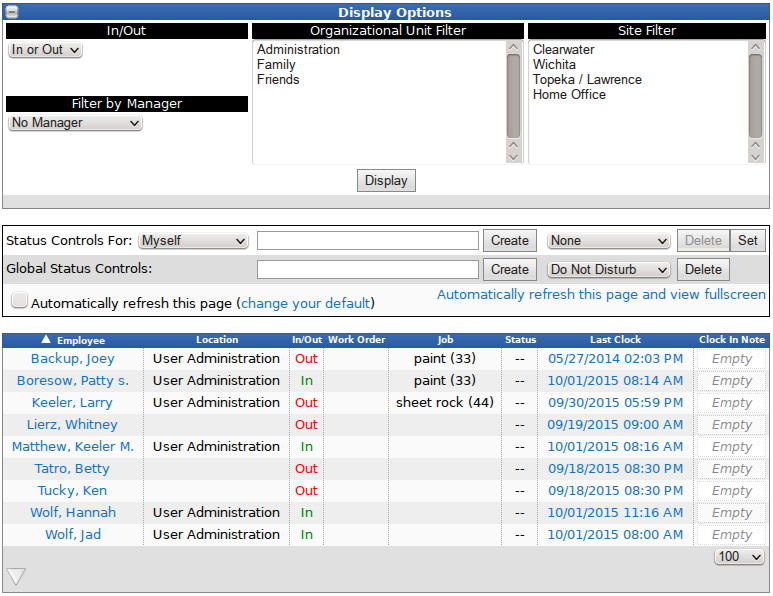
  • The Display Options window allows you to view/change the display preferences of the bottom window.
  • The middle window allows employees to create and set their own status, where as admins can create and set their own and an employee's status. For more detail, go to the Adding/Removing a Status Message and Using Global Status Message articles.
  • The bottom window displays all employees clocked status.  The link on the employee name will pull up the current day on the Time/Edit Report.  The link on the last clock event will pull up the Time/Edit Report for a date range that includes that last event, in case it needs to be edited.
  •  


    Employee List


      Click on the Employee List Icon


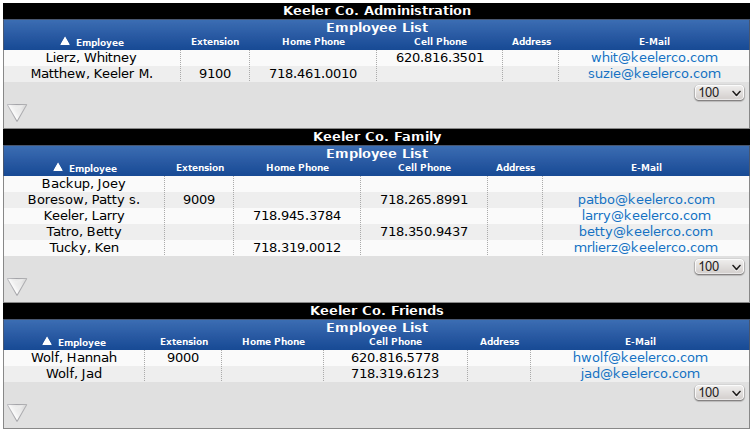
  • The Employee List information is pulled from the Employee page.

  • Using the left pane Main Menu » Administration, click on: Employees » Employees

    Below is a list of the employee data included on the Directory and the Employee page and field the information is pulled from:


    DIRECTORY DATA

    EMPLOYEE PAGE

    EMPLOYEE FIELD

    Name

    Personal Information

    First Name, Middle Name/Initial, and Last Name

    Department

    Employment Information

    Department

    Phone Ext

    Contact Information

    Phone Extension

    Home Phone

    Contact Information


    Home Phone

    NOTE: Check the box next to Publicly Viewable if you want the Home Phone to appear in the Directory.


    Cell Phone

    Contact Information


    Cell Phone

    NOTE: Check the box next to Publicly Viewable if you want the Cell Phone to appear in the Directory.


    Address

    Contact Information

    Address

    NOTE: Check the box next to Publicly Viewable if you want the Address to appear in the Directory.

    E-mail

    Time Reports/E-mail Alerts

    E-mail address marked as Employee's E-mail or Default.

    NOTE: Check the box next to Publicly Viewable if you want the Email to appear in the Directory.


    NOTE: Employee phone numbers will display only if marked as Publicly Viewable in the employee's information. To show or hide an employee's phone numbers, see the Contact tab under Employees section.


    Clocked In


      Click on the Clocked In Icon


  • Currently Clocked In Employees are grouped by their Organizational Unit.
  • NOTE: If there are more employees clocked in than fit on your screen you can click anywhere in the Currently Clocked In box, which will allow you to scroll up and down within the box.


    Clocked In Excess Hours


      Click on the Clocked In Excess Hours Icon


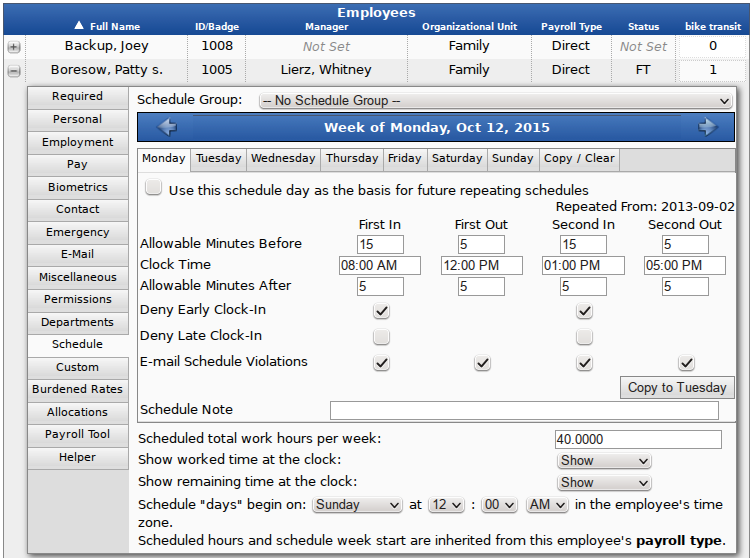
  • Employees exceeding their scheduled total work hours will be highlighted in red. These limits are set in the Employee section on the Schedule Tab.
  •  

    Using the left pane Main Menu » Administration, click on: Employees » Employees » Schedule


    • The bottom half of the Schedule tab is used to generate the Clocked In Excess Hours Monitor.
    • The Scheduled total work hours per week would need to be specified. If you would like the employee to see their hours worked or the remaining time to be worked in a week, select "SHOW."
    • Employee's schedules must have a start time for the week. Select the Begins on day of week and time of day from the drop-down boxes. If an employee's day begins at a time other than midnight, you may want to have one or more of the schedule points fall on a different calendar day. For example, an employee's schedule begins at noon, their first in could be 8pm, first out could be 12am, second in could be 1am, second out could be 4am.
      TIP: Click on the "Copy" tab above the daily In/Out times to quickly clear the schedule, load a standard 8-5 schedule, copy Monday to Tuesday-Friday, copy Monday to Tuesday-Sunday, copy a schedule forward to the next week, or to copy one employee's schedule to another's.


    Company Information

      Click on the Company Information Icon

    The Company Information includes general information about your company and can be customized using HTML tags from the Directory section of the Company/Divisions page.


    Using the left pane Main Menu » Administration, click on:  System » Company/Divisions » Directory


  • The Directory Page Company Info allows you to customize the information available in the directory with HTML formatting.
    TIP: IF you are not familiar with HTML coding, use the example HTML code provided. Locate the example information such as phone number and website then replace it with your company's information. You may also check out one of the many HTML guides available online. Click HERE for an example HTML website.
  •  

    Additional Directory Options


  • Require Login to View Directory is by default set to Require. Employees must have a username and password in order to view the Company Directory.
    NOTE: By changing this option to Not Required, anyone with access to your network will be able to view your employee list and contact details. This may not be desirable, especially if your system is port-forwarded to the Internet.
  •  

  • Select Visible under Show Last Clock Time if you want the last clocked in date and time of all employees to be viewable by all employees (who are not logged in) on the Employee Status View screen of the Directory page.
  •  

  • Select Visible under Show Employee Status if you want all employees (who are not logged in) to be able to view all statuses on the Employee Status View screen of the Directory page.
  •  

  • Be sure to SAVE ROW when you have finished making changes.
  •  

  • Once formatted, your Company Information will appear on the Directory page.


  • ©2004-2023 TimeIPS, Inc. All Rights Reserved - TimeIPS and the TimeIPS logo are registered trademarks of TimeIPS, Inc.
    "Intelligent Personnel System" "Run your Business. We'll watch the clock." are trademarks of TimeIPS, Inc.
    TimeIPS is protected by one or more patents. Patent No. US 7,114.684 B2.