Time clock systems by TimeIPS
Call Now! 316-264-1600
Information
Sales
Support
Knowledge Base Search:  
Main Menu
· Home

· Table of Contents
· Article Index

· Downloads
· New Features
· FAQ
· News
· Web Links

  
TimeIPS Knowledge Base

Table of Contents: Article IndexPrintable Version

Applies to versions: 1.10, 1.11


Initial Configuration of a Server (Master) System


TimeIPS Server Types

TimeIPS Servers are available as dedicated hardware servers (network appliances), hosted accounts (TimeIPS ASP), or as a virtual machine (TimeIPS VM).  The configuration process for each is similar after the server is running. 
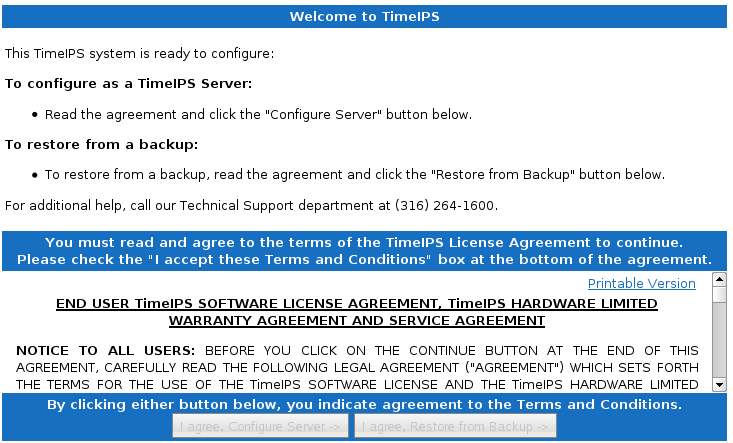
  • Hardware Server:  Requires connection to your network and power.  Initial configuration requires a monitor and keyboard to determine/set the IP address.
  • TimeIPS ASP Account:  Requires an Internet connection.  Then, just browse to the IP address and port number provided when you activated your account.
  • TimeIPS VM: Load the virtual machine on a host system and configure ports per the instructions that accompany the VM.

The Configuration Process

After your server is accessible on the network, the configuration process includes reviewing and accepting the license agreement, entering basic company information and creating a Full Access "Administrative Employee." The configuration process usually just takes a few minutes. Once completed, you can add and edit all settings and employee records as needed.


The Full Access Employee

The employee created on the initial configuration screen will be have Full Access permissions and will be an "Administrative Employee." This employee will initially have full administrative privileges and will have access to all parts of the system and system settings. This employee will be able to assign permissions to other employees, and with the optional IPSPRM Enterprise Permissions Module, can create and maintain permissions profiles.


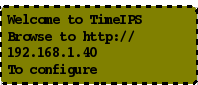
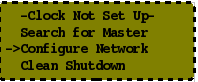
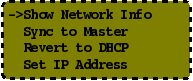
TimeIPS Hardware Server: Initial Configuration

Once a TimeIPS hardware server has been connected to your network, you will need a PC or laptop with a web browser to navigate to the IP address shown on a monitor (or optional LCD Display) connected to the TimeIPS Server. After the boot process is completed, select "Configure Network" on the initial menu, then "Show Network Info" to view the current IP address.


Initial Configuration


  1. After entering the IP address for your TimeIPS system, the Welcome to TimeIPS screen will appear.

  2.  


  3. Accept the License Agreement and click on the I agree, Configure Server button.
    NOTE: You will need to scroll to the bottom of the License Agreement and check the box at the bottom in order to activate the "I Agree, Configure Server" or "Restore from Backup" buttons.
  4.  


  5. The Company Information screen will appear. Enter your company information, administrator details, date and time, network settings and system email settings. Note: Some settings, such as the email and network configuration are not needed for TimeIPS VM and/or TimeIPS ASP servers and will not be shown.

  6.  


  7. Once you have completed adding your details to the Company Information screen (above), click on the Start TimeIPS button.
  8.  

    NOTE: TimeIPS ASP systems will have fewer options on the initial configuration page as shown below.


  9. You will see the message "System Setup Complete" with the TimeIPS Initial Configuration information at the bottom of the screen. We recommend you print this page and keep the hard copy in a safe location.

  10.  


  11. Click on the IP address link next to "Your station is ready. Click here to configure" to begin adding employees to TimeIPS.
  12.  


  13. The Welcome to TimeIPS screen will appear.

  14.  


Prepare Your System for Employees


It is essential that you begin by creating OverTime Policies and Workweek Groups for your employees to belong to when you add them. Please read Understanding Overtime Policies and Workweek Groups and be sure that when adding employees, you assign them to an appropriate Workweek group.


Prepare Your Employee Data


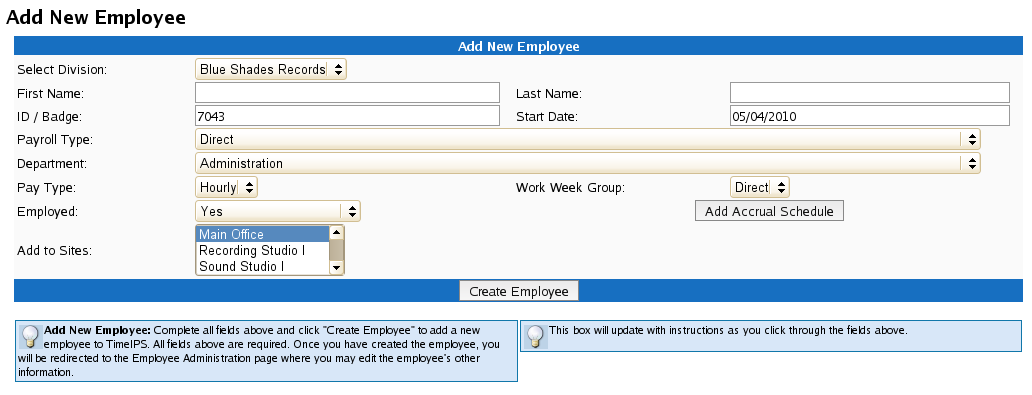
You can manually enter your employees into TimeIPS (see instructions below) or you can import the employee data from a spreadsheet. (See Importing/Updating Employee, Department, or Site Information.)

An employee's first and last name and a unique identifier (such as an employee number or badge number) are all that are initially required to set up an employee record. However, TimeIPS has the ability to maintain a vast array of employee details. Additional employee information can be added or edited at any time after the employee record has been created.

For initial setup, we recommend you prepare a list of your employees by first and last name and a unique identifier, such as an employee number or badge number.

NOTE: TimeIPS uses the badge number field to store the unique identifier for each employee. TimeIPS will automatically generate badge numbers for your employees if you do not assign them.


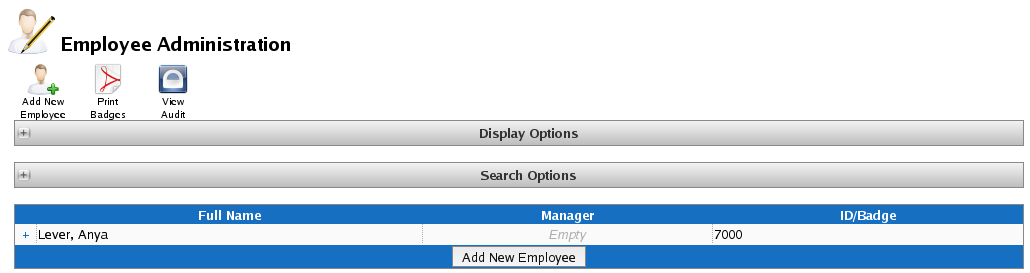
Manually Add Employees to TimeIPS


NOTE: See the Tabbed Employee Administration View for more information about the different employee tabs.


Using the left pane Main Menu, click on: Employees » Employees


  1. The Employee Administrator (Anya Lever, in the above example) will be the first employee record in your TimeIPS system.
  2.  


  3. Click on the Add New Employee icon or button to begin adding employees to TimeIPS.

  4.  


  5. Add the employee's first and last name, modify the badge number if needed, and click on Create Employee. Repeat this step until all employees have been added.
  6.  

Once your employees are entered into TimeIPS, your TimeIPS system is ready for employees to begin clocking!


See Also:
What's New in TimeIPS? (1.3, 1.4, 1.5, 1.6, 1.8, 1.9, 1.10, 1.11, 2.0, 2.1, 2.2, 2.3, 2.4, 2.5, 3.0, 3.1, 3.2)

©2004-2023 TimeIPS, Inc. All Rights Reserved - TimeIPS and the TimeIPS logo are registered trademarks of TimeIPS, Inc.
"Intelligent Personnel System" "Run your Business. We'll watch the clock." are trademarks of TimeIPS, Inc.
TimeIPS is protected by one or more patents. Patent No. US 7,114.684 B2.