|
|
Applies to versions: 1.3, 1.4
Jobs
Job Management allows you to track time worked on specific jobs and projects. You can also assign jobs to customers and organize your jobs by assigning them to categories. The IPSIPS optional module is required.
Security Level Required: Manager, Employee Administrator, or Payroll Administrator
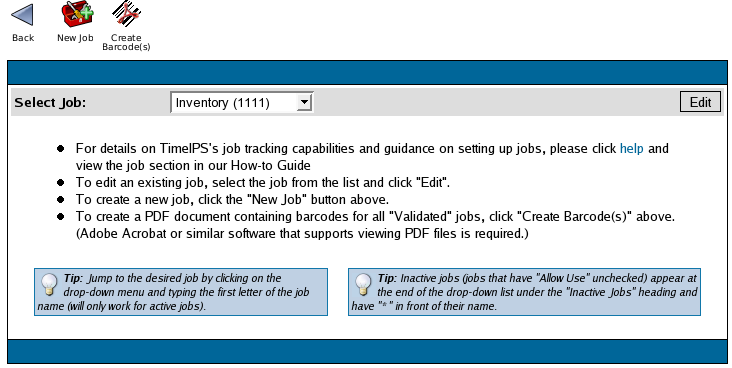
Using the left pane Main Menu, click on: Administration » Job Management » Jobs
HINT: If you plan on assigning jobs to customers for billing purposes or to organize jobs by categories, set up the Job Categories and Job Customers first.
To Add a New Job
- Click on the
New Job icon at the top of the page.
To Enter Job Details or Edit an Existing Job
- Select the Job from the pull-down and click on the Edit button.
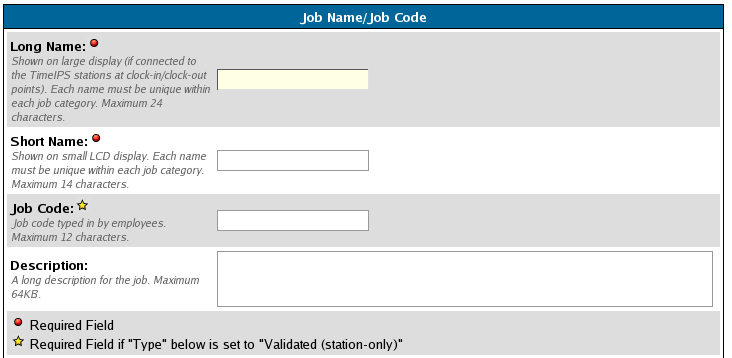
- If a computer monitor is connected directly to your TimeIPS time station, the Long Name displays during clock in and out of a job. The Short Name displays on the TimeIPS small LCD display.
- Job Codes can be 1-12 alpha-numeric characters in length. Each Job Code must be unique. Employees clock in and out of jobs using the this job code. The employee will enter the job code from the TimeIPS numeric keypad, from an alpha-numeric computer keyboard connected to TimeIPS (PS2), or with a barcode gun when clocking in/out of jobs.
NOTE: The TimeIPS 8150 Series Barcode Reader requires a minimum of 4 characters. The TimeIPS LS4000 Series Barcode Reader will read 1-12 characters.
NOTE: Job Codes can include numbers, capital and lower case letters, and dashes. Job Codes are case sensitive.
- Enter a Description of the job for reference, if necessary.
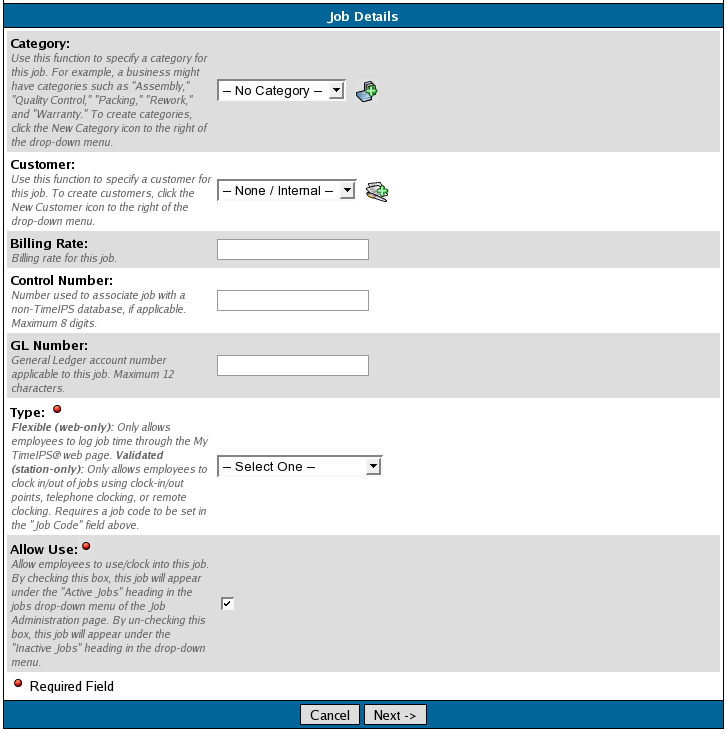
- Job Categories can be used to help organize jobs. Set up the categories before entering jobs or use the icon to the right of the Category field to add a new job category.
- Jobs can be assigned to specific Customers. Set up the Customers before entering jobs or use the icon to the right of the Customer field to add a new Customer.
- Each Job can be assigned a Billing Rate that will display on the Extended Employee/Job Report. This rate will not automatically be used to calculate the employee's gross pay for each job. You can, however, use functions within your spreadsheet application to create gross pay calculations.
- The Control Number can be used to link job codes to another application you might be using.
- GL (General Ledger) Number can be used to indicate an account number associated with the job.
- Flexible (web-only) jobs are designed for employees to designate how they spent their time worked after the time has been worked. Validated (station-only) jobs are designed to track actual time worked, in real-time, on specific jobs.
- Enter or edit the information as necessary.
- Click on the Next-> button to save the job or Cancel to cancel the adjustments.
NOTE: The Job is created when you click on the Next-> button.
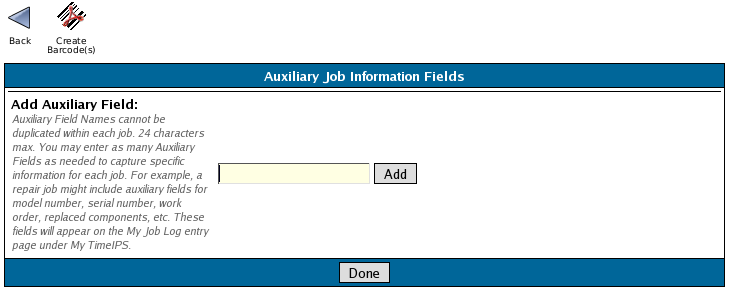
NOTE: Auxiliary Fields must be alphabetical and a maximum of 24 characters.
If you have created a Flexible Job, the Auxiliary Job Information Fields page displays:
Information relating to a specific job, such as the invoice number, due date, location, and the like, can be stored through custom fields called Auxiliary Fields. Auxiliary Fields can be added to flexible (web-only) jobs.
To Add an Auxiliary Field
- Type in the name of the Auxiliary Field then click on the Add button.
- Repeat step 1 to add additional Auxiliary fields.
- When finished entering Auxiliary fields, click on the Done button
To Edit an Auxiliary Field
- Click on the notepad icon to the right of a created Auxiliary field.
- Edit the Name of the field.
- Click on the Submit button to save the adjustment or Cancel to cancel the adjustment.
- When finished adjusting Auxiliary fields, click on the Done button.
To Delete an Auxiliary Field
- Click on the negative sign icon to the right of the created Auxiliary field.
- When finished adjusting Auxiliary fields, click on the Done button.
NOTE: You cannot delete an Auxiliary Field if the auxiliary field has been used for that job.
See Also:
Adjust Job Categories (1.3, 1.4, 1.5)
Adjust Job Customers (1.3, 1.4, 1.5)
Import/Export Jobs (1.3, 1.4, 1.5)
Modules/Upgrades (1.3, 1.4, 1.5, 1.6)
|

 Information