|
|
Applies to versions: 1.11, 2.0, 2.1
Custom Reporting/Payroll Export Settings
The TimeIPS Custom Payroll/Report Engine allows users to define the characteristics and contents of the file including the file extension, number of columns, field delimiter, line terminator, and data output. Custom Payroll requires the IPSCPE Customizable Payroll Export module (included in the IPSEPI Extended Payroll Integration module), the defined file can be generated then imported in your payroll application. Custom Reporting requires the IPSRPT Custom Report Module.
For Payroll:
Using the left pane Main Menu » Administration, click on: Payroll » Payroll Export

For Custom Report:
Using the left pane Main Menu » Administration, click on: Reports » Custom Report
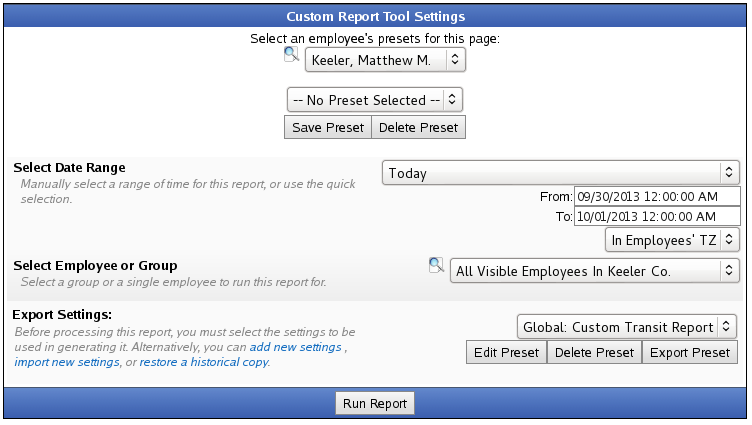
Before you export:
- Obtain the file layout requirements, including the field level detail, that your payroll application will import. You can obtain this information from your payroll application’s help documentation or support resources. This document should specify the data fields (columns of information) to be included in the file generated from TimeIPS.
EXAMPLE A: Landon Payroll Application provided the following file layout requirements:
| Name | Description | Data Type | Required? | Example |
| File # |
Unique number that identifies employee |
Numeric |
Y |
46228 |
| Emp Name |
Employee’s Name |
Text |
N |
Jones Mark |
| Payroll Date |
Payroll Period End Date |
Date (YYYYMMDD) |
Y |
20070420 |
| Emp Division |
Division (Location) Code employee is assigned to |
Text |
N |
557 |
| Reg Hrs |
Regular labor hours worked |
Numeric |
Y |
40 |
| O/T Hrs |
Labor hours worked; paid at 1.5 times normal rate |
Numeric |
N |
3.48 |
| Sick Hrs |
Sick hours used |
Numeric |
N |
8 |
| Vacation Hrs |
Vacation hours used |
Numeric |
N |
8 |
| Holiday Hrs |
Holiday hours paid |
Numeric |
N |
8 |
- Map the available TimeIPS fields to each required field included in the file layout.
EXAMPLE A2: TimeIPS contains several employee fields that can store a unique identifier as the "File #" including the employee's "ID/Badge Number," "Alternate Employee Number," or "SSN." In this example, we will enter the Landon Payroll Application's Employee "File #" as the TimeIPS "Alternate Employee Number." The “Emp Division” field is not a default field in TimeIPS. However, there are a number of employee fields that can store the data and be mapped as the “Emp Division.” In this example, we will enter the employee’s "Division Code" in TimeIPS’s "Department" field. The "File #" will be mapped to the "Alternate Employee Number" and the "Division Code" will be mapped to the TimeIPS’s "Employee Department" field in your custom payroll export preset’s Column tab.
| Name | Description | Data Type | Required? | TimeIPS Field | Example |
| File # |
Unique number that identifies employee |
Numeric |
Y |
Alternate Employee Number |
46228 |
| Emp Name |
Employee’s Name |
Text |
N |
Employee's Name (Last, First Mid) |
Jones, Mark |
| Payroll Date |
Payroll Period End Date |
Date (YYYYMMDD) |
Y |
Enter Payroll End Date |
20070420 |
| Emp Division |
Division Code (Location) employee is assigned to |
Text |
N |
Employee's Department |
557 (code for North Branch) |
| Reg Hrs |
Regular labor hours worked |
Numeric |
Y |
Calculated by TimeIPS |
40 |
| O/T Hrs |
Labor hours worked; paid at 1.5 times normal rate |
Numeric |
N |
Calculated by TimeIPS |
3.48 |
| Sick Hrs |
Sick hours used |
Numeric |
N |
TimeIPS Benefit Hours |
8 |
| Vacation Hrs |
Vacation hours used |
Numeric |
N |
TimeIPS Benefit Hours |
8 |
| Holiday Hrs |
Holiday hours paid |
Numeric |
N |
TimeIPS Benefit Hours |
8 |
- Once you have the file format you wish TimeIPS to generate, you are ready to build your custom preset.
Prepare Payroll for Export
First, choose to generate the report by Payroll Type or Manually select employees and a range of time.
Payroll Type
- Under Export Type, select Payroll Type to generate the report. (See "Manual" below for specifics on that option.)
- Select a Payroll Type. All employees (including released employees) that are currently in the selected Payroll Type will be included in the prepared payroll data.
- Select the Payroll Period from the drop-down boxes.
- Select a Time Zone. The start and end time of the export can be interpreted in the company's timezone or separately for each employee.
- Click the Prepare Payroll for Export button.

Manual
- Under Export Type, select Manual to generate the report. (See "Payroll Type" above for specifics on that option.) Select employees and a range of time.
- Select an employee or group of employees to include in the export.
- Manually select a range of time for this report, or use the quick selection drop down box.
- Select a Time Zone. The start and end time of the export can be interpreted in the company's timezone or separately for each employee.
- Click the Prepare Payroll for Export button.

Next you should see the payroll calculation being scheduled. 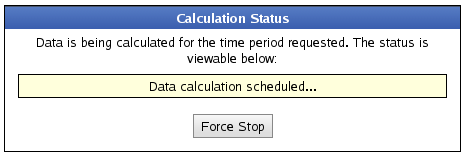
Export Payroll
After the payroll data is prepared for export, the Pending Export window will open. 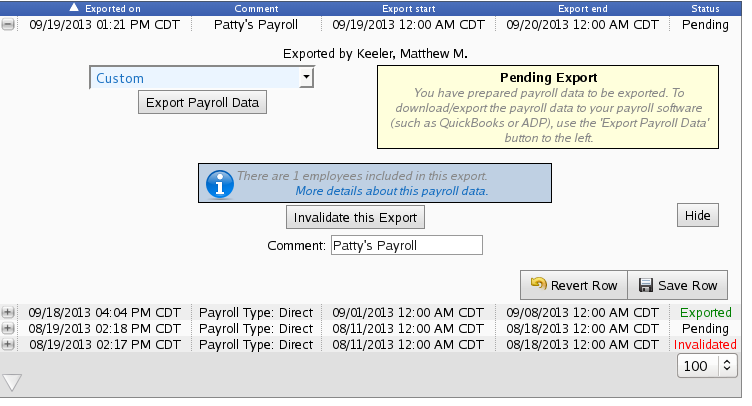
- Select Custom from the drop down menu.
- Next click on the button labeled Export Payroll Data.
NOTE:: Editing of time events is locked during payroll processing to avoid having another user make changes via the Time/Edit Report that would not be reflected properly in the current payroll run.
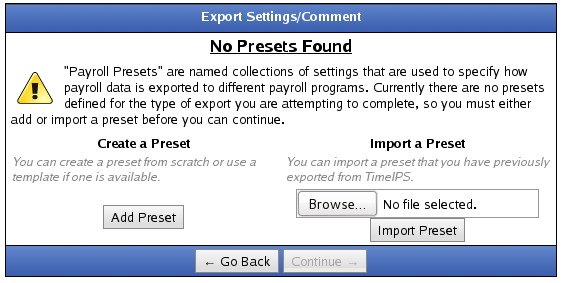
If you have not already created a Custom preset, you will see the following screen.
Click the Add Preset button to begin setup.
NOTE: A Preset is a set of stored settings that are used each time a payroll file is generated. If your settings change from one group of employees to another, you may create multiple presets and select the preset that applies for the group you are exporting at the time.
The preset window will appear with 8 tabs of customizable information.
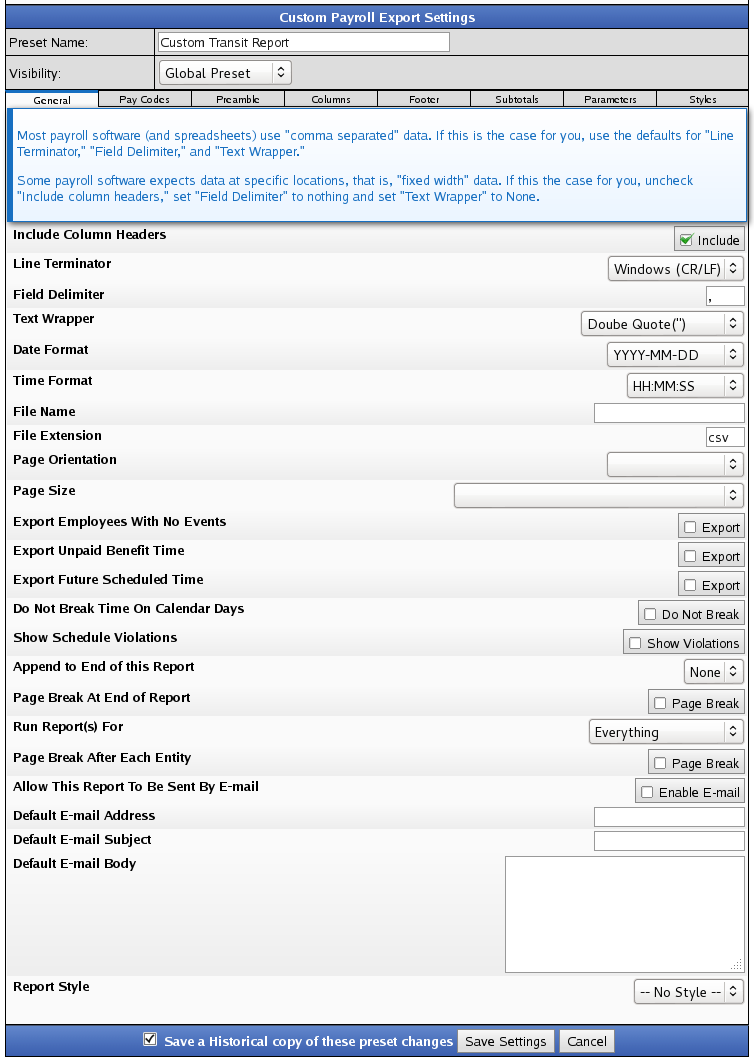
The General Tab
The General tab defines information about the format of the file.

The following export settings should be defined prior to running your Custom export:
- Check Include Column Headers if the first row of data contains labels for each column.
TIP: Most payroll applications that import delimited files (such as comma, tab, or special character delimiters) can include column headers and will ignore the first row. This allows you to preview the file with the label for each field identified in the first row before importing the file into your payroll application. You can preview the generated file in a spreadsheet application (for delimited files) or word processing application (for fixed length files).
- The Line Terminator defines a special character at the end of a row (line) of data in the file.
TIP: The CR/LF (Carriage return/Line Feed) is the most common as it is used by Microsoft Operating Systems by default. If you are unsure, select your operating system (Windows, Macintosh, or Unix).
Most payroll software (and spreadsheets) use "comma separated" data. If this is the case for you, use the default for Line Terminator.
- A Field Delimiter is a character that separates each piece of data in the file.
TIP: A CSV (Comma Separated Value) file uses a comma. A tab separated file uses a tab. A fixed length file does not use a Field Delimiter.
Most payroll software (and spreadsheets) use "comma separated" data. If this is the case for you, use the default for Field Delimiter.
- The Text Wrapper indicates the type of quotations, if any, to use for identifying text output.
Most payroll software (and spreadsheets) use "comma separated" data. If this is the case for you, use the default for Text Wrapper.
- If the file includes dates, select the Date Format to use.
- If the file includes times, select the Time Format to use.
- The File name is the name of the generated file. Leave it blank for default. Include [date] for date, [time] for time or [note] for note.
- The File extension defines the file type and may associate the generated file with an application. A Comma Separated Value file’s extension is "CSV." A fixed length file is generally “txt.” If your payroll application does not specify the file extension, use “CSV” for files using a Field Delimiter of a comma (,) and “TXT” for any other file type. By default reports are generated as flat text files. Choose one of "xls", "xlsx", "pdf", or "html" to ouput the report using advanced styling.
- Select the Page Orientation. Reports using advanced styling can be generated in either Landscape or Portrait orientation. Reports with many columns will fit better in Landscape.
- Reports using advanced styling can specify the Page Size for the generated file.
- Check the Export Employees With No Events box to include every employee in your selection at least once even if they have no payroll events in the report range.
- Check the Export Unpaid Benefit Time box to include benefit time that is part of a benefit type that is marked as unpaid. Uncheck to exclude these benefit events.
- Check the Export Future Scheduled Time box to include scheduled time for the employee as payroll events. This option is only honored in Custom Report. It is not available on Payroll Exports.
- A single event will be split into multiple events when it is sent to the report output. Splits happen on changes in rate, shift, holiday, overtime status and calendar days. Check the Do Not Break Time On Calendar Days box to prevent events from being split on calendar days. Available for Custom Report only. Not available on Payroll Exports. With appended reports the setting of the initial report will apply to all.
- Check the Show Schedule Violations box to Include additional rows for each schedule violation. Available for Custom Report only. Not available on Payroll Exports. With appended reports the setting of the initial report will apply to all.
- The Append to End of this Report option will allow an additional custom report to run immediately after this report. For example, this might be a summary report that you want to be followed by a more detailed report. NOTE: The drop down menu will contain the titles of each Custom preset you create (such as this one). If no custom presets have been created, 'None" is the only option.
- Enable the Page Break At End of Report option by checking the Page Break box. This option is useful for reports that will append other reports.
- Under most circumstances, choose to Run Report(s) For "Everything", This generates one consolidated report.
Under special circumstances, you may need to Run the Report For each Employee, each Organizational Unit, each Job, or each Work Order. For example, if you have 10 employees, the report will run 10 times, one for each employee, and appends them to each other.
Please NOTE: Running individual entities instead of running "Everything", significantly increases memory requirements and slows down processing time. For large quantities, the report may not be able to complete. (With appended reports, the settings for the initial report applies to all.)
- If using the previous option to run this report once for each entity, you can enable this option to force a Page Break After Each Entity.
- To Allow This Report To Be Sent By E-mail, check the Enable Email box. After running this payroll export, you will be prompted to email the report to a specified address. (Payroll Exports only)
- If you Allow This Report To Be Sent By E-mail, type in the Default E-mail Address. When you e-mail the report, this address will be used by default. (Payroll Exports only)
- If you Allow This Report To Be Sent By E-mail, type in the Default E-mail Subject. Template options include [date], [endDate], [employeeCount], [exportComment], [exporterName], [fileName] and [presetName] (Payroll Exports only)
- This is the body that will be included by default. Template options are the same as the default subject (Payroll Exports only)
- Optional: Select a Report Style that you created on the Styles tab. This style will be applied to every cell in the report. It is best suited for applying low weighted options that can be overridden in particular cells.
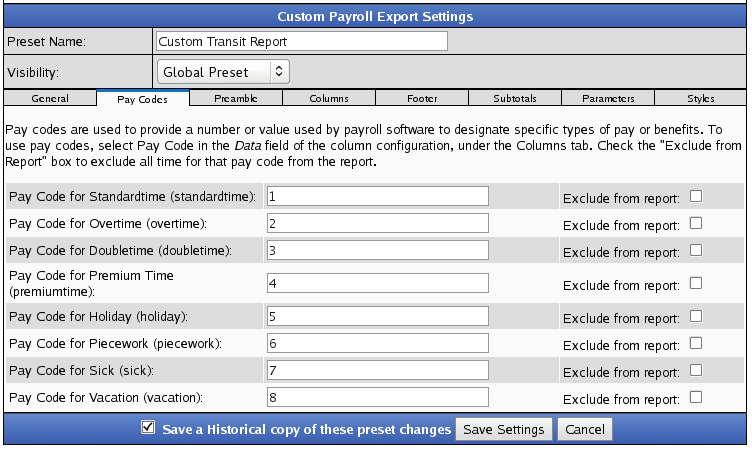
The Pay Codes Tab
The Pay Codes tab associates each type of earning or pay with a specific name or numeric code for identification in your payroll application.
EXAMPLE: In the screen shot above, standard time hours will be designated with code 1, overtime with code 2, and so forth. In that way, all hours can be included in a single column with a specific code (or name, such as "Hourly" and "Overtime") identifier.
NOTE: The Landon Payroll Application file requirements from example A separate each pay type into its own row. Therefore, the pay codes will not be used.
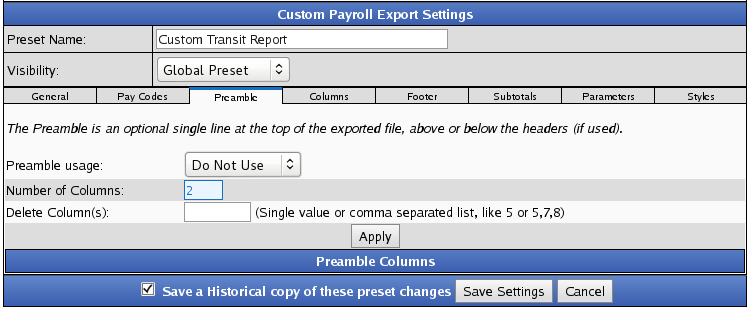
The Preamble Tab
The Preamble tab defines file heading rows that include summary data about the file. Unless preamble records are specified in the file layout requirements provided by your payroll application, leave the default value at “Do Not Use”.
NOTE: Most payroll applications do not require a preamble.
To add a Preamble, enter the Number of Columns and click the Apply button.
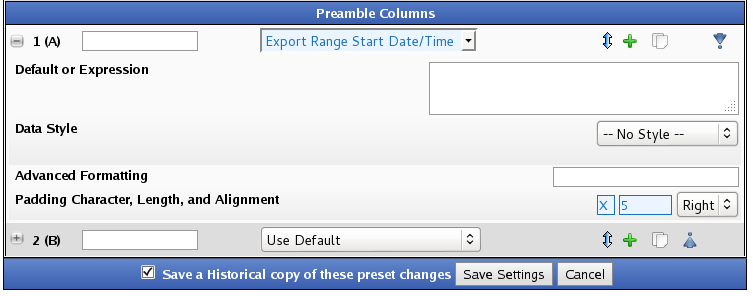
Click the + (plus) sign to the left of the column number to expand the window.
In the field to the right of the cell identifier (shown as "1 (A)" in the above example), enter that columns header.
From the drop down menu, choose the information that will be displayed in the preamble. (In the example above, the Export Range Start Date/Time will appear as the preamble.)
If there are multiple preambles, click and drag the blue arrow icon  to re-order them.
To insert a new column after this one, click the green plus sign to re-order them.
To insert a new column after this one, click the green plus sign  .
To duplicate this column, click the double paper icon .
To duplicate this column, click the double paper icon .
To move to the bottom of multiple preambles, click the blue dot/arrow icon .
To move to the bottom of multiple preambles, click the blue dot/arrow icon  .
If the value of Data is blank and set to Default, then the report uses the value from the Default or Expression field. If Data is set to Expression then the report pulls the expression from the Default or Expression field. .
If the value of Data is blank and set to Default, then the report uses the value from the Default or Expression field. If Data is set to Expression then the report pulls the expression from the Default or Expression field.
Select the advanced Data Style to apply to data in this column. Options include all named styles, the same style as other columns, or a style chosen through a custom logic expression.
Filter text through an Advanced Formatting pattern. For more details view the TimeIPS Knowledge Base.
Enter in a Padding Character, Length, and Alignment on fixed width reports. Select the character to pad with, the length to pad this column, and whether to align data to the left or right of the assigned width. (In the example above, X is the Padding Character and 5 is the Length. This Length restricts the preamble to be only 5 characters long.)
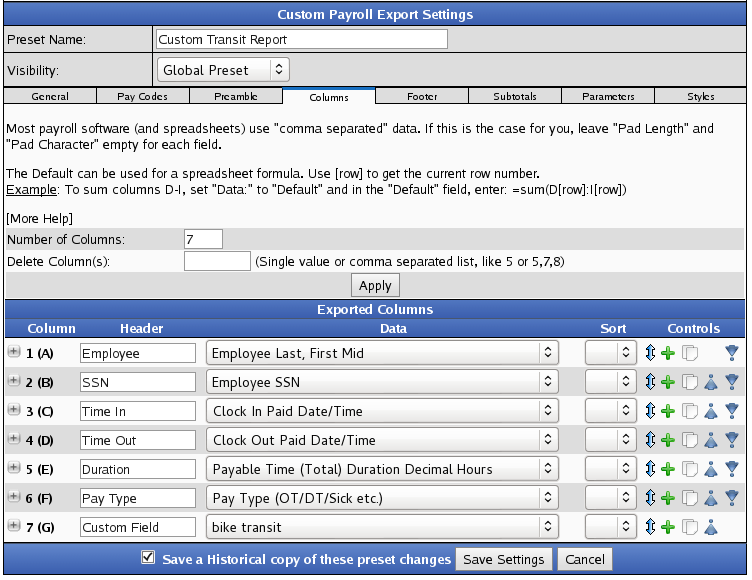
The Columns tab
The Columns tab defines the number of columns, the format for each column, and the data contained in each.

The Number of Columns defines the number of data fields included in the export.
If you wish to ADD MORE blank columns:
- Enter the new Number of Columns.
- Click on Save Settings.
- Edit your preset again and the new columns will be available.
EXAMPLE: The default preset selected includes 6 columns. The payroll file layout requires 3 additional fields at the end. Therefore, adjust the "Number of Columns" to 9, "Save Settings," and edit your preset again.
If you wish to DELETE an existing column:
- Enter the column number(s) in the the Delete Column(s) field.
- Click on Save Settings.
- Edit your preset again and the columns will be deleted.
NOTE: You do not need to adjust the # of columns as TimeIPS will automatically adjust them based on the duplicated/deleted columns entered.
If you wish to MOVE a column:
- Click and hold on the drag and drop icon
 . .
- Now drag the column to where you want it to show up in the custom export.
- Release your mouse button.
or
- Click on the move icon
 . .
- This will move the column up one spot or down one spot depending on the direction of the arrow.
If you wish to INSERT A SINGLE blank column:
- Click and hold on the drag and drop icon
 . .
- This will insert a new column directly below the column you chose the icon from .
If you wish to DUPLICATE A SINGLE column:
- Click on the duplicate icon
 . .
- This will duplicate the column directly below the column you chose the icon from .
The Header defines the name of the column. If "Include Column Headers" is checked on the General tab, the first row of the generated file will contain Column Headers, otherwise, the first row will be the first data record/row.
Pad Character defines the character to use in order to pad fixed length fields. Generally, fields are padded with a “0” or a space. For space padding, type a space in the Pad Character field.
Length defines the maximum length of a field. Fixed length fields will be truncated or padded to the defined Length. Delimited fields will be truncated to the Length.
Align defines how data is aligned in a fixed length field.
EXAMPLE: The Employee name “Thomas-Jones, Michael Anthony” will be output based on the column settings as indicated in the table below. Do note that text fields are generally padded with spaces. "x" is used in this example to provide a better visual explanation of the available settings:
| Length | Pad | Align | Output |
| 20 |
x |
Left |
Thomas-Jones, Michae |
| 20 |
x |
Right |
nes, Michael Anthony |
| 40 |
x |
Left |
Thomas-Jones, Michael Anthonyxxxxxxxxxxx |
| 40 |
x |
Right |
xxxxxxxxxxxThomas-Jones, Michael Anthony |
The Data field defines the contents of the column – the TimeIPS field to output in this column.
The Default data will be used if the selected "Data" field is blank.
EXAMPLE: Job Code is mapped into a column. If employee’s do not specific a job code when clocking in, their time should be billed to the job code 1511. The "Data" field should be mapped to the "Job Code" and the "Default" should be "1511."
If Total is checked, the data will be summarized for each record of matching information.
EXAMPLE: Below is the column data for a file without totals:
| Record # | Employee Name | Date | Job Code | Reg Hrs | O/T Hrs |
| 1 |
Jones Mark |
2007-06-04 |
84005 |
3 |
0 |
| 2 |
Jones Mark |
2007-06-04 |
84005 |
1 |
0 |
| 3 |
Jones Mark |
2007-06-04 |
37121 |
4 |
0 |
| 4 |
Jones Mark |
2007-06-05 |
84005 |
3.5 |
.5 |
EXAMPLE: Below is the same column data for a file with Total selected for the Reg Hrs field. Note that the Regular hours were totaled from the first and second records because the employee name, date, and job code were the same. The third row was not totaled because the job code was unique, and the fourth record was not totaled because the date was unique.
| Record # | Employee Name | Date | Job Code | Reg Hrs | O/T Hrs |
| 1 |
Jones, Mark |
2007-06-04 |
84005 |
4 |
0 |
| 3 |
Jones, Mark |
2007-06-04 |
37121 |
4 |
0 |
| 4 |
Jones, Mark |
2007-06-05 |
84005 |
3.5 |
.5 |
If Clear Duplicate is checked, the data in the column will be cleared if it's the same as the row(s) above. This is used, for example, to clear the employee's name for all rows after the first row to improve the appearance and readability of the report.
Notes on Payable Time Duration
- The "Other Payable Time Duration" column will display all hours NOT shown in other columns for specific pay types. For example, if your export includes a column for Standard Time, then standard time will be removed the from the total time shown by "Other Payable Time Duration."
- The "Total Payable Time Duration" column will display all hours, even if shown in other columns in the export.
Notes on Payable Rates
- Payable Hourly Rate (base, no modifiers): This is the employee's base hourly rate as entered on the employee tab. This is the raw rate without any kind of differentials, overrides, overtime, etc. applied.
- Payable Hourly Rate (diff/override): This is the employee's base hourly rate as above, plus any differentials or overrides due to jobs or per-event modifiers, but still without any overtime/doubletime/premiumtime multiplication.
- Payable Hourly Rate (diff/override and OT/DT/PT): This is what is used to actually pay an employee. It's the employee's base hourly rate, plus any differentials or overrides due to jobs or per-event edits, multiplied by overtime/doubletime/premium time multipliers, if applicable. For FLSA compliance, when in overtime/doubletime/premiumtime, this amount is at least the Payable FLSA Weekly Base Hourly Rate times the OT/DT/PT multiplier.
- Payable FLSA Weekly Base Hourly Rate: This is the FLSA Weekly Base Hourly Rate used to figure OT/DT/PT minimums for the entire week. For example, if an employee works 20 hours at $10/hour, then 20 hours on a job that pays $20/hour, then 10 more hours at $10/hour, FLSA requires that the 10 overtime hours be paid at 1.5x the employee's FLSA base rate, calculated as the total base pay for the week divided by total hours for the week. In this example: 20 x $10 + 20 x $20 + 10 x $10 = $700 / 50 = $14. So, the pay for the 10 OT hours must be a minimum of $14 * 1.5 = $21/hour.
Notes on Removing Rows
Any row that contains any field that evaluates to or consists of nothing but the keyword "action_remove_this_row" will cause the entire row to be removed. This is useful in cases where specific types of time, pay, jobs, workorders, etc. should be excluded from the report.
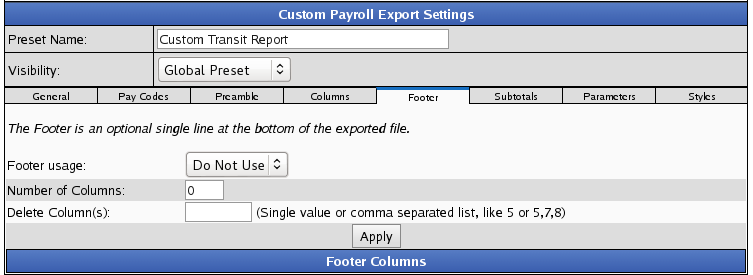
The Footer Tab
The Footer tab defines file footer rows that include summary data about the file. The Footer is an optional single line at the bottom of the exported file.
NOTE: Most payroll applications do not require a footer.
Unless Footer records are specified in the file layout requirements provided by your payroll application, leave the default value at “Do Not Use”.
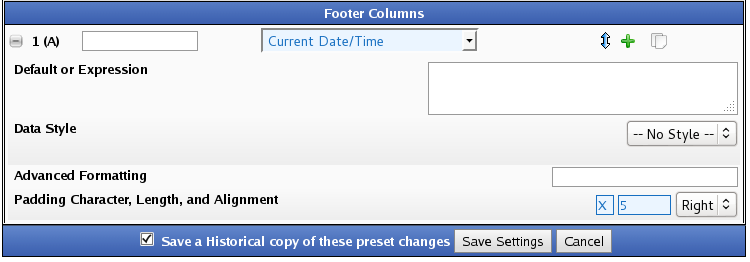
Click the + (plus) sign to the left of the column number to expand the window.
In the field to the right of the cell identifier (shown as "1 (A)" in the above example), enter that columns header.
From the drop down menu, choose the information that will be displayed in the footer. (In the example above, the Current Date/Time will appear as the footer.)
If there are multiple footers, click and drag the blue arrow icon  to re-order them.
To insert a new column after this one, click the green plus sign to re-order them.
To insert a new column after this one, click the green plus sign  .
To duplicate this column, click the double paper icon .
To duplicate this column, click the double paper icon .
If the value of Data is blank and set to Default, then the report uses the value from the Default or Expression field. If Data is set to Expression then the report pulls the expression from the Default or Expression field. .
If the value of Data is blank and set to Default, then the report uses the value from the Default or Expression field. If Data is set to Expression then the report pulls the expression from the Default or Expression field.
Select the advanced Data Style to apply to data in this column. Options include all named styles, the same style as other columns, or a style chosen through a custom logic expression.
Filter text through an Advanced Formatting pattern. For more details view the TimeIPS Knowledge Base.
Enter in a Padding Character, Length, and Alignment on fixed width reports. Select the character to pad with, the length to pad this column, and whether to align data to the left or right of the assigned width. (In the example above, X is the Padding Character and 5 is the Length. This Length restricts the footer to be only 5 characters long.)
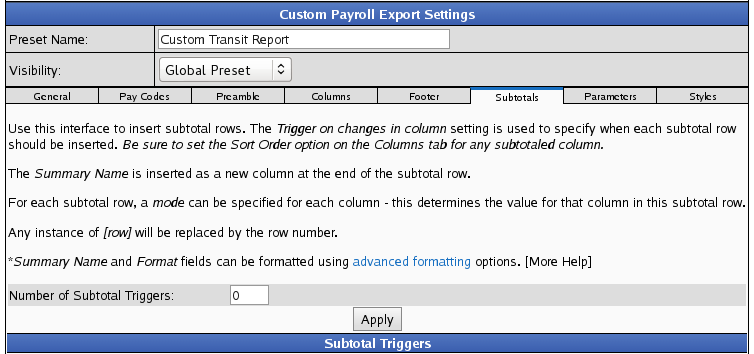
The Subtotals Tab
The Subtotals tab allows you to create subtotal in the custom pay export.
- Type in the the number of subtotals you would like in the Number of Subtotal Triggers: field.
- Click the Apply button and the Subtotal Triggers window will expand.
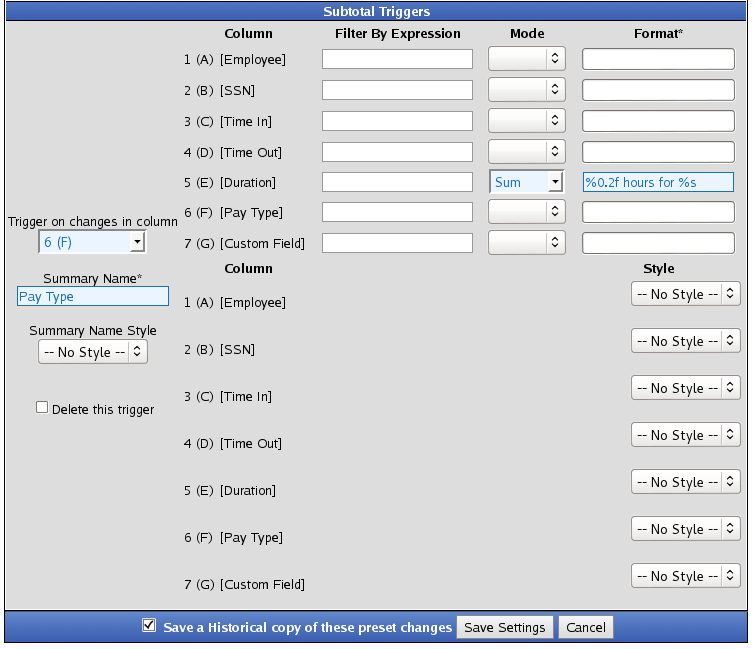
The Subtotal Triggers define what information will have a subtotal.
- Trigger on changes in column is used to specify when each subtotal row should be inserted. Be sure to set the Sort Order option on the Columns tab for any subtotaled column.
- Summary Name* is inserted as a new column at the end of the subtotal row. You can use advanced formatting or it can be any value you would like. Example: If you are subtotaling total hours worked for a pay period, you could call it Worked Time.
- Summary Name Style defines the appearance of the Summary Name. For example, if you want the Summary Name to be bold and red, you can create and assign that style to it.
- Column tells you the name of the column in the custom payroll export.
- Mode allows you to choose a function for each column and thus determines the value for that column in the subtotal row.
- Sum sums the information in the column by the defined trigger.
- Mean is the arithmetic average of a set of values,
- Median is the number separating the higher half of a sample from the lower half.
- Mode is the element that occurs most often.
- Min is the minimum number in the range.
- Max is the Maximum number in the range.
- Count counts the number of values in a range.
- Distinct counts the number of unique values in a range.
- Format* allows you to use advanced formating.
- Style defines the appearance of Column Name.
The Parameters Tab
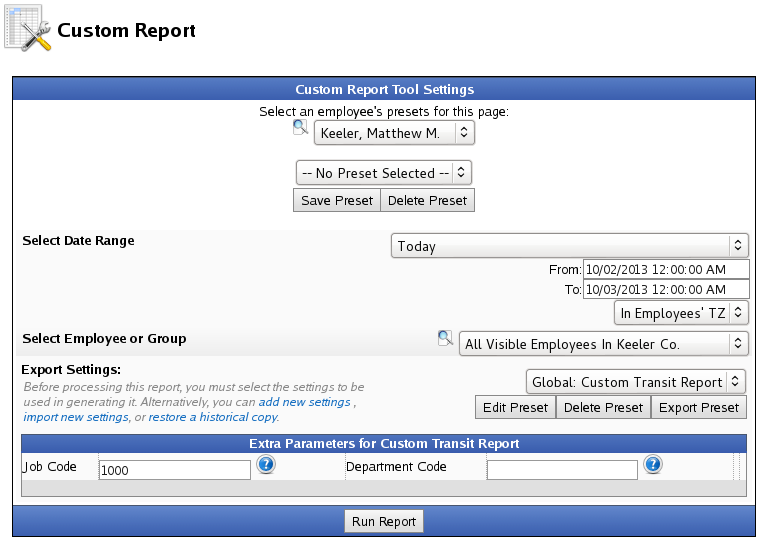
Extra parameters are optional input boxes you can use to provide additional data to a custom report. These can be accessed through expressions as [parameter_n] where n is the parameter number. This is not available for Payroll Export, only for Custom Reporting.
- Type in the the Number of Extra Parameters you would like to add.
- Click the Apply button and the Extra Parameters window will expand.
- Add a Name, Default Value, and Description.
NOTE: The Extra Parameters will appear on the bottom of the Custom Reporting Page as seen below. The Description is visable as "help" if you click on the blue question mark  next to the parameter.

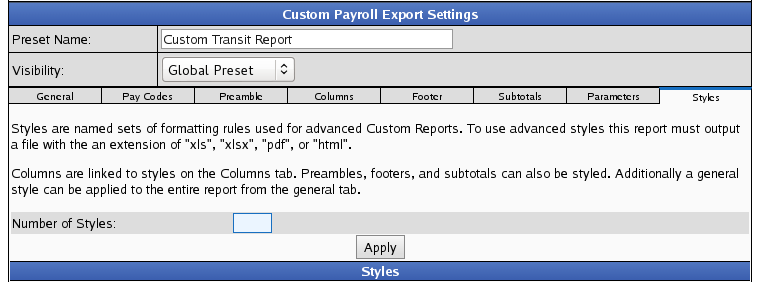
The Styles Tab
Styles are named sets of formatting rules used for advanced Custom Reports. To use advanced styles this report must output a file with the an extension of "xls", "xlsx", "pdf", or "html".
Columns are linked to styles on the Columns tab. Preambles, footers, and subtotals can also be styled. Additionally a general style can be applied to the entire report from the general tab.
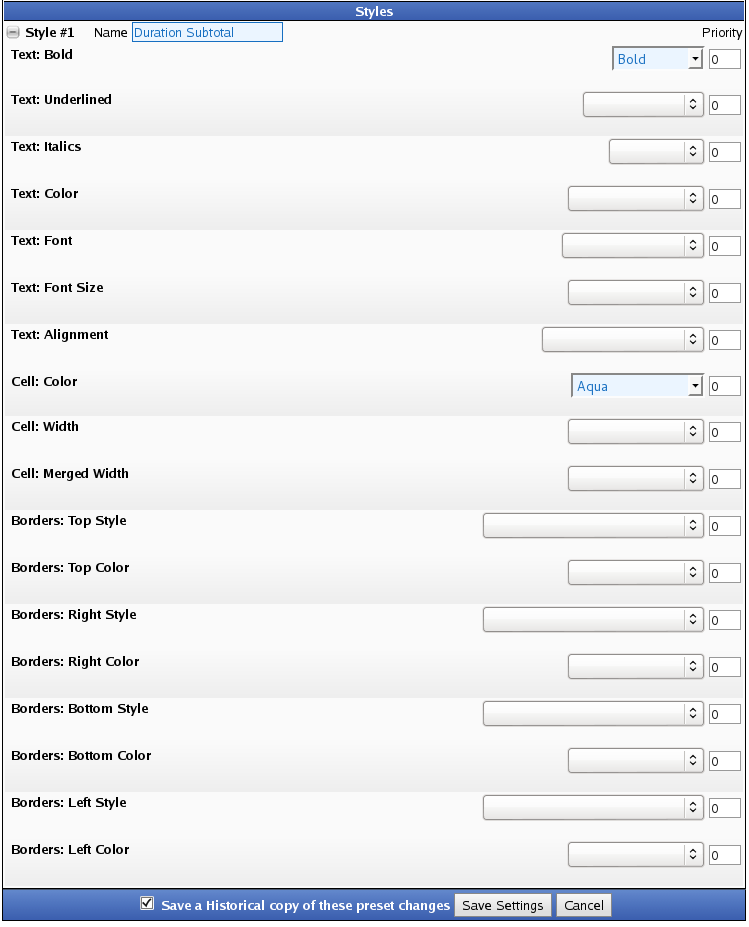
Click the + (plus) sign to the left of the Style number to expand the window.
Name the style.
Use the drop down menus to define the characteristics of the style.
In the EXAMPLE above: Style #1 will be used to display the Duration Subtotal with BOLD text inside an AQUA cell.
If some characteristics take presidence over others, change the Priority value. The smaller the number, the higher the priority.
Once your preset has been configured, click on "Save Settings" to save, or "Cancel" to exit without saving.

- On the next screen be sure that your new preset is the one selected in the Export Settings Preset drop down menu.
- Optionally, you can add a comment to the export making it unique and easily identifiable.
- Click Continue.
Next you should see the payroll calculation being scheduled. 
Payroll Export Data - Final Step
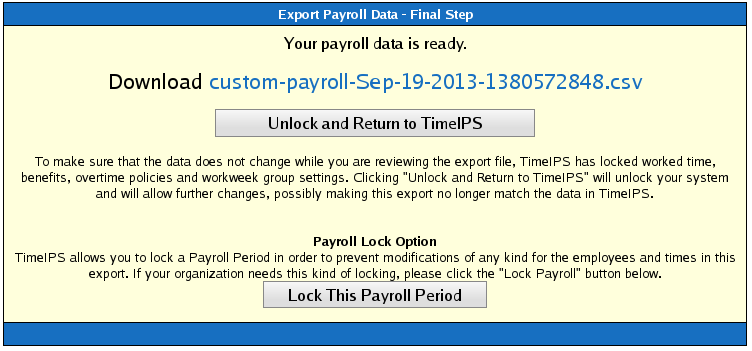
- Click the blue link to Download the data and open it in a spreadsheet program such as Open Office Calc or Microsoft Excel.
- If you have confirmed that the information contained in this export is correct and wish to permanently lock the payroll period, click the button labeled Lock This Payroll Period, otherwise choose Unlock and Return to TimeIPS. Locking the payroll period prevents future modifications of any kind.
NOTE: If you choose "Cancel, return to TimeIPS", the export will be listed as "Pending" and futher changes can be made to the data. Pending exports can be exported again to other payroll output formats as often as you like until they have been accepted/locked.
If you choose "Yes, the export was accepted", the payroll status will show "Exported". Exported payroll runs are locked and time can no longer be edited in the system for that period of time.

For immediate assistance with any of the above payroll exports,
call our Customer Support staff at 877-846-3256.
See Also:
Payroll Export (TimeIPS Version 1.11) (1.11, 2.0, 2.1)
Advanced Formatting for Custom Payroll (1.5, 1.6, 1.8, 1.9, 1.10, 1.11, 2.0, 2.1, 2.2, 2.3, 2.4, 2.5, 3.0, 3.1, 3.2, 3.3, 4.0)
|

 Information
 Sales
Sales Support


 to re-order them.
  .
. .
. to re-order them.
  .
. .
.






 .
.  .
.  .
.  .
. 